Nginx is a high-performance, low-overhead optimized web server that can handle HTTP and HTTPS connections, which can also work as a reverse proxy and load balancer: it also has a lot of useful features, such as request buffering and HTTP caching, that can be customized in various ways to increase our web site performance, reliability and speed just like a dedicated HTTP accelerator such as Varnish. Nginx is free and open source software, released under the terms of a BSD-like license, and is probably the most used piece of software in web-based architectured nowadays.
In this post, we'll briefly explain how to install it on a CentOS 7.x or FreeBSD machine and configure it to make it act as a Reverse Proxy for a web site installed either on the same machine or on a different machine within the same LAN. For further info regarding Nginx we strongly suggest to read the following articles: How to configure Nginx as a Reverse Proxy with Proxy-Cache and How to configure Nginx as a Reverse Proxy with FastCGI-Cache. If you don't want to install a Reverse-Proxy and handle everything with Apache using native modules such as mod_cache and mod_cache_disk, you could be interested in this article instead.
Installing Nginx
Installing Nginx on Linux is rather easy, since all package managers have it available on their catalogue.
CentOS 7
Let's start with typing the following commands from a terminal:
|
1 |
sudo yum install Nginx |
Answer "Y" to all the questions until the terminal says that the installation is complete.
Once done, we could start the Nginx service and also have it start automatically on each startup with the following lines:
|
1 2 |
sudo systemctl start Nginx sudo systemctl enable Nginx |
Answer "Y" to all the questions until the terminal says that the installation is complete. Once done, we could start the Nginx service and also have it start automatically on each startup with the following lines:
|
1 2 |
sudo systemctl start Nginx sudo systemctl enable Nginx |
FreeBSD
These are the required steps to install Nginx on a FreeBSD server:
|
1 |
sudo pkg install nginx |
Right after that, we need to add it to the /etc/rc.conf file to ensure that it will automatically start upon each boot. We can do that automatically in the following way:
|
1 |
echo 'nginx_enable="YES"' >> /etc/rc.conf |
Or by installing a text-editor such as Nano and perform the changes manually:
|
1 2 |
sudo pkg install nano nano /etc/rc.conf |
We just need to add nginx_enable="YES" to the end of the file, save and we're done.
Opening the Firewall Port(s)
The default CentOS firewall rules does not allow inbound HTTP / HTTPS traffic, hence its necessary to open up some TCP ports for a webserver such as Nginx to accept connections from the outside. How it can be done depends of the firewall that our CentOS machine is actually using: firewalld or iptables.
Firewalld
These are the shell commands to open up Firewalld (assuming that the public zone has been assigned to the WAN network interface):
|
1 2 3 |
sudo firewall-cmd --permanent --zone=public --add-service=http sudo firewall-cmd --permanent --zone=public --add-service=https sudo firewall-cmd --reload |
Iptables
These are the rules to set for Iptables (assuming that we want to accept traffic coming from the eth0 network interface):
|
1 2 3 4 |
iptables -I INPUT 5 -i eth0 -p tcp --dport 80 -m state --state NEW,ESTABLISHED -j ACCEPT iptables -I INPUT 5 -i eth0 -p tcp --dport 443 -m state --state NEW,ESTABLISHED -j ACCEPT service iptables save systemctl iptables restart |
Basic Scheme for Reverse-Proxy
Now that we installed Nginx, we can configure it to act as a Reverse Proxy with HTTP caching features for our Apache web-server. This basically means that it will sit in front of our Apache Web Server, intercept all the incoming HTTP/HTTPS calls and conditionally pass them to the aforementioned server or directly serve them using its disk and/or memory cache.
Here's how it actually works:
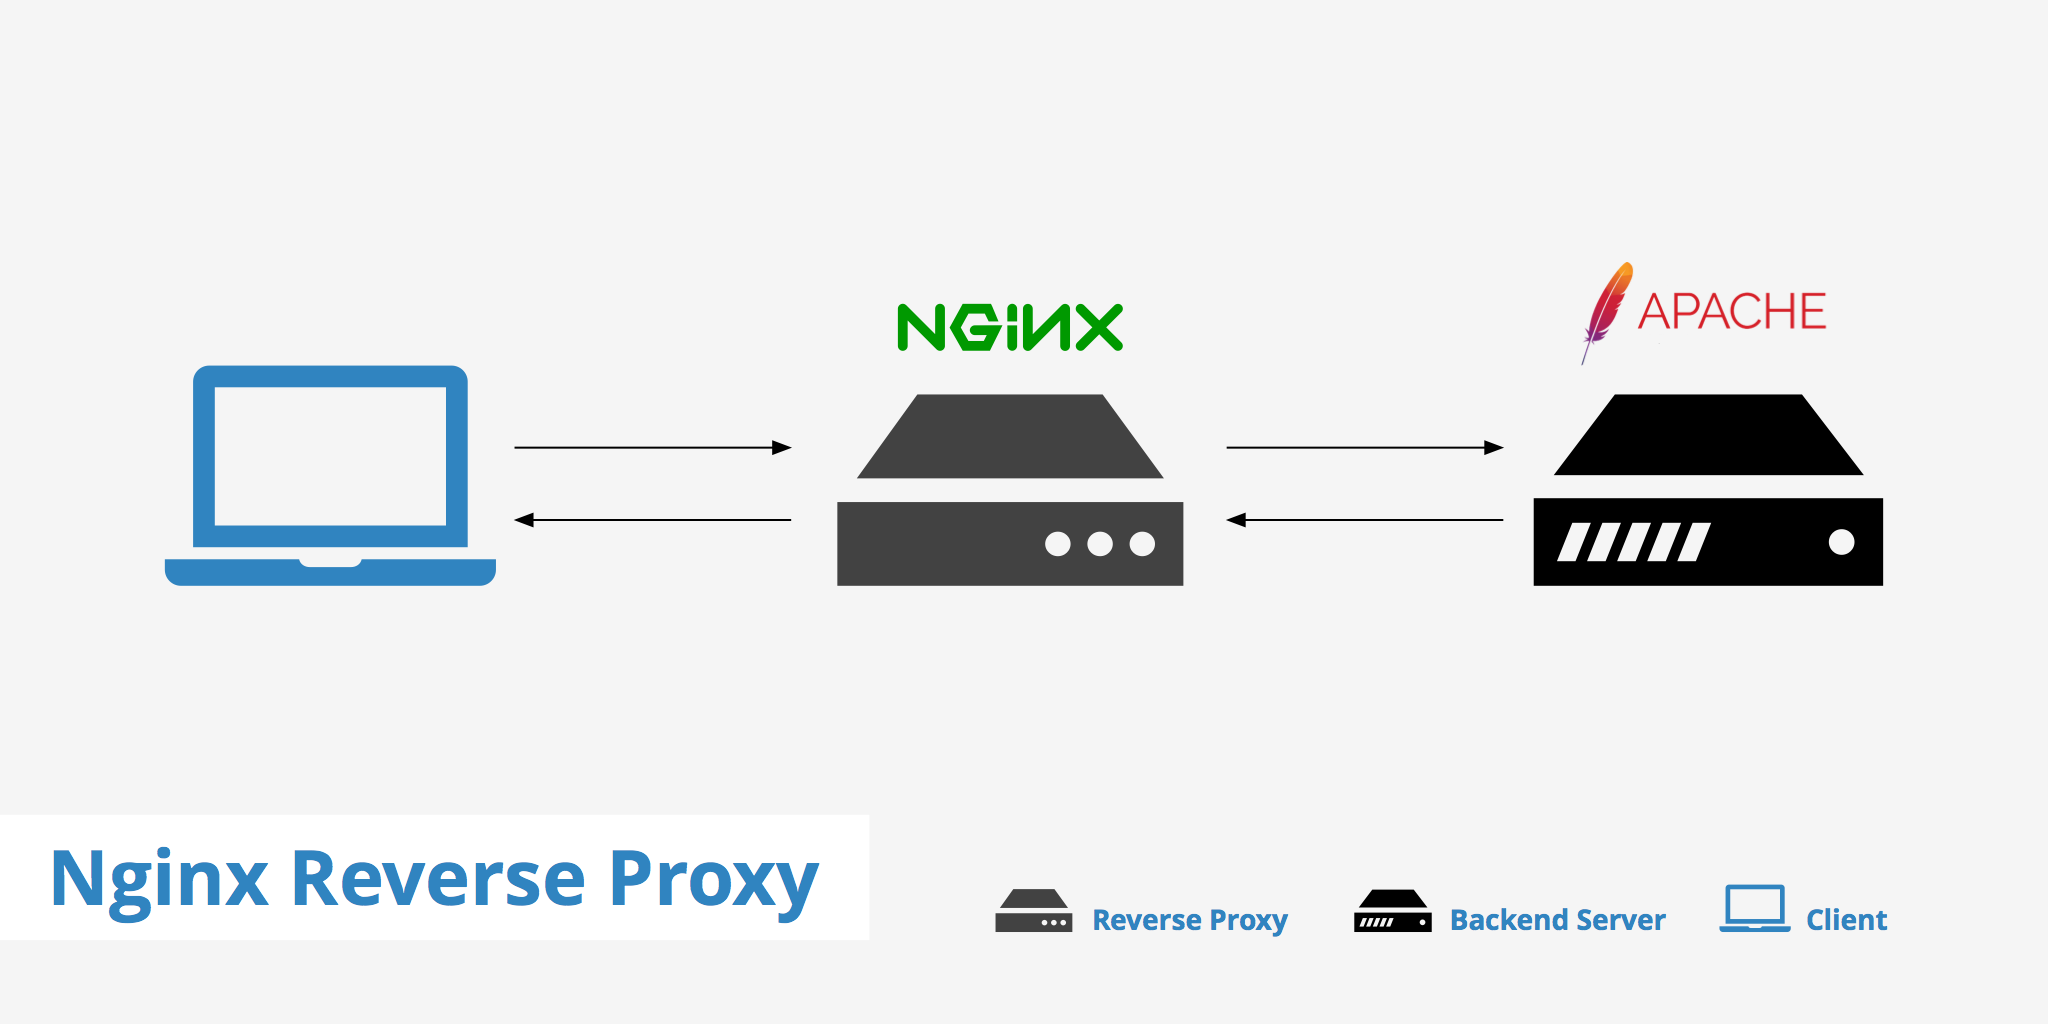
This is called Edge-Origin (or Origin-Edge) pattern, because we got an edge server - Nginx - exposed to the WAN acting as a reverse proxy, load-balancer and/or caching service on top of one (or more) origin web server(s) - Apache - which lies within the LAN.
As we can see, if we want to pull-off this configuration on a single machine, it means that we need to make Nginx listen to the actual HTTP/HTTPS ports (80 and 443), while the Apache Web Server will be configured to listen to a different port (usually 81, 82 and so on). It's also worth nothing that, given that scenario, the SSL channel only needs to be configured within the edge server, as it's the only one publicly accessible through the WAN: since the origin server(s) will only communicate with it, they can do that via a standard HTTP channel (or a Linux socket) without the risk of raising security issues.
Basic Configuration
Here's a sample nginx.conf configuration file that could be used implement an easy, straight-forward proxy with disk-cache capabilities:
|
1 2 3 4 5 6 7 8 9 10 11 12 13 14 15 16 17 18 19 20 21 22 23 24 25 26 27 28 29 30 31 32 33 34 35 36 37 38 39 40 41 42 43 44 45 46 47 48 49 50 51 52 53 54 55 56 57 58 59 60 |
# --------------------------------------------------------------------- # NGINX - Basic-Proxy configuration (no cache) # --------------------------------------------------------------------- # Created by Ryadel on 2017.12.09 # www.ryadel.com # --------------------------------------------------------------------- user apache; worker_processes 2; working_directory /var/www; error_log /var/log/nginx/error.log; pid /run/nginx.pid; # Load dynamic modules. See /usr/share/nginx/README.dynamic. include /usr/share/nginx/modules/*.conf; events { worker_connections 1024; } http { log_format main '$remote_addr - $remote_user [$time_local] "$request" ' '$status $body_bytes_sent "$http_referer" ' '"$http_user_agent" "$http_x_forwarded_for"'; access_log /var/log/nginx/access.log main; sendfile on; tcp_nopush on; tcp_nodelay on; keepalive_timeout 65; types_hash_max_size 2048; include /etc/nginx/mime.types; default_type application/octet-stream; proxy_cache_path /var/cache/nginx levels=1:2 keys_zone=edge-cache:10m inactive=20m max_size=1g;<br> proxy_temp_path /var/cache/nginx/tmp;<br> proxy_cache_lock on;<br> proxy_cache_use_stale updating;<br> proxy_bind 0.0.0.0;<br> proxy_cache_valid 200 302 10m;<br> proxy_cache_valid 301 1h;<br> proxy_cache_valid any 1m; upstream origin { # if the upstream is installed in this machine (for example, an Apache Server) # map this to localhost or to an "origin" hostname pointing to 127.0.0.1 in the /etc/hosts file server origin.example.com:82; } server { listen 80 default_server; server_name www.example.com; location / { proxy_pass http://origin; proxy_cache edge-cache; proxy_http_version 1.1; proxy_set_header Connection ""; add_header X-Cache-Status $upstream_cache_status; add_header X-Handled-By $proxy_host; } } } |
As we can see, we're using the origin-edge pattern: Nginx will work as an edge server that will (reverse) proxy the upstream Apache Web Server, which - in this example - is installed on the same machine and listening to port 82. It goes without saying that, if the origin server is installed on a different machine, we just need to write the proper hostname (or IP address) - assuming that we can reach it via LAN, VPN or anything else.
Advanced Configuration
For further configuration settings - including load-balancing and buffering features - and a full explanation of the directives we used in the above example, we strongly suggest to take a look at this article, which is dedicated to web-site caching using NGINX.
To implement rate limiting / connection limiting in Nginx, check out this article instead.
2 Comments on “How to install NGINX in CentOS 7 or FreeBSD and configure it to act as a Reverse Caching Proxy for Apache”