Table of Contents
We already talked a number of times of Nginx, allegedly one of the best web server, load balancers and HTTP accelerators out there these days. Among its most useful, but often misunderstood and misconfigured features there is rate limiting, which can be effectively used to limit the amount of GET and/or POST requests a user can make in a given period of time.
Rate limiting can be used for security purposes, for example to slow down brute force password guessing attacks: it can greatly help us to protect our website against DDoS attacks by limiting the incoming request rate to a value typical for real users, and (with logging) identify the targeted URLs. Aside from security issues, rate limiting is also a technique widely adopted by heavy-traffic web sites to protect upstream application servers from being overwhelmed by too many user requests at the same time.
In this post we'll do our best to explain how to implement a basic set of rate limiting features with Nginx. For additional info regarding the topic, we strongly suggest to take a look at their official on-demand webinars.
How Rate Limiting Works
As explained by the official site, Nginx rate limiting implements the leaky bucket algorithm, which is widely used in telecommunications and packet‑switched computer networks to deal with burstiness (a measure of the unevenness or variations in the traffic flow) when bandwidth is limited. The algorithm name has been chosen to visualize the analogy of how a bucket with a leak will overflow if either the average rate at which water is poured in exceeds the rate at which the bucket leaks or if more water than the capacity of the bucket is poured in all at once, and how the water leaks from the bucket at an (almost) constant rate.
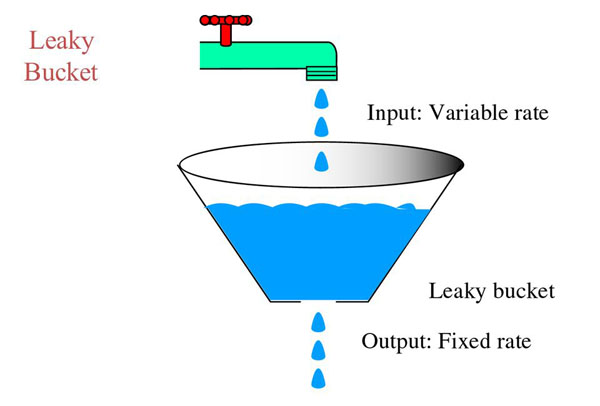
In terms of request processing, the water represents requests from clients, and the bucket represents a queue where requests wait to be processed according to a first‑in‑first‑out (FIFO) scheduling algorithm. The leaking water represents requests exiting the buffer for processing by the server, and the overflow represents requests that are discarded and never serviced.
From the above picture we can easily see why the leaky bucket is being used as a bandwidth and traffic control mechanism: it grants a fixed-rate output regardless of a variable input, which is the key to keep a web service up and running avoiding to flood it with more request than he could actually handle.
Configuring Basic Rate Limiting
Rate limiting in Nginx is configured using two main directives, limit_req_zone and limit_req. Usually the first one is defined at high level - such as within the http { } block - to make it available for use in multiple contexts, while the latter is handled within one or more location { } blocks, much like the following example:
|
1 2 3 4 5 6 7 8 9 |
http { limit_req_zone $binary_remote_addr zone=mylimit:10m rate=10r/s; server { location /login/ { limit_req zone=mylimit; } } } |
limit_req_zone
The limit_req_zone directive defines the parameters for rate limiting and takes the following three parameters:
- Key - Defines the request characteristic against which the limit is applied. In the example it is the NGINX variable $binary_remote_addr, which holds a binary representation of a client’s IP address. This means we are limiting each unique IP address to the request rate defined by the third parameter. (We’re using this variable because it takes up less space than the string representation of a client IP address, $remote_addr).
- Zone - Defines the shared memory zone used to store the state of each IP address and how often it has accessed a request‑limited URL. Keeping the information in shared memory means it can be shared among the NGINX worker processes. The definition has two parts: the zone name identified by the zone= keyword, and the size following the colon. State information for about 16,000 IP addresses takes 1 megabyte, so our zone can store about 160,000 addresses. If storage is exhausted when NGINX needs to add a new entry, it removes the oldest entry. If the space freed is still not enough to accommodate the new record, NGINX returns status code 503 (Service Temporarily Unavailable). Additionally, to prevent memory from being exhausted, every time NGINX creates a new entry it removes up to two entries that have not been used in the previous 60 seconds.
- Rate - Sets the maximum request rate. In the example, the rate cannot exceed 10 requests per second. NGINX actually tracks requests at millisecond granularity, so this limit corresponds to 1 request every 100 milliseconds. Because we are not allowing for bursts (see the next section), this means that a request is rejected if it arrives less than 100 milliseconds after the previous permitted one.
limit_req
The limit_req_zone directive sets the parameters for rate limiting and the shared memory zone, but it does not actually limit the request rate. For that you need to apply the limit to a specific location or server block by including a limit_req directive there. In the above example, we are rate limiting requests to /login/ so that each unique IP address will be limited to 10 requests per second: to be more precise, they cannot make a request for that URL within 100 milliseconds of its previous one.
It's very important to understand that limit_req enables rate limiting only within the context where it appears - in the avove example, for all requests to /login/.
HTTP error codes
What happens if we get 2 (or more) requests within 100 milliseconds of each other? For the second request Nginx returns a HTTP 503 - Connection Unavailable error code to the client. If we're unhappy with it, and we want to return a different error code, we can configure it using the limit_req_status directive in the following way:
|
1 |
limit_req_status 429; |
This will output a HTTP 429 - Too Many Requests error code instead of the default 503, which could be probably better suited for most scenarios.
Handling Bursts
Regardless of the chosen error code, sistematically blocking these requests isn't the best possible approach to the problem, because web applications tend to be bursty in nature: for example, when the user visits the site for the first time, he will probably "flood" the web server with a number of initial requests for a bunch of CSS, JS and IMG files that will be cached for any subsequent request. Instead we want to buffer any excess requests and service them in a timely manner.
This is how we can use the burst parameter to limit_req:
|
1 2 3 4 5 6 7 8 9 |
http { limit_req_zone $binary_remote_addr zone=mylimit:10m rate=10r/s; server { location /login/ { limit_req zone=mylimit burst=20; } } } |
The burst parameter defines how many requests a client can make in excess of the rate specified by the zone. We already know that, within our sample mylimit zone, the rate limit is 10 requests per second, or 1 every 100 milliseconds: with the burst parameter set in the above way, any request that arrives sooner than 100 milliseconds after the previous one is put in a queue with a size of 20.
This basically means that, if 21 requests arrive from a given IP address simultaneously, Nginx will forward the first one to the upstream server group immediately and put the remaining 20 in the queue: it will then forward a queued request every 100 milliseconds, returning an HTTP error (503 or a custom one, see above) to the client only if an incoming request makes the number of queued requests go over 20.
IMPORTANT: Notice how we're using $binary_remote_addr instead of $remote_addr to keep track of the requesting clients IP address: the reason for that is very simple - it takes much less space.
Queueing with No Delay
A configuration with burst results in a smooth flow of traffic, yet it can make your site appear slow to the clients. In the above example, the 20th packet in the queue will wait 2 seconds before being forwarded: such delay will be hardly acceptable in most scenarios, expecially when the request is not async - such as a JavaScript file. Luckily enough, the issue can be easily addressed by adding the nodelay parameter along with the burst parameter:
|
1 2 3 4 5 6 7 8 9 |
http { limit_req_zone $binary_remote_addr zone=mylimit:10m rate=10r/s; server { location /login/ { limit_req zone=mylimit burst=20 nodelay; } } } |
When the nodelay parameter is set, Nginx still allocates slots in the queue according to the burst parameter and imposes the configured rate limit, but not by spacing out the forwarding of queued requests: instead, when a request arrives “too soon”, Nginx will immediately forward it as long as there is a slot available for it in the queue. It still marks that slot as "taken" and does not free it for use by another request until the appropriate time has passed (in our example, after 100 milliseconds). In other words, the queue will still be used, but won't be blocking: it would basically be a parallel queue instead of a serial one.
Let's make a quick example to be sure we properly understood that: suppose, as before, that the 20‑slot queue is empty and 21 requests arrive simultaneously from a given IP address. Nginx will forward all 21 requests immediately and marks the 20 slots in the queue as taken, then frees 1 slot every 100 milliseconds. If there were 25 requests instead, Nginx would immediately forward 21 of them, mark 20 slots as taken, and reject 4 requests with status 503 (or custom, see above). Now suppose that 101 milliseconds after the first set of requests was forwarded another 20 requests arrive simultaneously: only 1 slot in the queue would have been freed, so Nginx will forward 1 request and rejects the other 19; if instead 501 milliseconds have passed before the 20 new requests arrive, 5 slots will be free so Nginx will forward 5 requests immediately and rejects 15... And so on. Notice how the effect is still equivalent to a rate limit of 10 requests per second.
All in all, the nodelay option is very useful if you want to impose a rate limit without constraining the allowed spacing between requests: that's why it's highly recommended to use both the burst and nodelay parameters to the limit_req directive in most deployment scenarios.
Implementing a Whitelist
We can easily pull off a whitelist to exclude one or multiple IPs from rate-limiting rules, for example to allow some administrators to perform stress tests, benchmark tests and so on:
|
1 2 3 4 5 6 7 8 9 10 11 12 13 14 15 16 17 18 19 20 |
http { geo $limit{ default 1; 10.0.0.0/8 0; 192.168.0.0/24 0; } map $limit $limit_key { 0 ""; 1 $binary_remote_addr; } limit_req_zone $limit_key zone=mylimit:10m rate=10r/s; server { location /login/ { limit_req zone=mylimit burst=20 nodelay; } } } |
This example makes use of both the geo and map Nginx directives to determine if we need to apply a request limiting or not depending on the client IP address.
Here's how the logic actually works:
- The geo block assigns a value of 0 to $limit for all the IP addresses included, and 1 for all others.
- The map block translates those values into a key, such that:
- If $limit is 0, $limit_key is set to the empty string.
- If $limit is 1, $limit_key is set to the client’s IP address in binary format.
- The limit_req_zone directive will use the resulting $limit_key value to selectively apply or not apply the rate limiting features:
- when its first parameter is an empty string, the limit is not applied, hence whitelisted IP addresses (in the 10.0.0.0/8 and 192.168.0.0/24 subnets) won't be limited;
- all other IP addresses will be limited to 10 requests per second.
Limiting the number of connections
The limit_conn_zone and limit_conn directives can be used to limit the number of connections per defined key, such as the number of connections from a single IP address. They work in the same way of limit_req_zone and limit_req, meaning that we can create one or more zones in the http level and then apply them on a global scope or wherever we want to.
Here's how these directives can be used to limit a single IP address to make no more than 100 connections within 1 minute.
|
1 2 |
limit_conn_zone $binary_remote_addr zone=limit_conn:1m; limit_conn limit_conn 100; |
It's worth noting that not all connections are counted: a connection is counted only if it has a request processed by the server and the whole request header has already been read: if the request is discarded - for example, due to a limit_req directive - the connection wil be ignored.
Denying All Requests to a Specific Location
In case we want to deny all requests for a specific URL, rather than just limiting them, we can use the deny all directive in the following way:
|
1 2 3 |
location /foo.php { deny all; } |
Conclusion
That's it, at least for now: as always, for additional info regarding Nginx, don't forget to take a look at the official docs.