L'articolo How to Convert OST to PST with Stellar Converter for OST è in prima posizione su Ryadel.
]]>In this review, we will take a practical look at Stellar Converter for OST, a Windows software specifically designed to convert offline Outlook data files into PST files and other export formats. The main goal is to understand where this kind of tool makes sense, how the workflow looks, and what an IT administrator should check before relying on it in a real conversion scenario.
OST and PST files in Outlook
Outlook uses different local data file formats depending on the account type and configuration:
- A PST file is a portable Outlook data file commonly used for archives, exports, backups, and manual imports.
- A OST file, instead, is an offline cache used by Exchange, Microsoft 365, Outlook.com, and IMAP accounts to keep a synchronized local copy of the mailbox.
The difference matters because a PST file can usually be opened or imported in Outlook on another machine, while an OST file is tied to the original mailbox profile and synchronization context. When the server-side mailbox is still available, Outlook can recreate the OST file by downloading the mailbox again. However, when the mailbox is gone, disabled, or no longer reachable, the OST file may be the only local copy left.
That is the scenario where an OST to PST converter becomes useful: Outlook’s built-in import/export wizard is not designed to open an orphaned OST file directly, so a dedicated conversion tool is often the fastest way to access usable mailbox data.
What Stellar Converter for OST does
Stellar Converter for OST scans an offline Outlook data file and extracts mailbox items such as emails, attachments, contacts, calendars, tasks, notes, and journals. The converted data can be saved as a PST file, which can then be opened or imported in Outlook, or exported to other formats such as MSG, EML, RTF, HTML, and PDF.
The product is currently available in multiple editions:
- The Corporate edition covers the typical OST to PST conversion workflow;
- The Technician edition adds features aimed at IT teams, including batch conversion, export to Microsoft 365, export to live Exchange, Outlook profile export, PST compacting and splitting options.
- The Toolkit edition comes with all the features above, and also bundles the converter with additional mailbox repair and recovery tools.
For most single-user conversion, the Corporate edition is the one to evaluate first; Technician and Toolkit editions become more interesting when the task involves multiple OST files, or direct export to Microsoft 365 or Exchange.
Typical use cases
The software is most relevant in situations where the standard Outlook recovery path is unavailable or inconvenient. A few realistic examples:
- A former employee’s Exchange mailbox was deleted, but the workstation still contains the local OST file.
- Outlook shows synchronization errors and the mailbox data cannot be reliably exported from the client.
- An organization is moving mailboxes to another platform and needs to extract local Outlook data from multiple machines.
- A Microsoft 365 or Exchange profile was removed, while the OST file still contains messages that were never archived elsewhere.
- A user needs to recover calendar items, contacts, or attachments from an old Outlook profile without reconnecting to the original server.
There is an important operational point here: when the original mailbox still exists and is healthy, recreating the Outlook profile is often cleaner than converting the OST file. Conversion is more valuable when the OST is orphaned, inaccessible, encrypted, too large, or disconnected from the original mailbox context.
Installation and first launch
The installation follows the usual Windows wizard approach: download the installer, accept the license agreement, choose the destination folder, and complete the setup. There is nothing unusual here, and that is a positive point for this kind of utility; in conversion, the last thing an admin wants is a setup process that introduces extra dependencies or unclear prerequisites.
After launch, Stellar Converter for OST presents the user with the option to select an OST file. The software can automatically list Outlook data files from the default location, but it also allows manual browsing and search.
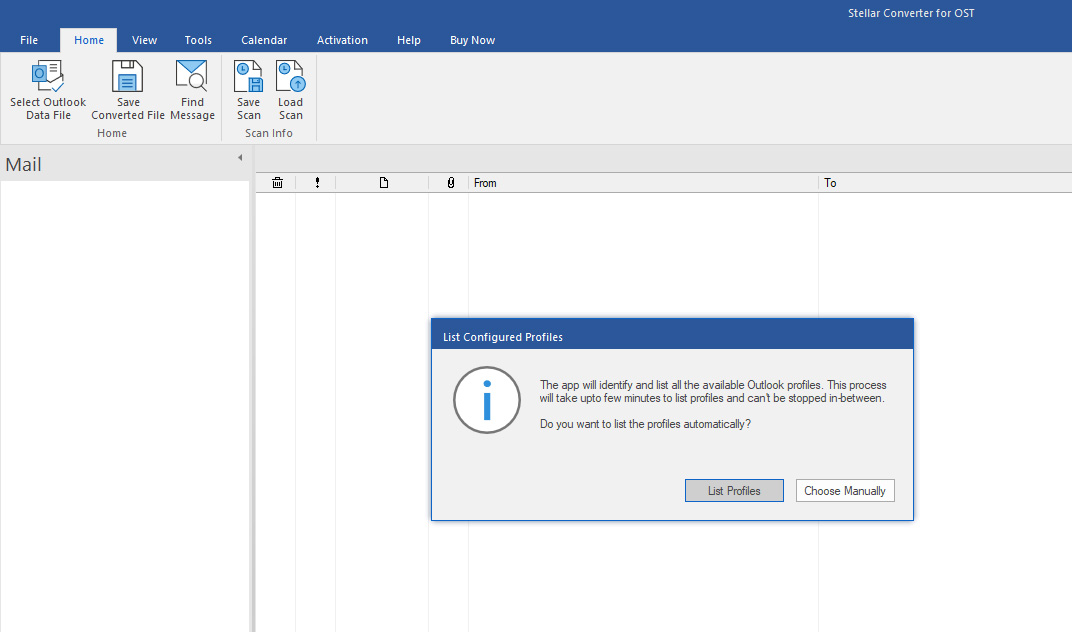
This is useful because the default Outlook data directory is not always enough, especially on systems where user profiles were migrated, disks were attached externally, or Outlook data was stored outside the standard path.
C:\Users\<USERNAME>\AppData\Local\Microsoft\Outlook
That path is still the first place to check on a standard Windows installation, but the ability to search across folders and drives avoids wasting time when dealing with copied user profiles or recovered disks.
Conversion workflow
The conversion process is straightforward:
- Select or locate the OST file.
- Start the scan.
- Preview the detected mailbox folders and items.
- Search or filter the content, if needed.
- Choose the export format.
- Save the converted data to PST or another supported format.
After scanning the OST file, the software shows the mailbox structure in a preview interface. From a usability point of view, this preview stage is important: it lets the operator verify that the expected folders, messages, contacts, and calendar items are actually visible before spending time on the final export.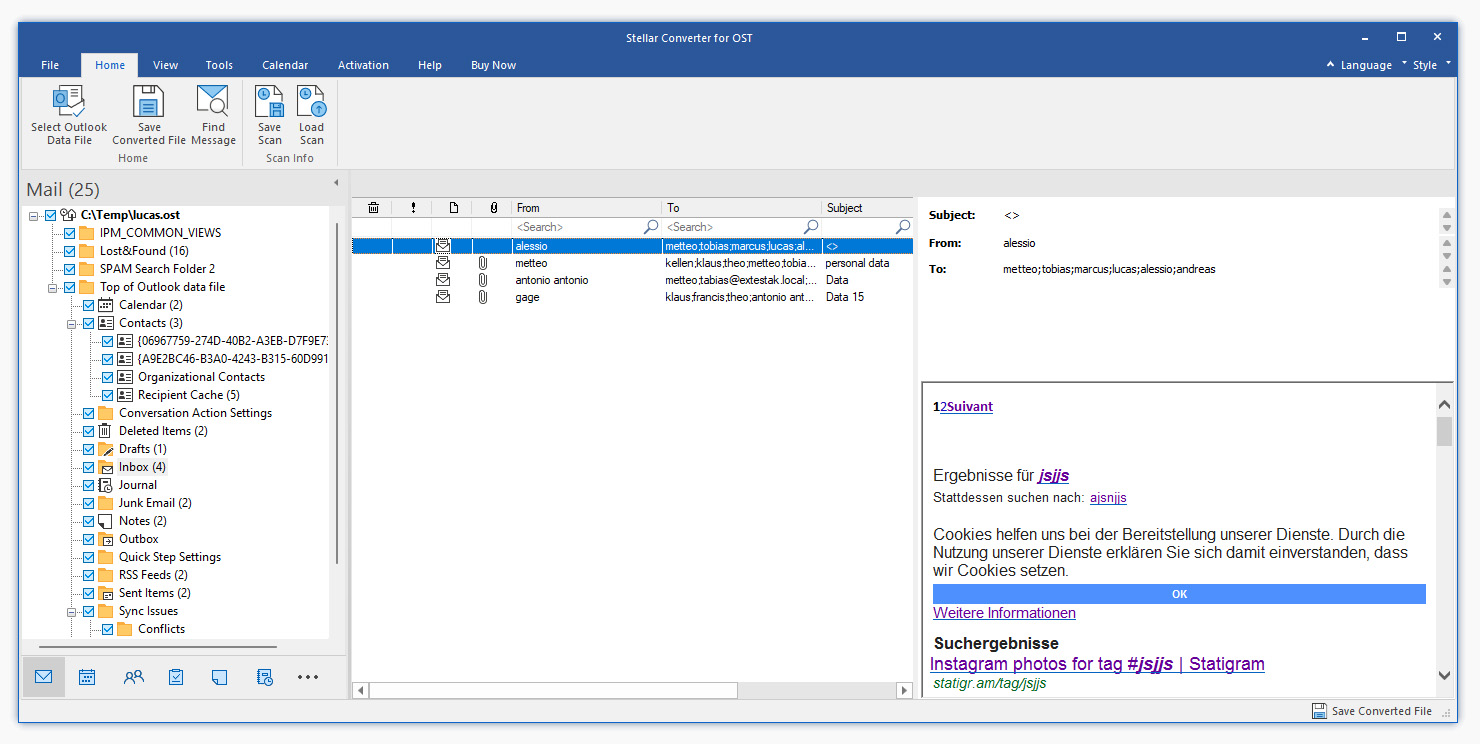 The preview also helps in partial recovery scenarios. If the goal is to extract only a subset of messages, for example a specific date range or a few folders related to a legal or support case, the operator can inspect the content before saving it.
Search and selective export
One of the more useful features is the ability to search mailbox items before export. Older versions of this type of software usually limited search to basic fields such as sender, recipient, subject, and date. The current product documentation also references message text search, which makes the feature more useful when looking for a specific conversation without knowing the exact folder.
Selective export is especially relevant when the source OST is large. Exporting everything to PST is the safest approach for archival recovery, but it is not always the most practical one. When a user needs a single project folder, a small set of contacts, or a few calendar items, saving only the required content can reduce processing time and keep the resulting PST easier to handle.
Supported export formats
PST is the obvious target format because it preserves the Outlook-oriented workflow: once created, the PST can be imported or opened in Outlook and then moved, archived, or processed by standard tools.
Stellar Converter for OST also supports additional export formats:
- MSG, useful when individual Outlook messages need to be stored as standalone files.
- EML, a more portable email format supported by several mail clients and forensic tools.
- RTF and HTML, practical for readable exports when Outlook is not required.
- PDF, often requested for documentation, legal review, or sharing with non-technical users.
For system administrators, PST remains the most useful output in day-to-day Outlook activity. For auditing, support, and documentation tasks, PDF or HTML export can save time because the recipient does not need to open Outlook at all.
Video walkthrough
Stellar also provides a short video walkthrough showing the main conversion steps, from selecting the OST file to previewing the converted mailbox and saving the converted data. It is worth watching before running the software for the first time, especially if you need to perform the conversion on a production workstation or on a user profile accessed from another machine.
The video is available on YouTube here: How to Use Stellar Converter for OST.
Handling large OST files
Large Outlook data files are always a potential source of trouble. Even when the conversion succeeds, the resulting PST may become difficult to move, backup, or import if it grows too much. Stellar Converter for OST includes an auto-split option for large PST files, with the product page indicating automatic splitting around 45 GB.
This is a sensible safeguard. Modern Outlook versions can handle large Unicode PST files, but very large PSTs are still inconvenient in real environments: backup jobs take longer, imports are slower, and any later corruption has a larger impact. Splitting huge outputs into smaller PST files is often the more manageable choice, especially for long-term archives.
Technician edition features
The Technician edition is clearly aimed at administrators, MSPs, and support teams rather than individual Outlook users. Its most relevant additions are batch conversion and direct export to Microsoft 365 or live Exchange.
Batch conversion is useful when multiple workstations contain local OST files that need to be extracted during a conversion. Direct export to Microsoft 365 or Exchange can also simplify the workflow because it removes the intermediate step of creating a PST and then importing it manually.
That said, I would still be careful with direct exports in production mail environments. For one-off conversions, exporting to PST first gives you a verifiable artifact that can be backed up, inspected, and imported later. Direct export makes more sense when the migration path has already been tested and the destination mailbox strategy is clear.
Demo version and licensing
The free demo version is useful for validation because it allows the user to scan the OST file and preview the converted mailbox data. This is the right model for conversion: before buying a license, an administrator should be able to confirm that the tool can actually read the source file and show the expected content.
Saving the full converted mailbox requires a paid license (as explained above). The best edition depends on the use case: Corporate for standard OST to PST conversion, Technician for batch jobs and Microsoft 365 or Exchange export, Toolkit when the work also involves PST repair, password recovery, deleted email recovery, or other mailbox maintenance tasks.
Things to check before converting
Before running any OST conversion, we would recommend a few basic precautions:
- Make sure the destination drive has enough free space for both the scan data and the final PST output. The PST can be larger than the original OST.
- Close Outlook before starting the conversion, otherwise the OST file may be locked or still changing during the scan.
- After exporting to PST, open it in Outlook and verify key folders before considering the conversion.
These checks are not specific to Stellar’s product; they are part of a complete conversion workflow. A converter can extract data, but it cannot replace a clean operational process around evidence, backups, and validation.
What we liked
The strongest aspect of Stellar Converter for OST is the clarity of the workflow: select the OST, scan it, preview the mailbox, and save the converted data. The interface is built around that sequence, which is exactly what most users need during the final conversion.
The preview pane is also valuable because it gives immediate feedback before export. In our experience, this is where many conversion tools either gain or lose trust: if the operator can quickly see the folder hierarchy and inspect messages, contacts, and calendar data, the conversion feels controllable rather than opaque.
The multiple export formats are useful, but the real value remains PST output. The Technician edition features are also well aligned with IT support needs, particularly batch conversion and Microsoft 365 export.
Limitations and caveats
There are a few practical limits to keep in mind. Conversion time depends on file size, disk speed, available memory, as well as Outlook data complexity, and the amount of recoverable content. Vendor benchmarks and third-party reviews can provide expectations, but they should not be treated as guarantees for every OST file.
Another point concerns licensing. The demo is useful for checking whether the mailbox can be previewed, but a paid license is required for full saving and advanced export features. That is normal for this category of software.
Verdict
Stellar Converter for OST is a practical tool for a specific and common Outlook problem: turning an inaccessible or orphaned OST file into data that can be opened, searched, archived, or imported again. The product covers the essential workflow well, supports the export formats most users will need, and offers more advanced options for administrators through the Technician edition.
It's important to understand that it shouldn't be taken as a substitute for proper Exchange or Microsoft 365 backup policies, and we would not recommend treating OST files as a planned archival format. Still, when the only useful mailbox copy is trapped inside an OST file, having a tool that can scan, preview, and export that content to PST can save a lot of time.
For individuals, the Corporate edition is likely enough. For IT teams dealing with several users or direct Microsoft 365 export, the Technician edition is the one worth evaluating.
References
- Stellar Converter for OST product page - Official product page with features, editions, pricing, technical specifications, and download links.
- Stellar Converter for OST user manual - Official documentation for installation, file selection, scanning, preview, and export operations.
- How to Use Stellar Converter for OST - Official video walkthrough showing the conversion process.
- Import email, contacts, and calendar from an Outlook PST file - Microsoft support guide for importing PST files into Outlook.
- Introduction to Outlook Data Files - Microsoft documentation explaining PST and OST files.
L'articolo How to Convert OST to PST with Stellar Converter for OST è in prima posizione su Ryadel.
]]>