Table of Contents
In this article we'll show you how to create a self-signed TLS/SSL certificate and configure it in Apache or Nginx web server to allow secure, encrypted connections. This tutorial will take for granted that you don't already have purchased a TLS/SSL certificate for your domain and you're not interested in doing so: conversely, those who already have a valid certificate and just want to install it on Apache and/or Nginx can skip the first paragraph and directly jump to the Configuring Apache / Configuring Nginx sections below.
Introduction
Before jumping to the terminal commands it can be useful to quickly summarize what we're talking about.
TLS, or Transport Layer Security - and its predecessor, SSL or Secure Sockets Layer - are cryptographic protocols that provide communications security over a computer network. Several versions of the protocols find widespread use in applications such as web browsing, email, Internet faxing, instant messaging, and Voice over IP (VoIP). Websites are able to use TLS to secure all communications between their servers and web browsers. The Transport Layer Security protocol aims primarily to provide privacy and data integrity between two communicating computer applications. When secured by TLS, connections between a client (e.g., a web browser) and a server (e.g., wikipedia.org) have one or more of the following properties:
- The connection is private (or secure) because symmetric cryptography is used to encrypt the data transmitted. The keys for this symmetric encryption are generated uniquely for each connection and are based on a shared secret negotiated at the start of the session, during a phase called TLS handshake. The server and client negotiate the details of which encryption algorithm and cryptographic keys to use before the first byte of data is transmitted. The negotiation of a shared secret is both secure (the negotiated secret is unavailable to eavesdroppers and cannot be obtained, even by an attacker who places themselves in the middle of the connection) and reliable (no attacker can modify the communications during the negotiation without being detected).
- The identity of the communicating parties can be authenticated using public-key cryptography: this authentication can be made optional, but is generally required for at least one of the parties (typically the server).
- The connection ensures integrity because each message transmitted includes a message integrity check using a message authentication code to prevent undetected loss or alteration of the data during transmission.
In addition to the properties above, careful configuration of TLS can provide additional privacy-related properties such as forward secrecy, ensuring that any future disclosure of encryption keys cannot be used to decrypt any TLS communications recorded in the past.
In a nutshell, we can say that, when using TLS, servers can send traffic safely between the server and clients without the possibility of the messages being intercepted by outside parties: if the certificate is released by a trusted third-party (i.e. a registered Certificate Authority), the certificate system also assists users in verifying the identity of the sites that they are connecting with.
That's not true for self-signed certificates, which lacks of this important feature: that's the reason why they will always generate a warning in most browsers, such as the following one:
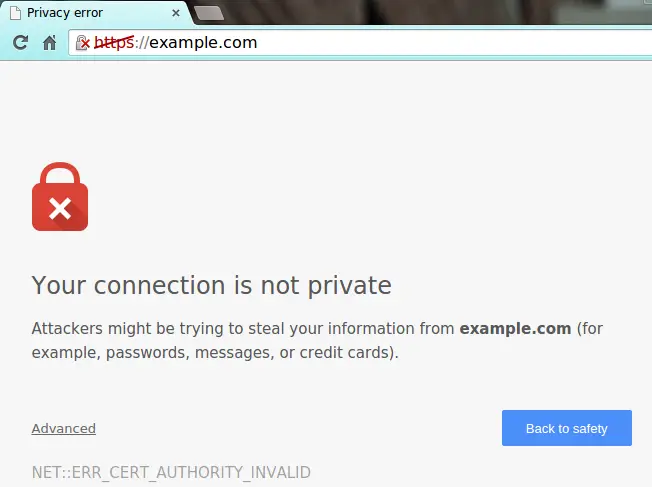
Such warnings are important because they are telling the user that the SSL certificate used by that server is not signed by any of the trusted certificate authorities included with web browsers, hence it cannot be used to validate the identity of the server automatically.
When facing this warning, the connecting user has the following choices: if he thinks that the server can be trusted, he can ignore the warning and go ahead; conversely, he should click the Back to safety button and stay away from it.
Self-Signed Certificates: how and when to use them
The above explanation clearly shows when using a self-signed certificate can be completely safe: we can use a self-signed certificate whenever we need to secure the connection for something that is meant to be accessed from a restricted list of users that can trust the server they're connecting to. Possible scenarios include administrative services with a Web-based GUI such as Webmin, our Firewall appliance, our Source-Control Manager and any private or public service that we don't want to open to the masses. Conversely, whenever we want to open our service to the outside world, we should really get a SSL Certificate from a Certificate Authority. The reason for that is very simple: we cannot expect that our self-signed certificate will be trusted by people who don't know us.
It's very important to understand that a self-signed certificate will still encrypt communication between your server and any clients, hence it will still greatly increase the security level of any web-based site, service or application - expecially if it's not user-facing.
Create the SSL Certificate
Now that we know the basics, let's see how we can create a self-signed TLS/SSL certificate and configure it within our Apache and/or Nginx servers.
The first thing to do is to create a /etc/ssl/private/ folder on the server, which we'll use to store the SSL/TLS key files. Since the secrecy of this key is essential for security, we will lock down the permissions to prevent unauthorized access:
|
1 2 |
mkdir /etc/ssl/private/ sudo chmod 700 /etc/ssl/private/ |
Once done, we can run the terminal command below to create the certificate and key in a single step:
|
1 |
sudo openssl req -x509 -nodes -days 365 -newkey rsa:2048 -keyout /etc/ssl/private/httpd-selfsigned.key -out /etc/ssl/certs/httpd-selfsigned.crt |
The /etc/ssl/certs folder, which will be used to hold the public certificate, should already exist on the server.
Here's a useful explanation of the above switches:
- req - is a command for X.509 Certificate Signing Request (CSR) management.
- x509 - means X.509 certificate data management.
- days - defines number of days certificate is valid for.
- newkey - specifies certificate key processor.
- rsa:2048 - RSA key processor, will generate a 2048 bit private key.
- keyout - sets the key storage file.
- out - sets the certificate storage file.
Once submitted, the above command will ask you to answer the questions below:
- Country Name (2 letter code) [XX]: the ISO 3166-1 two-letter country code for your country. Example: US
- State or Province Name (full name) []: the state or province name. Example: Massachusetts
- Locality Name (eg, city) [Default City]: the city of the service. Example: Boston
- Organization Name (eg, company) [Default Company Ltd]: the FTP company name. Example: Example.com
- Organizational Unit Name (eg, section) []: The company main area of interest. Example: Information Technology
- Common Name (eg, your name or your server's hostname) []: the hostname required to connect to the FTP server. Example: example.com
- Email Address []: the admin e-mail address. Example: ftp-admin@example.com
Fill out the prompts appropriately. The most important line is the one that requests the Common Name: we need to enter the domain name associated with our server or our server's public IP address.
Create a Strong Diffie-Hellman group
While we are using OpenSSL we should also create a strong Diffie-Hellman group, which is used in negotiating Perfect Forward Secrecy with clients.
We can do this by typing:
|
1 |
sudo openssl dhparam -out /etc/ssl/certs/dhparam.pem 2048 |
This may take a few minutes, but when it's done you will have a strong DH group at /etc/ssl/certs/dhparam.pem that we can use in our configuration.
Configuring Apache
Installing a self-signed certificate on Apache is easy: we just need to add the following lines to the proper <VirtualHost> node within the /etc/httpd/conf/httpd.conf file:
|
1 2 3 4 5 6 7 8 9 10 11 12 13 14 15 |
<VirtualHost *:443> DocumentRoot /var/www/example.com <Directory "/var/www/example.com"> # ... # [...custom directory options...] # ... </Directory> HostNameLookups off ServerName www.example.com SSLEngine on SSLCertificateFile /etc/ssl/certs/httpd-selfsigned.crt SSLCertificateKeyFile /etc/ssl/private/httpd-selfsigned.key SSLOpenSSLConfCmd DHParameters "/etc/ssl/certs/dhparam.pem" </VirtualHost> |
If we want to redirect the non-HTTPS requests to HTTPS, we can also add the following lines:
|
1 2 3 4 |
<VirtualHost *:80> ServerName www.example.com Redirect 301 / https://www.example.com/ </VirtualHost> |
Configuring Nginx
Here's how we can tweak the /etc/nginx/nginx.conf settings file to allow our example.com website to accept HTTPS connections using the files we created above:
|
1 2 3 4 5 6 7 8 9 10 11 12 13 14 15 16 17 18 19 20 21 22 23 24 25 26 27 28 29 30 31 32 33 |
server { listen 443 http2 ssl; listen [::]:443 http2 ssl; server_name example.com; ssl_certificate /etc/ssl/certs/httpd-selfsigned.crt; ssl_certificate_key /etc/ssl/private/httpd-selfsigned.key; ssl_dhparam /etc/ssl/certs/dhparam.pem; ######################################################################## # from https://cipherli.st/ # # and https://raymii.org/s/tutorials/Strong_SSL_Security_On_nginx.html # ######################################################################## ssl_protocols TLSv1 TLSv1.1 TLSv1.2; ssl_prefer_server_ciphers on; ssl_ciphers "EECDH+AESGCM:EDH+AESGCM:AES256+EECDH:AES256+EDH"; ssl_ecdh_curve secp384r1; ssl_session_cache shared:SSL:10m; ssl_session_tickets off; ssl_stapling on; ssl_stapling_verify on; resolver 8.8.8.8 8.8.4.4 valid=300s; resolver_timeout 5s; add_header Strict-Transport-Security "max-age=63072000; includeSubdomains"; add_header X-Frame-Options DENY; add_header X-Content-Type-Options nosniff; ################################## # END https://cipherli.st/ BLOCK # ################################## } |
The last big block of directives are additional SSL options that will increase our site's security, as suggested by Remy van Elst on the Cipherli.st site. You can learn more about his decisions regarding the Nginx choices by reading Strong SSL Security on Nginx.
If we want to use our self-signed certificate to protect multiple web sites, we can place the SSL-related directives directly on the http { } block: however, in order to do that, we need to create a multi-domain self-signed certificate using the subjectAltName option like explained in this StackOverflow answer.
If we want to redirect the non-HTTPS requests to HTTPS, we can also add the following lines:
|
1 2 3 4 5 6 7 8 |
server { listen 80; listen [::]:80; server_name example.com; return 301 https://$host$request_uri/; } |
Conclusion
That's it for now! We sincerely hope that this post will help system administrators to configure their web servers in a most secure way.