Table of Contents
If you're a PHP developer there's a high chance that you already know Imagick, a native php extension to perform image processing tasks using the ImageMagick API. ImageMagick, in turn, is a open-source software suite that can be used to create, edit, and compose bitmap images in a variety of formats (over 100) including DPX, EXR, GIF, JPEG, JPEG-2000, PDF, PhotoCD, PNG, Postscript, SVG, and TIFF.
In this post we'll see how we can use the Imagick PHP extension to proportionally resize and crop images in real-time: in a nutshell, we'll learn how to create real-time thumbnails from a given source image; the main advantage about such technique is that it can be used in Windows and Linux environments, since the Imagick extension and the ImageMagick tools suite are available for both platforms.
To-do list
Here's a brief summary of what we're going to throughout this post:
- Install the Imagick PHP extension
- Install ImageMagick
- Check the installation
- Create a sample PHP file (sample source code included)
As we'll see, the first two steps are quite different for Windows and Linux and will require separate instructions, while the third one is identical.
Install the Imagick PHP extension
If you are using a Linux server, in order to setup and activate the Imagick PHP extension you just need to install the corresponding package in the following way:
|
1 2 |
$ sudo apt install php php-common gcc $ sudo apt install php5.6-imagick |
The first command will install some prerequisites (which you might already have), while the latter will setup the Imagick extension; it goes without saying that the above commands are meant for Debian-based Linux distributions (Debian, Ubuntu, and the likes): if you're using another distro, use the available package manager to do the same.
If you are under Windows, you will need to edit the php.ini file and uncomment the following line:
|
1 |
extension=php_imagick.dll |
In the unlikely case it doesn't exist, you can add it under the [ExtensionList] block.
Needless to say, you also need to ensure that you actually do have such DLL file in the /ext/ subfolder - the one placed under your system's PHP installation folder. If you don't have that, you can get it on the PECL Imagick package archive at the following url:
Install ImageMagick
Now that we've got the PHP extension we need to install the ImageMagick software suite, as it will be the underlying engine that will actually perform the image processing tasks. In order to do that, go to the ImageMagick official website, navigate to the download section and pick the Linux or Windows Binary Release compatible with your environment.
If you're using Linux, you can also try to directly install the ImageMagick's latest versions through your package manager in the following way:
|
1 |
$ sudo apt install imagemagick |
Check the installation
As soon as we've installed the Imagick PHP extension and the ImageMagick software tool we might want to check if everything is working properly. In order to do that, reload the PHP handler by restarting your web server (of the php-fpm service, in case you're using it) and then create a PHP file with the following content:
|
1 |
<?php echo phpinfo(); ?> |
Put the one-liner above in a phpinfo.php file, publish it to your web server and run it once to see if our prerequisites are being properly loaded:
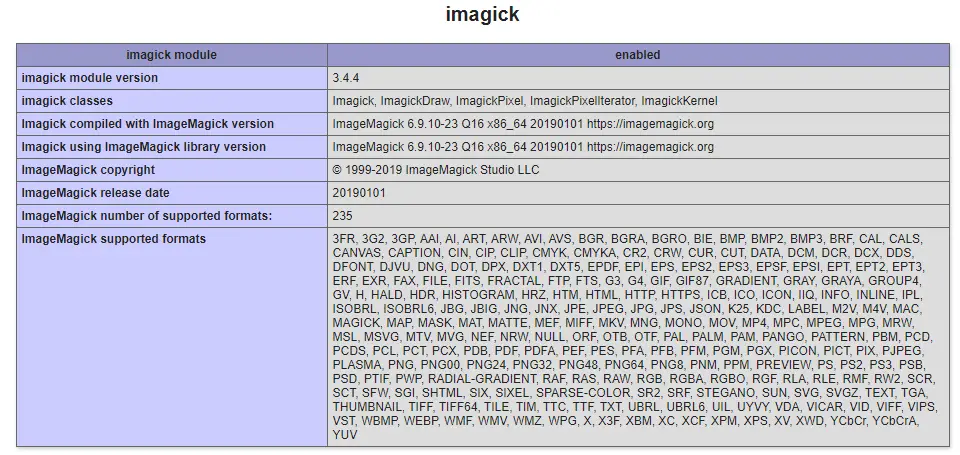
If you see something like this, it means that both the Imagick PHP extension and the ImageMagick software suite are ready to be used by PHP. If you don't see this, here are some common issues you might need to fix, splitted into Windows and Linux.
If you don't want to use the phpinfo() technique, you can check if the extension is properly loaded using the PHP CLI in the following way:
|
1 |
$ php -m |
If imagick is present among the resulting text lines, it means that everything is ok.
Windows issues
- Add the ImageMagick installation folder to the PATH environment variable. Be sure to add the folder containing the executable files, because it has been changed between ImageMagick 6.x and 7.x versions in the following way:
- 6.x: C:\Program Files (x86)\ImageMagick-6.9.3-7-vc11-x86\bin
- 7.x: C:\Program Files (x86)\ImageMagick-7.0.11-Q16
- Create a temporary folder accessible by ImageMagick and add it to the MAGICK_TEMPORARY_PATH (or MAGICK_TMPDIR) environment variable. This might be required if your PHP temporary folder is unaccessible from the ImageMagick executables, which seems to be fairly frequent on most Windows-based servers. If you see "permissions denied" issues, this workaround will most likely fix it.
Linux issues
None so far: the Linux configuration is usually free from major issues, as long as the appropriate Imagick and ImageMagick versions are being installed.
Source code sample
Now that we've dealt with the prerequisites and checked that everything is worked as expected, we can proceed with the source code.
Here's the sample code for a minimalistic thumb.php file that accepts the following GET parameters:
- url : the URL of a source image
- w : the width of the thumbnail that will be generated
- h : the height of the thumbnail that will be generated
- mode : 0 for proportional resize with a "best-fit" crop (default), 1 for proportional resize with background padding.
- bg : the background padding color, only used when mode is equal to 1 and the thumbnail requires a padding (default is 000000, meaning that we'll have a black background).
The main difference between mode 0 and mode 1 is that the first will potentially crop the source image in order to make it fit to the given width/height while avoiding the "padding" effect, while the second will preserve the image content while potentially adding a padding to make it fit. To better understand it, take a look at the following screenshot:
If one between width (w) and height (h) parameter is not present, it will be automatically calculated using the same ratio inferred from the other one; this also means that mode will be irrelevant in such scenario, since no cropping nor padding will occur. If neither of them are present, the script will just return the source image without performing changes.
That said, here's the PHP source code:
|
1 2 3 4 5 6 7 8 9 10 11 12 13 14 15 16 17 18 19 20 21 22 23 24 25 26 27 28 29 30 31 32 33 34 35 36 37 38 39 40 41 42 43 44 45 46 47 48 49 50 51 52 53 54 55 56 57 58 59 60 61 62 63 64 65 66 67 68 69 70 71 72 73 74 75 76 77 |
<?php /* QueryString-driven image handler/resizer, based on the following GET parameters: - url : image url [required] - w : new MAX width [optional] - h : new MAX height [optional] - bg : background color for the image frame for mode > 0 (see below) [optional w/default] - 456FE2 (6 hex digits: can handle upper and lower cases) - DEFAULT: 000000 (black) - mode : enum corresponding to resize mode type [optional w/default] - 0 (default) : proportional resize (mantaining h/w ratio) with best-fit crop - 1 : proportional resize with center padding (using background color) */ $url=(!empty($_GET["url"]))?$_GET["url"]:null; $w=(!empty($_GET["w"]))?$_GET["w"]:null; $h=(!empty($_GET["h"]))?$_GET["h"]:null; $bg=(!empty($_GET["bg"]))?$_GET["bg"]:"000000"; $mode=(!empty($_GET["mode"]))?$_GET["mode"]:0; // die if required parameters are not present if (empty($url)) { die("ERROR: Missing image url.");exit; } // prevent path traversal hacks $url=str_replace("\\","/",$url); $url=str_replace("../","",$url); $url=str_replace("./","/",$url); $path = "/www/website/images/".$url; // open the image with Imagick (or die if can't) if ($path==="") { die("ERROR: path not found.");exit; } $image = new Imagick(); $image->readImage($path); if ($image===false) { die("ERROR: Unable to open image.");exit; } if (!empty($w) || !empty($h)) { if (empty($w)) $w = round($h * ($image->getImageWidth() / $image->getImageHeight())); if (empty($h)) $h = round($w * ($image->getImageHeight() / $image->getImageWidth())); switch($mode) { case 0: default: $image->cropThumbnailImage($w, $h); break; case 1: $image->setImageBackgroundColor("#$bg"); $image->thumbnailImage($w, $h, true, true); break; } } // add the "Content-type" header header('Content-type: image/jpeg'); // add a "Expires" header with an offset of 24 hours $offset = 3600 * 24; $expire = "Expires: " . gmdate("D, d M Y H:i:s", time() + $offset) . " GMT"; header($expire); // add a "Cache-control" header header("Cache-Control: max-age=3600, must-revalidate"); // Set the image format to JPEG and enable compression $image->setImageFormat("jpeg"); $image->setImageCompression(Imagick::COMPRESSION_JPEG); // Set compression level (1 lowest quality, 100 highest quality) $image->setImageCompressionQuality(90); // Strip out unneeded meta data $image->stripImage(); echo $image; exit; ?> |
NOTE: the code can be used "as-is" to test if the Imagick implementation works: however, in a real production environment, we strongly suggest to further improve the "path traversal hacks" countermeasures to prevent (malicious) users from being able to call the script and obtain "any" image file present on the server: the best thing to do in order to avoid that would be to only allow image resize from a number of fixed folders, stripping everything minus the filename from the input URL and constructing the path using a secure server-side logic.
In practical terms, instead of doing this:
|
1 |
$path = "/www/website/images/".$url; |
we could do something like this:
|
1 |
$path = "/www/website/images/".basename($url); |
And obtain a much safer outcome: if you need to specify subfolders (or different folders), you can add another paramter and use a "safe" convention to make the caller able to select it (such as "1" for "/www/website/images", "2" for "/www/website/images/subfolder/", "3" for "/www/website/anotherfolder/", and so on).
Conclusions
That's it, at least for now: I hope that this post and the above code sample will be useful for other PHP developers that are looking for a way to perform image processing tasks in a easy and convenient way.

