A couple days ago I posted a tutorial about caching a web site using Nginx and FastCGI-Cache in CentOS 7, which is a great alternative to the Reverse-Proxy cache technique when dealing with PHP-based dynamic pages: today I would like to complete the picture by talking about Nginx's http reverse-proxying capabilities, which allow the web server to pass requests off to backend http servers for further processing.
As a matter of fact, Nginx is often set up as a reverse proxy - just like dedicated applications such as Squid and Varnish - to help scaling out an infrastructure or to ease the job of one or more upstream web servers that are not suited to handle large client loads. Nginx is an excellent product for these kind of scenarios, as it has great built-in load balancing, buffering and caching capabilities.
IMPORTANT: if you are using Nginx to act as a reverse-proxy for a WordPress-enabled web site (hosted by Apache, Nginx or IIS), you might also want to check out this other post for some additional settings required to fine-tune such specific scenario.
What's a Reverse Proxy?
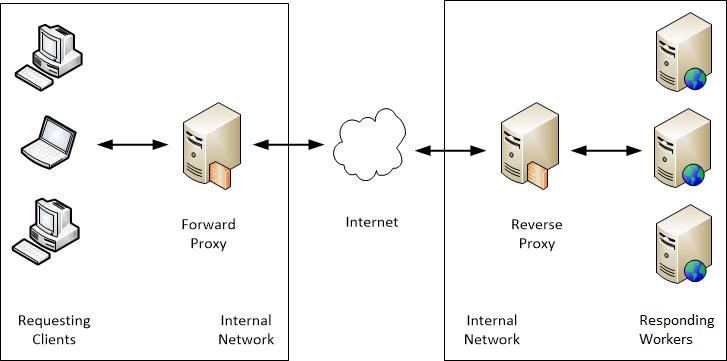
Those who only used a single web server for simple tasks - such as a Joomla, WordPress or phpBB based web site - might be wondering what a reverse-proxy actually is. As its name implies, a reverse proxy does the exact opposite of what a forward proxy - often simply called "proxy" - actually does: while a forward proxy proxies in behalf of clients or requesting hosts, a reverse proxy proxies in behalf of servers. To put it in other words, if a forward proxy can be pictured as a centralized bucket that optimizes the requests made by one or more connected clients, a reverse proxy is a centralized bucket that optimizes the responses of one or more connected upstream servers (or workers) - and serve them to the requesting clients.
That's great to hear, but... why we need to proxy a HTTP request?
As a matter of fact, there are multiple reasons for doing that: for example scaling, intended as the ability to scale out our infrastructure. Nginx is built to handle many concurrent connections at the same time, thus making it ideal for being the clients' endpoint. Whenever it receives the requests, it can pass them to any number of backend servers to handle the bulk of the work, spreading out the load across our whole infrastructure. This design also provides us with flexibility,as we can easily add backend servers or remove them as needed for maintenance, dealing with increased bandwidth or request loads, tests and so on.
Another good reasons to proxy HTTP request is stability, which is also a field where Nginx shines: conversely, there are a lot of web servers - for example, those packaged with most development frameworks or web-based applications - that are not as robust. Putting Nginx in front of these servers will also lead to an incresed level of security, since most web-based malicious attacks are designed to cause stability issues and exploit them to harm the host.
Last but not least comes performance: as long as a reverse-proxy can conditionally cache some responses for multiple clients on a web-server level, it will actually prevent most server-side processors and pre-processors such as PHP, ASP.NET, Java, Phyton and so on from having to perform the same work multiple times, thus reducing their required overhead - with great benefits for CPU and memory.
How does it work
When Nginx acts as a proxy, it processes each request by checking its cache, then (if not present) passing it to the upstream server(s) for the actual processing, gets the result, conditionally cache it and then and relay it to the client: the next time it receives that same request, assuming it could be cached, it will just take it from the cache and serve it without passing anything to the upstream server(s).
This, in a nutshell, is what a reverse-proxy actually does.
It's worth noting that the upstream servers can be local applications, remote machines or even other virtual servers defined within the same Nginx instance: they can be standard HTTP(s) servers such as Apache and IIS or even FastCGI, SCGI, UWSGI and Memcached services. In this post we'll take for granted that we want to cache a standard HTTP Web Server: for other scenarios, check out the Nginx FastCGI-Cache article mentioned earlier.
Installing the prerequisites
Now that we're done with the introductory part, let's start to install Nginx.
Let's start with typing the following commands from a terminal:
|
1 2 |
sudo yum install epel-release sudo yum install Nginx |
Answer "Y" to all the questions until the terminal says that the installation is complete.
Once done, we could start the Nginx service and also have it start automatically on each startup with the following lines:
|
1 2 |
sudo systemctl start Nginx sudo systemctl enable Nginx |
However, activating it now wouldn't be a wise choice, as Nginx would start with its default /etc/nginx/nginx.conf configuration file, which is most likely not suited to our desired scenario - and lacks of any proxing feature. That's why, before doing that, we need to perform some changes to that configuration file's settings (see below).
Basic Proxy implementation
Let's start with a sample nginx.conf configuration file that could be used implement an easy, straight-forward proxy without any caching features:
|
1 2 3 4 5 6 7 8 9 10 11 12 13 14 15 16 17 18 19 20 21 22 23 24 25 26 27 28 29 30 31 32 33 34 35 36 37 38 39 40 41 42 43 44 45 46 47 48 49 50 51 52 53 54 55 56 |
# --------------------------------------------------------------------- # NGINX - Basic-Proxy configuration (no cache) # --------------------------------------------------------------------- # Created by Ryadel on 2017.12.09 # www.ryadel.com # --------------------------------------------------------------------- user apache; worker_processes 2; working_directory /var/www; error_log /var/log/nginx/error.log; pid /run/nginx.pid; # Load dynamic modules. See /usr/share/nginx/README.dynamic. include /usr/share/nginx/modules/*.conf; events { worker_connections 1024; } http { log_format main '$remote_addr - $remote_user [$time_local] "$request" ' '$status $body_bytes_sent "$http_referer" ' '"$http_user_agent" "$http_x_forwarded_for"'; access_log /var/log/nginx/access.log main; sendfile on; tcp_nopush on; tcp_nodelay on; keepalive_timeout 65; types_hash_max_size 2048; include /etc/nginx/mime.types; default_type application/octet-stream; upstream origin { # if the upstream is installed in this machine (for example, an Apache Server) # map this to localhost or to an "origin" hostname pointing to 127.0.0.1 in the /etc/hosts file server origin.example.com:82; } server { listen 80 default_server; server_name www.example.com; location / { proxy_pass http://origin; proxy_http_version 1.1; proxy_set_header Connection ""; add_header X-Handled-By $proxy_host; } } } |
As we can see, we're using the origin-edge pattern: to put that concept in very concise words, Nginx works here as an edge server that will (reverse) proxy an Apache Web Server, which is called origin. As we can see, if the origin server is installed on the same machine, we need to configure it to listen to a non-standard TCP port for HTTP traffic - such as TCP 82 - because TCP 80 and/or TCP 443 will be used by the edge server; it goes without saying that, if the origin server is installed on a different machine, we just need to write the proper hostname (or IP address) - assuming that we can reach it via WWW, VPN or anything else.
Load-Balancing
In case we have multiple servers, we can configure multiple origin servers in the following way:
|
1 2 3 4 5 |
upstream origin { server origin1.example.com; server origin2.example.com; server origin3.example.com; } |
In the above example we've set up a simple round-robin selection process, meaning that each request will be routed to a different host in turn.
Balancing Algorithms
If we want more complex load-balancing we can configure a custom algorithm with the following available parameters:
- least_conn: Specifies that new connections should always be given to the backend that has the least number of active connections: this can be especially useful in situations where connections to the backend may persist for some time.
- ip_hash: This balancing algorithm distributes requests to different servers based on the client's IP address: the first three octets are used as a key to decide on the server to handle the request. The result is that clients tend to be served by the same server each time, which can assist in session consistency.
- hash: This balancing algorithm is mainly used with memcached proxying: the servers are divided based on the value of an arbitrarily provided hash key (text, variables, or a combination of them). This is the only balancing method that requires the user to provide data, which is the key that should be used for the hash.
For example, if we configure our upstream block in the following way:
|
1 2 3 4 5 6 |
upstream origin { least_conn; server origin1.example.com; server origin2.example.com; server origin3.example.com; } |
The origin server will be selected based on which one has the least connections.
If we do that instead:
|
1 2 3 4 5 6 |
upstream origin { ip_hash; server origin1.example.com; server origin2.example.com; server origin3.example.com; } |
Most of the requests originating from the same user will be routed to the same origin server: this could be a great way to implement "sticky sessions" for some simple scenarios.
Server Weight
When we load-balance our traffic among multiple origin servers, Nginx gives the same weight to each one of them by default. This means that we assume that each server can - and should - handle the same amount of requests, regardless of the chosen algorithm (see above).
If we're not happy with that, we can change the weight of each server in the following way:
|
1 2 3 4 5 |
upstream origin { server origin1.example.com weight=2; server origin2.example.com; server origin3.example.com; } |
In the above example, origin1.example.com will receive twice the traffic as the other two servers: the default weight (when not set) is always equal to 1.
Configure Buffering
Let's now introduce the first of the two advanced topics regarding Proxy-Cache: the Nginx buffering feature. In a nutshell, it's a tool to reduce the minimum amount of lag caused by the double connection required by the Proxy-Cache pattern:
- The connection from the client to the Nginx proxy.
- The connection from the Nginx proxy to the backend server.
Without buffers, data is sent from the proxied server and immediately begins to be transmitted to the client: conversely, Nginx gives the administrator the chance to optimize both of them by properly configure a wide set of buffers. If they are enabled, he Nginx proxy will temporarily store the backend's response and then feed this data to the client. If the client is slow, this behaviour will allow the Nginx server to close the connection to the backend sooner and free the related process (and system resources).
Nginx defaults to a buffering design since clients tend to have vastly different connection speeds: the buffering default behavior can be adjusted with the following directives:
- proxy_buffering: This directive controls whether buffering for this context and child contexts is enabled. By default, this is "on".
- proxy_buffers: This directive controls the number (first argument) and size (second argument) of buffers for proxied responses. The default is to configure 8 buffers of a size equal to one memory page (either 4k or 8k). Increasing the number of buffers can allow you to buffer more information.
- proxy_buffer_size: The initial portion of the response from a backend server, which contains headers, is buffered separately from the rest of the response. This directive sets the size of the buffer for this portion of the response. By default, this will be the same size as proxy_buffers, but since this is used for header information, this can usually be set to a lower value.
- proxy_busy_buffers_size: This directive sets the maximum size of buffers that can be marked "client-ready" and thus busy. While a client can only read the data from one buffer at a time, buffers are placed in a queue to send to the client in bunches. This directive controls the size of the buffer space allowed to be in this state.
- proxy_max_temp_file_size: This is the maximum size, per request, for a temporary file on disk. These are created when the upstream response is too large to fit into a buffer.
- proxy_temp_file_write_size: This is the amount of data Nginx will write to the temporary file at one time when the proxied server's response is too large for the configured buffers.
- proxy_temp_path: This is the path to the area on disk where Nginx should store any temporary files when the response from the upstream server cannot fit into the configured buffers.
The above directives can be set in the http, server, or location contexts. It is important to keep in mind that the sizing directives are configured per request, so increasing them beyond your need can affect your performance when there are many client requests: the most useful to adjust are often the proxy_buffers and proxy_buffer_size, as the other already have great default values that will work well on most scenarios.
Configure Caching
Although the buffering feature can be great to free up the origin server(s) resources, Nginx has an ever better tool in its shed: we're talking about caching, which is often the main reason for a system administrator to setup a reverse proxy to begin with. If you stumbled upon this post, it probably means that this is the topic you were looking for to begin with; however, for those who don't, let's try to summarize what proxy-caching is about: in a nutshell, it's a Nginx feature that can be used to conditionally cache content from backend servers, thus eliminating the need to connect to the upstream at all for many requests.
The main directive required to set up the proxy-cache is proxy_cache_path: this will create an area where data returned from the proxied servers can be stored and kept for future usage. The proxy_cache_path directive must be set in the http context of the nginx.conf file.
Here's a basic example of proxy-caching:
|
1 2 3 4 5 6 7 8 |
proxy_cache_path /var/cache/nginx levels=1:2 keys_zone=edge-cache:10m inactive=20m max_size=1g; proxy_temp_path /var/cache/nginx/tmp; proxy_cache_lock on; proxy_cache_use_stale updating; proxy_bind 0.0.0.0; proxy_cache_valid 200 302 10m; proxy_cache_valid 301 1h; proxy_cache_valid any 1m; |
As we can see, we will cache all the pages returning HTTP 200 (status OK) or 302 (temporary redirect) for 10 minutes, those returning HTTP 301 (permanent redirect) for an entire hour, and anything else (such as 404, error 500 and so on) for one minute.
If we add the above lines to our nginx.conf file, we can use the edge-cache zone in any location sections the following way:
|
1 2 3 4 5 6 7 8 9 10 |
location / { proxy_pass http://origin; proxy_cache edge-cache; proxy_http_version 1.1; proxy_set_header Connection ""; add_header X-Cache-Status $upstream_cache_status; add_header X-Handled-By $proxy_host; } |
That's basically it.
Advanced Proxy-Cache Implementation
Time to put everything together: here's a fully-featured nginx.conf file implementing Proxy, Load-Balancing, Buffering and Proxy-Cache features:
|
1 2 3 4 5 6 7 8 9 10 11 12 13 14 15 16 17 18 19 20 21 22 23 24 25 26 27 28 29 30 31 32 33 34 35 36 37 38 39 40 41 42 43 44 45 46 47 48 49 50 51 52 53 54 55 56 57 58 59 60 61 62 63 64 65 66 67 68 69 70 71 |
# --------------------------------------------------------------------- # NGINX - Proxy-Cache configuration # --------------------------------------------------------------------- # Created by Ryadel on 2017.12.09 # www.ryadel.com # --------------------------------------------------------------------- user apache; worker_processes 2; working_directory /var/www; error_log /var/log/nginx/error.log; pid /run/nginx.pid; # Load dynamic modules. See /usr/share/nginx/README.dynamic. include /usr/share/nginx/modules/*.conf; events { worker_connections 1024; } http { log_format main '$remote_addr - $remote_user [$time_local] "$request" ' '$status $body_bytes_sent "$http_referer" ' '"$http_user_agent" "$http_x_forwarded_for"'; access_log /var/log/nginx/access.log main; sendfile on; tcp_nopush on; tcp_nodelay on; keepalive_timeout 65; types_hash_max_size 2048; include /etc/nginx/mime.types; default_type application/octet-stream; proxy_buffering on; proxy_cache_path /var/cache/nginx levels=1:2 keys_zone=edge-cache:10m inactive=20m max_size=1g; proxy_temp_path /var/cache/nginx/tmp; proxy_cache_lock on; proxy_cache_use_stale updating; proxy_bind 0.0.0.0; proxy_cache_valid 200 302 10m; proxy_cache_valid 301 1h; proxy_cache_valid any 1m; upstream origin { # if the upstream is installed in this machine (for example, an Apache Server) # map this to localhost or to an "origin" hostname pointing to 127.0.0.1 in the /etc/hosts file server origin.example.com:82; # mapped to 127.0.0.1 server external-1.example.com:80; # remote IP address server external-2.example.com:80; # remote IP address } server { listen 80 default_server; server_name www.yourwebsite.com; location / { proxy_pass http://origin; proxy_cache edge-cache; proxy_http_version 1.1; proxy_set_header Connection ""; add_header X-Cache-Status $upstream_cache_status; add_header X-Handled-By $proxy_host; } } } |
Again, in case you're reverse-proxying a WordPress web site, don't forget to also read this post.
Setting Permissions
Before firing the engine and starting Nginx we need to ensure that the Linux user we're using for the Web-Server related tasks (www, apache, nginx, www-data or anyone else), together with its relevant group, will be able to access to the required www, Nginx-Cache and PHP-FPM-Cache folders. Here are the folder that you need to check:
- Your website(s) path, such as /var/www/example.com
- The Nginx cache folder: /var/cache/nginx
- The Nginx cache temporary folder: /var/cache/nginx/tmp
- The Nginx temporary folders: /var/lib/nginx and /var/lib/nginx/tmp (IMPORTANT: you need to set permissions on both of them - see this ServerFault thread).
That's it for now: is something goes wrong with your configuration, feel free to contact us and we'll be happy to help you figure out what you did wrong. If you're mostly using PHP-based web sites such as WordPress, Joomla, phpBB and so on we strongly suggest to read this other article about Nginx FastCGI caching, which is often a faster and more reliable alternative for those scenarios.
Opening the Firewall Port(s)
The default CentOS firewall rules does not allow inbound HTTP / HTTPS traffic, hence its necessary to open up some TCP ports for a webserver such as Nginx to accept connections from the outside. How it can be done depends of the firewall that our CentOS machine is actually using: firewalld or iptables.
Firewalld
These are the shell commands to open up Firewalld (assuming that the public zone has been assigned to the WAN network interface):
|
1 2 3 |
sudo firewall-cmd --permanent --zone=public --add-service=http sudo firewall-cmd --permanent --zone=public --add-service=https sudo firewall-cmd --reload |
Iptables
These are the rules to set for Iptables (assuming that we want to accept traffic coming from the eth0 network interface):
|
1 2 3 4 |
iptables -I INPUT 5 -i eth0 -p tcp --dport 80 -m state --state NEW,ESTABLISHED -j ACCEPT iptables -I INPUT 5 -i eth0 -p tcp --dport 443 -m state --state NEW,ESTABLISHED -j ACCEPT service iptables save systemctl iptables restart |
Further references
- Reverse Proxy and Cache Server with Nginx from reviewsignal.com.
- Understanding Nginx HTTP Proxying, Load Balancing, Buffering and Caching from digitalocean.com.
2 Comments on “How to cache your website using NGINX Reverse Proxy and Proxy-Cache in CentOS 7”