Expanding disk partitions to use all the available (unallocated) disk space is a common issue among Linux Administrators, expecially when working in a VMware-based Cloud environment: deploying a Linux VM from an existing template will often lead to disk partitions smaller than the disk space allocated during the VM configuration phase.
Consider the following scenario:

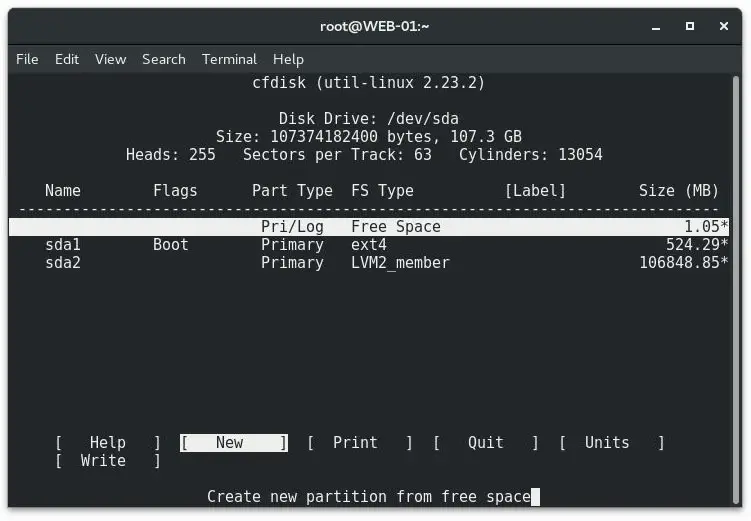
This screen can be obtained by running cfdisk from the terminal and shows the following:
- a 524MB boot partition [sda1]
- a 6.8GB drive [sda2], used by the Linux OS and all its installed packages.
- 100GB of unallocated space
It would be great to extend that puny 6.8GB partition and make it become a 106.8GB drive... How can we do that? If you take a look around you'll see that the web is awfully short of a quick and effective tutorial for this: that's why I eventually chose to write my own guide: here it is!
Luckily enough, we won't need anything fancy to perform our task: we're just going to make good use of fdisk , pvresize , lvdisplay and lvextend , some handy command-line tools shipped with any Linux distribution: that's great to hear, since it means that this tutorial will work for any Linux distro, including CentOS 5.x, CentOS 6.x, CentOS 7.x, RHEL, Ubuntu, Debian and more!
Step 1: Alter the Partition Table
The first thing we need to do is to modify our partition table to make sda2 end at end of disk: don't worry, you will not lose your existing data! However, this task will require a reboot in order to write the changes that we're going to make and also to re-read the updated partition table.
Let's start with running the following command:
|
1 |
fdisk /dev/sda |
This will make the terminal enter in fdisk mode: once there, type p to print the current partition table: it's very important to keep note of the numeric values of the START and END columns for the /dev/sda2 partition, as we're going to need them soon enough. If you want to be sure to not lose them or typing them wrong, just print-screen or paper-print them.
Once done, type d to access the delete mode, and then the number of the partition record that you want to remove (that would be 2 in the above scenario). Again, DO NOT WORRY: you're not deleting the partition data, just its mapping addresses on the partition table.
Right after that, type n to create a brand-new second partition: choose the same partition mode of the previous one (that would be Primary in the above scenario), then input the START numeric value you've recorded earlier - which shoud be the suggested default; also, make sure that the end is at the end of the disk - which should also be the default.
Last but not least, we need to change the partition type from Linux to Linux LVM: to do so, type t to access the change partition type mode, then 2 , then 8e and that's it.
When done, type p to review your new partition layout. Be sure to triple-check that the start of the new second partition is exactly where the old second partition was: this is very important! In case you did it wrong, type d to delete the wrong partition and start over.
If everything looks right, issue w to write the partition table to disk.
Step 2: Reboot
Right after writing the new partition table to disk, you'll immediately get a system error message due to the fact that the partition table couldn't be accessed for read, because the disk is in use. That's why we need to reboot our system.
Step 3: Expand the LVM Partition
Wait for the system to reboot, then issue the following command:
|
1 |
pvresize /dev/sda2 |
Right after that, run cfdisk again now. If everything went good, you should see the following:
Meaning that our physical LVM volume has been extended to rest of the drive: a second reboot would be required to ensure that all the services will take into account the new volume size.
Step 4: Extend Logical Volume
The next thing we need to do now is to extend our logical volume into that space. In order to do that we need to retrieve its path, which can be done by issuing the following command:
|
1 |
lvdisplay -v |
It should be the first of the list: however, you can easily figure out what it is by looking at the volume sizes. In the above scenario, the path is /dev/vg/lv_root .
Once retrieved, we can extend that logical volume with the following command:
|
1 |
lvextend -l +100%FREE /dev/vg/lv_root |
Step 5: Extend the File System
Now that the logical volume has successfully been extended to use all the unallocated space, we still have to perform one last step: increase the file system to match the logical volume size. Doing that is just as easy as typing one of the following command, depending if we're using EXT4 (which should be the default nowadays) or XFS. Again, we have to use the logical volume path here, the same one that we've used with the lvextend command a moment ago.
For EXT4, type the following:
|
1 |
resize2fs /dev/vg/lv_root |
For XFS, type the following:
|
1 |
xfs_growfs /root |
This will trigger the on-line resizing of the file system, which will be extended in order to use all the available logical volume space.
... And that's it! I hope that this post will help more System Administrators in working with their Linux systems.
Precise, easy to understand and execute. Thank you.
Thank you!
Very useful guide!
I have an error after rebooting the error says:
mount: wrong fs type option, bad superblock on /dev/sda2 missing codepage
PS: I followed all your instructions above.
Ouch: if you get that message, it most likely mean that you’ll need to restore your bad superblock.
Here’s a great tutorial for that:
https://ubuntuforums.org/showthread.php?t=1245536&p=7822694#post7822694
Hope you’ll fix your issue!
I got grub error after rebooting.
Do you have any idea?
Thanks
Ouch! I’m sorry to hear that: I pulled off that procedure a number of times and never hit such issue.
Try to follow the following tutorial:
https://askubuntu.com/questions/493826/grub-rescue-problem-after-deleting-ubuntu-partition
Hi mate,
thank you for the great work you’ve done very well explained.
Unfortunately, I’ve stacked with some errors after rebooting Centos7 at Step 2: Reboot.
Could you pls check out the log file down below? Hopefully returning with some solution. Would be very much appreciated :)
https://imgur.com/s6msivs
Great article! worked like a champ!
I tried it – it worked – I’m thankful.
Thank you for posting these instructions. Much appreciated.
Thank you so much for your post. It has been very helpful
very appreciated for the the detail instruction!
This article has helped me solve the disk space issue many times now. thanks for that. very neat and clean steps. thanks for the article
After reboot, this is what pvresize /dev/sda2 command produces:
Failed to find physical volume “/dev/sda2”.
0 physical volume(s) resized or updated / 0 physical volume(s) not resized
Here’s the cfdisk screenshot:
https://imgur.com/CL5gbgh.png
Here’s the fdisk /dev/sda, followed by p (print):
https://imgur.com/UWTDkYU.png
Hello there,
it definitely seems like the new partition table has not been written.
I would repeat the first step, be sure to type “w” at the end to write the new partition table.
Excellent, with minor adjustments it worked great on Fedora 30…thanks!
Finally I was able to solve this. Thank you!
Thank you for your kind reply :) If you like our post, feel free to like us on FB/Twitter :)
Did this and on rebbot my computer just says grub>
What do I do now?
Thanks, worked great on Oracle Linux 7.7 (on VM).
Fantastic explanation thank you, I have been pulling my hair out trying to extend a partition.
I tried this and get a permission denied message.
I began with this laptop using Win OS. I installed unbuntu, then erased Win. Now I have a huge block of unusable space on the hd that is unallocated. I would like to have it available to unbuntu.
Ken Parker
Use sudo <- to request root permissions.
Ryan; Thanks for your reply. However, I am a novice and require some hand holding. If you are willing to put up with my ignorance I would deeply appreciate your elementary-style instruction. Maybe Skype or Facetime? Let me know.
Ken Parker
Hi Ken,
thanks to you for reading our blog! Unfortunately, I am unable to provide Skype or Facetime support at this time: I am willing to help you via email (info@ + this website domain), but before doing that, let me explain what I mean with “sudo”.
Please take a good read of the following post:
https://www.unixtutorial.org/sudo-meaning-what-does-sudo-mean
Right after that, try to prepend “sudo” to all the Linux command shown in my post: you’ll be asked for the administrative password, wich you will need to have (if you don’t, ask your administrator to perform the task for you).
How does it sound?
I can get the “sudo” command to display command prompts…
-h, -v, -l; etc. Not sure what this means.
When I type “d” as you state, I get “command not found”. No sure where to go from here. Sorry for being a pain. I am just not very intuitive with Linux.
Ken Parker
Given your answers, I strongly advise against performing admin-like tasks such as resizing HDD by yourself: there’s a high chance that you will break your OS.
This post is a tutorial for non-basic Linux users: given your scenario, I would suggest to ask for help to a more experienced Linux user instead, so that you can A) resize your HDD and B) learn how to perform some basic commands. If you have a more experienced friend, let him/her help you (you can use this post as a guidance).
For the record, prepend commands with “sudo” means typing “sudo fdisk /dev/sda” instead of “fdisk /dev/sda”, and so on.
I’ll give it a shot. Gracias
Ryan, Not sure how I did it, but I was able to reset the unallocated partition without losing any data. I think I just probed until I got to the right command. Thanks for your help and my apology for taking your valuable time. I wish I could duplicate by fix so I could share it.
Ken Parker
I would be afraid of resizing partition on prod servers in that manner. There can go always something wrong and we don’t want to lose data. Apart from that we don’t want to restart servers. That’s why I always prefer to deploy new partition, then initialize it via pvcreate and vgextend.
lsblk looks strange after several disks added but it is much safer.
Nevertheless .thanks a lot for a stimulating article!
Thanks for the straight forward approach to adding disk drive space. For the record thanks to your tutorial , I was able to apply 15 GB increase applied to 20 GB VMDK disk for a Cent OS 7-64 bit VM hosted in VMware Workstation 15.5 Pro.
Respect,
M. Wright
Awesome article.
Its perfect and very easy to follow. I have done it in 5 mins.
Thank you so much Ryan
What if the partition you want to extend comes before other partition (e.g. ext and swap)?
This happens to be the case for me, and I followed your guide only to get the warning “Partition #1 contains a ext4 signature”. I continued with removing the signature, did a new (p)rint and the partition size is the same as before. Have not written any changes.
I have the following table:
/dev/sda1 2048 60819453 60817406 29G 8e Linux LVM
/dev/sda2 60819454 62912511 2093058 1022M 5 Extended
/dev/sda5 60819456 62912511 2093056 1022M 82 Linux swap / Solaris
I took the easy way out – GParted live ISO.
Spectacular fail. No such partition on reboot. Glad I backed up.
You rule.
I would recommend just using cfdisk to Resize the partition, no need to use fdisk.
It seems kind of strange to use cfdisk to view the partition table, then use fdisk to do the work when you could just do it in cfdisk, and a bit more user friendly at that.
I had to run
sudo parted -lfirst in order to Ubuntu knew it had new free space availableGreat guide! Thanks for tips!
Nikola
worked great! Thanks!
Worked perfect, first time… this really helped me out, thanks!
Hi I tried the above process. Successfully i am able to increase my /root space but after rebooting my Network become unreachable.
even “ifconfig” is not showing any ip.
unable to ping gateway aswell.
Please help me how to resolve this.
Thank you very much. Took me about 5 minutes to expand the drive size.
Hmm, I don’t see any of those tools on my Linux. Except for cfdisk and parted. This do seem to have the ability by themselves to add free space to a partition. I’m wondering if it is destructive of data though.
I’m use to working at low levels in systems but not in all areas so I’m not quite sure how I could install them.
I have a Western Digital My Book Live ( a NAS drive) which has a GNU distribution of Linux. I can ssh to connect to it. There is a browser interface for managing various aspects of the drive, including the ability to mange share points. But only for adding or deleting, not for increasing the size of one. I suspect the tools were purposely removed to prevent messing around at a low level like this post’s instructions do. thoughts anyone.
Hey,
I followed your guide to increase my /home with some extra unallocated space I had, but I think I ‘m stuck on step 2. I ‘ve followed the guide without deviation, except for a missing step (The one about keeping the signature or not, which I pressed “Yes”).
sudo pvresize /dev/sda5Failed to find physical volume "/dev/sda5".
0 physical volume(s) resized / 0 physical volume(s) not resized
The partition now shows up in gparted, that it contains unallocated space. ( https://imgur.com/GvWTWLm)
Any idea how to solve this?
Thanks in advance
Thanks for sharing this, Helped me do the task so easily. Thanks
You wrote this some time ago, but a huge thank you. My hosting company were less than helpful and like you wrote at the top, there’s not that much online that covers this like you do. So thank you, lots of head scratching now resolved.
When I run cfdisk, I get very different output. The headers output are Device, Boot, Start, End, Sectors, Size, Id and Type. Why is my cdfdisk not displaying the same data as your cfdisk?
No idea: I’m referring to this cfdisk, maybe check out if you’re using something else…
https://it.wikipedia.org/wiki/Cfdisk
When you say, “a second reboot would be required to ensure that all the services will take into account the new volume size” – what does it mean “would be”? Do I need to reboot again?
Yes
Thank you very much for this guide, as you said, there is not much clear information on this on the internet. Your guide is well documented and thoroughly laid out. THANK YOU!
Great tutorial! Thank you.