Table of Contents
Do you know React Native? You most likely do, since you found this post. In case you don't, it's a great framework that lets you build native mobile apps using only JavaScript: it uses the same design as React, letting you compose a rich mobile UI from declarative components.
Unlike Progressive Web Apps built with client-side framerworks, a React Native app is a real mobile app, not a "mobile web app", an "HTML5 app", or a "hybrid app", as the frameworks uses the same fundamental UI building blocks as regular iOS and Android apps written in Objective-C, Swift and Java. If you're interested in taking a look you can check out the React Native official website and/or the React Native GitHub repository, where you will find a decent Getting Started guide and a link to the Documentation.
In this chapter we'll deal with a specific issue that might affect you when trying to install React Native on Windows machines, which can be normally done in less than 5 minutes but could be troublesome if you got multiple IP Addresses on your development machine - which is pretty common, since most of us will have multiple NICs, VMWare virtual adapters and so on.
Installing React Native on Windows
Let's start with the basics: React Native is basically a (huge) NPM package, therefore the first thing to do is to install Node.js.
Installing Node.js
Installing Node.js in a Windows environment is rather easy to do, as long as you follow the following suggestions to avoid the most common issues:
- Get the Node.js LTS version for Windows 64-bit (if you can, otherwise the 32-bit), ignoring the Latest Version.
- Uninstall any previous Node.js and/or NPM version (including those shipped with development frameworks such as Visual Studio) you.
- Do NOT install it in C:\Program Files\ or C:\Program Files (x86)\ to avoid critical permissions issues: just use C:\nodejs\ or a similar "permission free" new folder.
If you follow these guidelines, you shouldn't run into troubles.
Upgrading NPM
Upgrading npm on Windows requires manual steps to ensure that PowerShell/CMD find the new version of npm. Therefore, the best way to update npm on Windows is to use the awesome npm-windows-upgrade package, a small tool that will reduce such process to the following few steps:
- Run PowerShell as Administrator using Start > search for PowerShell > Right-click > Run as Administrator.
- Execute the following PowerShell command: Set-ExecutionPolicy Unrestricted -Scope CurrentUser -Force
- Install the npm-windows-upgrade package by typing npm install --global --production npm-windows-upgrade
- Once done, launch it with the following command: npm-windows-upgrade
The tool will show you a list of all the published and available versions of npm (including pre-release and beta versions): choose the one you want to install - arguably the most recent one - and the tool will do the rest.
Installing the CreateReactNativeApp package
The easiest way to start building a new React Native application on Windows is by installing and launching the Create React Native App npm package: such package allows you to start a project without installing or configuring any tools or frameworks to build native code (!).
To install it, simply type the following command from an elevated PowerShell prompt:
|
1 |
npm install -g create-react-native-app |
Then run the following commands to create, initialize and launch a new React Native project called "MyTestProject":
|
1 2 3 |
create-react-native-app MyTestProject cd MyTestProject npm start |
The first of the commands above will create a "MyTestProject" subfolder in the folder you are in: be sure to change the path of your PowerShell prompt accordingly before launching it.
Running the App
The above commands will launch a local development server that contains the app, such as in the following screenshot:
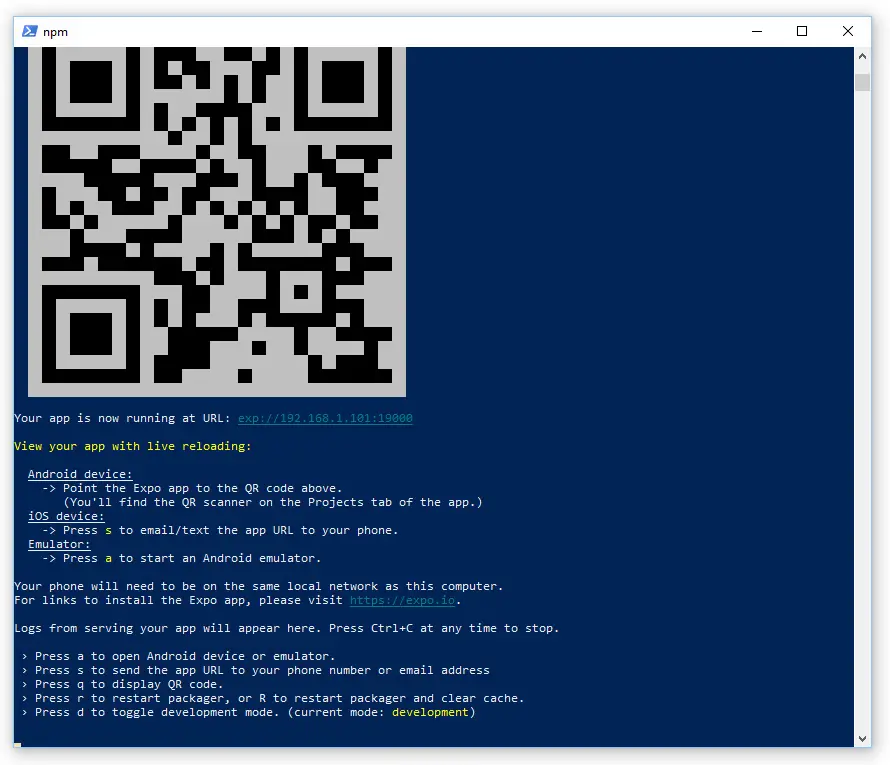
As we can see, it's pretty awesome: we can even access the app from our Smartphone by installing the Expo Client app (available from Android from Google Play or for iOS through the App Store) and scan a QR Code... as long as our phone is on the same local network as our "server" machine.
Seems pretty easy, right? Well, unfortunately there are at least two things that you will need to do in order to allow this awesome connection method on a Windows machine:
- Create a incoming connection rule within the Windows Firewall for the port shown (in the above screenshot is the TCP port 19000).
- Ensure that the create-react-native-app will pick the proper IP address among all those installed on your machine.
The former issue is rather trivial - we will just assume that the average reader can deal with it: conversely, the latter requires some hidden knowledge.
The "Wrong IP" issue
The issue is a consequence of the fact that the create-react-native-app package is using the npm's ip package to auto-detect the server's IP address, which - on Windows machine - picks the IP address used by the NIC having the highest interface metric (aka Adapter Priority Setting) configured: in other words, it will always pick the first IP address shown when running ipconfig from a Windows command prompt.
For additional info on how to set the Adapter Priority Settings for your Network Interface Cards on Windows 10 you can take a look at this post. However, you don't need to do that: luckily enough, there's a simpler solution to this nasty issue.
The Fix
To ensure that the create-react-native-app package will pick a specific IP Address, follow these steps:
- Open Start > Control Panel > System
- Go to Advanced System Settings > Environment Variables
- Set a System Environment Variable with the following name/value pair:
- name: REACT_NATIVE_PACKAGER_HOSTNAME
- value: <the IPv4 address you want to use>
That's about it!
IMPORTANT: remember to close and re-open the elevated PowerShell command prompt, since newly added Environment Variables wont' be available on the existing prompts.
