Table of Contents
In this five-part tutorial we'll see how we can create a sample React Native app (you might call it a "Hello World" or "boilerplate") that will be capable of receiving Push Notifications using Firebase. Such guide could definitely be a great headstart for React Native beginners, yet also for those intermediate or experienced developers who want to know more about push notifications: how they work, what are their best usage scenarios and how much they can be an improvement for almost any mobile app.
The entire source code shown throughout this tutorial, as well as a working sample app built with it, is available on GitHub under MIT license: if you happen to like it, don't forget to give it a star (and a like to this website)!
For the sake of simplicity this tutorial has been splitted into multiple parts, each one dedicated to a specific sub-topic:
- Part 1 of 5: Understanding Push Notifications, in which we'll try to understand what push notifications actually are and the impact they could have (when used properly) on a typical client-server app.
- Part 2 of 5: Setup React Native and Firebase, where we'll deal with the installation and configuration of our whole development stack: React Native, the Firebase SDK and the Visual Studio Code environment, together with the required settings to get our app ready to work with Android and iOS.
- Part 3 of 5: Configure the Firebase Service, in which we'll create the Firebase Project and configure the Firebase Push Notification Services to ensure that our React Native app will be able to receive push notifications through the Firebase API on any Android and iOS device.
- Part 4 of 5: Design and Test the React Native UI, where we'll test our front-end skills by laying out a React-Native UI in order to make our app actually able to receive push notifications and send HTTP requests to the server to remotely keep track of our actions - and possibly fire subsequent push notifications to other clients.
- Part 5 of 5: Server-Side Handler, in which we'll use ASP.NET Core to create a sample, lightweight web service that will be able to receive HTTP requests issued by the clients and/or feed them with push notifications through the Firebase API.
In this first post we'll talk about push notifications.
Introduction
Before going further, let's spend a couple minutes to properly understand how a push notifications workflow tipically works for most apps, which can be useful to understand what do we have to do.
Let's say we want to create a Personal Calendar app that can be used to configure events and (optionally) schedule reminders that will be sent to the user whenever these events are about to start: the best method we can use to "send" these reminders are notifications. The user will see them, even if the app is minimized, and (optionally) click on them to open the app and get further info on that topic. This is a typical example of an interactive app that makes use of notifications to fullfill some of its features: the users add events, configure reminders and receive notifications accordingly. The big question here is, who is in charge of sending these notifications? The answer of such question is not trivial, as it entirely depends on how the app itself actually works.
Serverless or Client-Server?
Here's a list of the most common implementation patterns that we could theoretically follow to implement a Personal Calendar app in a decent way:
- Serverless: both the app and the events database, including the reminders, are entirely installed on the mobile phone. We won't need to fetch/receive anything from the web, therefore we won't need a server - as well as dealing with the whole HTTP stack. Such approach grants a tremendous gain in terms of development costs and overall complexity, which definitely is a a huge pro, yet also a lot of cons in terms of data resilience, backup plans, app usage through different clients and/or devices, and a lot of "cloud-based" features we would be forced to give up. These cons are often very relevant, to the point that serverless apps are a small minority. It's a viable approach for simple apps that are supposed to do specific "offline" tasks, such as torch lightning or size measurement apps.
- Server-Client: the app is meant to be a client installed on the mobile phone, but the database, as long as most business logic and data-handling tasks, are handled using a collection of services installed on a remote public or private server. This is the most common approach for almost any app nowadays: games, instant-messaging, social networks, and almost any app which requires to fetch any possible kind of data from the outside.
Push Notifications
If we choose to make our Personal Calendar a serverless app, we wouldn't need to handle push notifications at all... because there would be nothing to push. The word "push" implies that there's something coming from the outside: serverless apps doesn't interact with a server, therefore there would be noting to receive. Conversely, if we choose to follow the client-server path, our Personal Calendar app could greatly benefit from such feature: push notifications are the perfect way to have the server take track of our reminders and sends them to any client that should receive them: that way we could support multiple clients for a single user, a "reminder sharing" feature that would allow us to "share" our events (and their reminders) with other users, and so on.
Long story short, we can say that push notifications would be a huge feature even for a rather "simple" app such as a Personal Calendar, meaning that we should really favor the client-server approach over the serverless one. In more general terms, we can say that whenever there are good reasons to pick the client-server approach, it means that our app could also benefit from push notifications. That being the case, imagine how important push notifications would be for instant-messaging apps like Whatsapp, Line, Telegram, and virtually any app who needs to support some form of real-time communication between clients. In these kinds of scenarios push notifications could play a major role, as they can be used to istantly notify any relevant action performed by a single client to any other "connected" clients.
Push Notifications Workflow
The following diagram depicts a standard Push Notification Workflow that could be used on a typical instant messaging app:
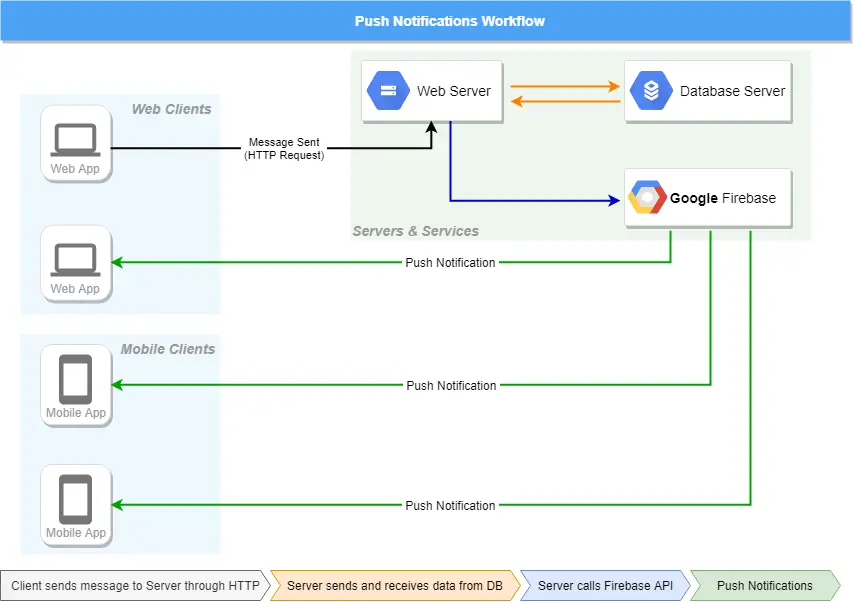
As we can see, the push notifications are originated by a single HTTP request sent by the Client to the Server (black line) to inform it about a relevant action: a message, yet also a channel join (or part), an avatar change, a logout, and so on. The HTTP request is received by the server in a RESTful fashion and initiates a series of subsequent tasks:
- The Server, typically a Web Server, calls the Database Server (orange line) to log the action performed by the client and save the relevant changes (for example, save its new message in the messages table). However, the interaction with the DB Server is bidirectional, as the server, immediately after writing the new data, also needs to retrieve from the DB the necessary info required to send a push notification to the affected clients to notify them of the new action - in our example, the new received message. Those info are typically the unique IDs which the notification service can use to identify those client: if we use Firebase, they are called FCM Tokens (read here for additional info). It goes without saying that those IDs, which act just like a fingerprint of each client, must be collected before sending the push notifications, for example when the client installs the app for the first time, or the user creates its account, or during the login phase... But we'll deal with that later on.
- Once the action has been logged and/or saved and the unique tokens have been retrieved, the Server can call the notification service (in our example, Google Firebase) using its API (blue line), and tell it to send the push notifications to the affected clients: doing that is almost as easy as sending the new action's details (in our example, the new message) to the notification service, together with the list of unique tokens to send them to.
- The notification service (in our example, Firebase) sends the push notifications to the clients (green lines), who can receive and consume them thanks to the notification service's SDK (the client-side modules) which has been installed on them during the development phase. A push notification can be consumed in a number of ways: showing its title and body attribute values in the device's notifications area, showing a dedicated popup, launch our app and/or bring it to foreground, and so on. In our example, since the push notification contains info about a new message, consuming it would most likely mean to show it in the chat view within a "bubble", create a notification popup to tell the user that a new message has arrived, and maybe even incrementing the "notification counter" on our app's icon (if the app is minimized).
That's basically it: now we should have a pretty clear idea about what we need to implement whenever we want to add push notification support to our app.

Part 2 of 5: Setup React Native and Firebase

 what it is and how to prevent it")