Table of Contents
If you've stumbled upon this post, it most likely means that you're getting an odd error when rying to install Kerio Control VPN Client on a Windows 8, 8.1 or Vista machine. In this post you'll find a simple tutorial that might help you to fix such issue for good.
The error(s)
Here are the two errors that you might see when trying to install the Kerio VPN client.
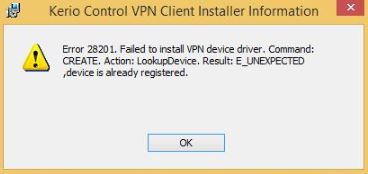
LookupDevice Error
ERROR 28201. Failed to install VPN device driver. Command: UPDATE. Action: LookupDevice. Result: E_UNEXPECTED,device is already registered.
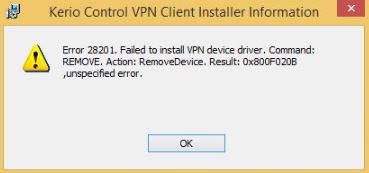
RemoveDevice Error
ERROR 28201. Failed to install VPN device driver. Command: UPDATE. Action: RemoveDevice. Result: 0x800F020B,unspecified error.
These errors might produce the following error codes in the Windows event viewer:
- Failed to install VPN device driver, 0x800F020B
- Failed to install VPN device driver, 0x800F0244
In the following paragraph we'll take a look at the available fixes.
The Fix(es)
Here's a list of the know fixes: if you know the above error code you can use the corresponding one, otherwise you can try both of them (one at a time) and see if it works for your specific scenario: both fixes won't be harmful for your Windows environment.
#1. Error code 0x800F020B
- Go to Start > Control Panel > Programs and features panel and uninstall any existing version of the Kerio VPN client from your system.
- Go to Start > Run and type regedit to execute the Windows Registry Editor.
- Locate and delete the following key: HKEY_LOCAL_MACHINE\SOFTWARE\WOW6432Node\Kerio
- Navigate to Device Manager > Network Adapter and uninstall the Kerio Virtual Network Adapter.
- If you see WAN Miniport adapters, uninstall all of them as well.
- Reboot the PC.
- Disable any antivirus running on the machine.
- Download and install an older version of Kerio VPN Client from this page (all URLs are direct links to the official website): we suggest to use 9.2.2 or 9.2.1, as they usually install without issues on Windows 8: in the unlikely scenario that you're getting the same error, don't worry and continue.
- Download the Kerio VPN Recovery tool (the URL is a direct link to the official website).
- Unzip the tool and run it with administrative priviledges: it's very important to do that, because the tooll will need to overwrite some protected files. If you want to be sure that the recovery tool actually worked, run it from the command line (opening it with administrative rights) so that you can properly check the output from the console.
Right after the step #10, you'll be able to install the latest version of the Kerio VPN Client: the new version will automatically upgrade/overwrite the "older" version installed during step #8.
#2. Error code 0x800F0244
This fix is a bit more complex than the previous one, but could help you to fix your issue for good if the above method didn't work.
- Go to Start > Control Panel > Programs and features panel and uninstall any existing version of the Kerio VPN client from your system.
- Go to Start > Run and type regedit to execute the Windows Registry Editor.
- Locate and delete the following key: HKEY_LOCAL_MACHINE\SOFTWARE\WOW6432Node\Kerio
- Navigate to Device Manager > Network Adapter and uninstall the Kerio Virtual Network Adapter.
- If you see WAN Miniport adapters, uninstall all of them as well.
- Reboot the PC.
- Disable any antivirus running on the machine.
- Download and install an older version of Kerio VPN Client from this page (all URLs are direct links to the official website): we suggest to use 9.2.2 or 9.2.1, as they usually install without issues on Windows 8: in the unlikely scenario that you're getting the same error, don't worry and continue.
- Download the VPN.zip file (the URL is a direct link to the official website) and extract it to a separate folder (such as C:\Temp).
- Go to Control Panel > Device Manager.
- Click Network Adapters > Kerio Virtual Network Adapter.
- Right-click and select Properties.
- Go to the Details tab, select Inf name from Property select box.
- Take note of the name shown in the Value section (such as "oem22.inf").
- Rename the oem.inf file that came out from the previously unpacked VPN.zip archive so that it matches the above Value name (see step #9).
- Copy the renamed file to the C:\Windows\INF system folder, overwriting any existing file (you will need administrative privileges to do that).
- From that same source folder, copy the kvnet.sys file to the C:\Windows\System32\drivers system folder (again, you'll need administrative rights).
Once done, you should be able to install the latest version of the Kerio VPN Client: the new version will automatically upgrade/overwrite the "older" version installed during step #8.
References
This tutorial is made from various suggestions taken from this article from the GFI Software official site and this community post on the GFI forum community site (GFI Software acquired Kerio Technologies in January 2017).
")