
Table of Contents
In general terms, authorization refers to the permission or power to perform, carry out or exercise certain rights. In the IT field, authorization is defined as the process by which a system makes it possible to assign different access privileges (also known as permissions) to individual computers, software, or users (or groups of them).
Such task is typically handled through the implementation of access policies, claims, or permission groups that allow or prohibit each relevant action or activity (reading, writing, deleting, etc.) within a given set of logical spaces (filesystem folders, drives network, database, sections of a website, Web API endpoints, etc.).
In practical terms, authorization is often provided or denied by defining a series of Access Control Lists (ACLs) that specifies:
- The access type(s) allowed for a specific resource (read, write, delete, and so on)
- Which computers, software, or users (or groups of them)
Although authorization is orthogonal and independent of authentication, we can quickly see how the two concepts are inherently entwined. If a system is unable to identify its users, it won’t be able to properly match them against its ACLs and therefore grant or deny access to its resources; for that very reason, most access control mechanisms are designed to require both.
More precisely, they do the following:
- Assign the lowest possible authorization permissions to non-authenticated (anonymous) users; these permissions typically include accessing the “public” (unrestricted) content, as well as the login page, module, or form.
- Authenticate the users that successfully perform a login attempt.
- Check their ACLs to assign the authenticated users the proper access privileges (permissions).
- Authorize the users to access the restricted content or not, depending on the permissions given to them or to the group(s) they belong to.
The authentication and authorization flow described in this scenario can be visually shown in the diagram depicted below, which mimics the behavior of a typical web application with a set of resources accessible to authorized users only:
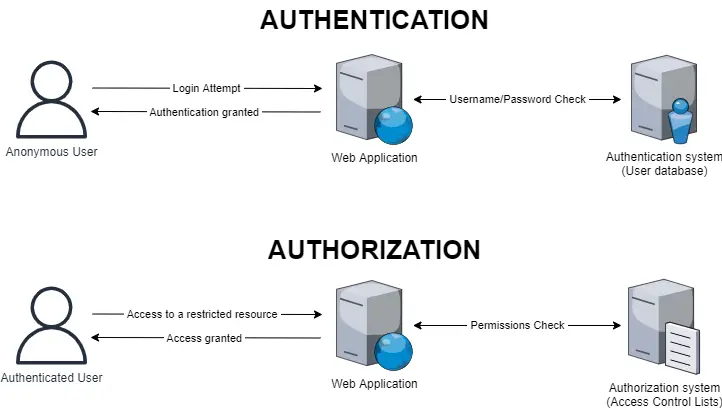
Notice how, in the above example, the authentication process is meant to happen before authorization, since the latter requires the former in order to perform its job.
However, such a statement is not necessarily true: if an anonymous user tries to access a restricted resource, the authorization system will kick in before authentication, denying access to non-authenticated users - and likely driving the web application to redirect the user to the login page. In some edge-case scenarios, there could even be resources meant to be accessible by anonymous users only (and not for authenticated ones): a typical example of that is the login page itself since an authenticated user should never be allowed to perform additional login attempts until logging out.
Connecting all these dots, we should now be able to see how authentication and authorization are two distinct, separate, and independent things, even if they are ultimately meant to work together: more specifically, even if authorization could work without knowing the identity of the connecting party (as long as it has a feasible ACL for non-authenticated users), it definitely requires an authentication mechanism in order to fulfill the rest of its job.
Now that we have gotten the general picture, we need to understand how we can implement a viable authentication and authorization mechanism for our Web API.
Implementation methods
As we have learned in the previous section, in a typical web application the authentication process – often represented by a login phase – is expected to happen before the authorization part: once the user has been successfully logged in, we get to know its permissions and hence we can authorize it or not go anywhere.
However, we also (likely) know that the HTTP protocol is stateless: each request is executed independently, without any knowledge of the requests that were executed before it. This basically means that everything the client and server do within a request/response cycle – including all data set and/or received – is meant to be lost at the end of the response.
That is unless the client and server are equipped with some mechanisms to store this data somewhere. These mechanisms are not part of the HTTP protocol, but they typically take advantage of some of its features – in other words, they are built over it. A good example of that is the HTTP caching techniques that can be implemented at the client-side and/or server-side level: such techniques use a specific set of HTTP headers – such as the Cache-Control header – to instruct the caching service on what to do.
If we connect these two facts, we can easily see that we have a problem: if each request doesn’t know what happened before it, how can we know whether the user has been authenticated or not? How can we keep track of the outcome of the request/response cycle triggered by the login form, that is, the login result and (if successful) the user’s actual identity?
In the following sections, we’ll briefly discuss some methods to overcome this issue and see which one of them could be more suited for Web APIs in general, as well as for our specific scenario.
Sessions/Cookies
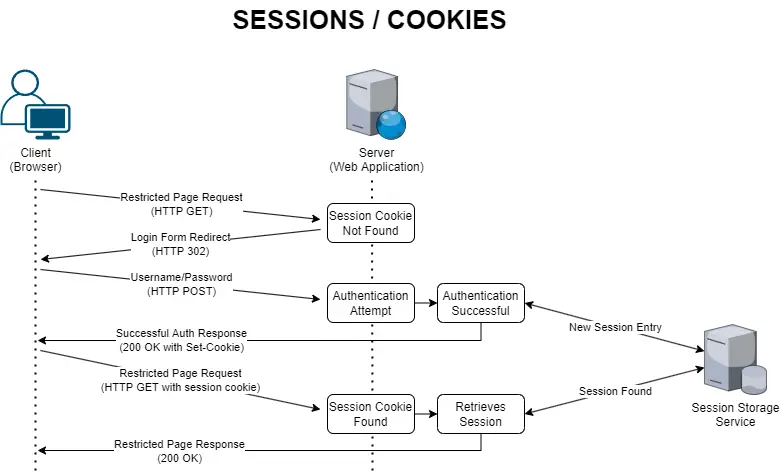
Most traditional web applications keep track of the authentication result using a session state manager: a key/value storage service (located on the web server itself or on an external server or cluster) used by the web application to store the relevant user data (the value), assigning them an auto-generated unique session id (the key).
The session id is typically sent back to the authenticated user’s client (typically using a cookie), so that it will be re-sent upon all subsequent requests and used to the server to retrieve the session (and the authentication data) and act accordingly (perform authorization-based checks) in a seamless and transparent way.
The whole process can be summarized in the following diagram:
The session-based authentication mechanism is a very common and convenient technique, which explains why it’s still used by most web applications – including industry-standard Content-Management Systems (CMS) such as WordPress, Drupal, Joomla, and the like. Even most web development frameworks, including ASP.NET Core, provide built-in capabilities to easily implement it.
However, this approach undeniably comes with several drawbacks, such as:
- Per-user overhead. Since each authenticated user requires its own session, the web server and the session state manager will have to perform additional work for each one of them; if a web application has a lot of users, this could result in an intensive I/O, TCP, or socket overhead, not to mention the memory required by the session state manager to store the session data. To mitigate this issue, the mechanism typically contemplates a session timeout after some users’ inactivity time (20-30-60 minutes). However, even a short timeout timeframe won’t help if the web application must deal with a lot of simultaneous users (peak traffic).
- Scalability. Replicating a session state manager (or creating a session management cluster) is not a trivial task, since the session data should be ideally checked, retrieved, and updated in real-time to ensure session consistency between each user’s subsequent requests.
- Cross-Origin Resource Sharing (CORS). Session cookies behave just like standard cookies, so they are subject to several restrictions that prevent them to be easily shared between different origins/domains. This limitation might not be a problem for most websites, provided they only use a single domain, but it can be quite troublesome for complex web applications that span some resources (such as external image services) over multiple domains.
- Security. Session cookies are subject to several security-related issues, such as Cross-Site Request Forgery (CSRF) attacks, hijacking attempts, and more. Most of them can be mitigated by some countermeasures, yet they can be difficult to handle for junior or novice developers.
Even without considering the above downsides, we can already say that session-based authentication is not the way to go for our scenario – and for RESTful Web APIs in general: adopting such an approach would break the Statelessness REST constraint, which prevents us from using a session state of any sort.
Bearer Tokens
Token-based authentication (also called Bearer authentication) is one of the most used approaches for Web API, as it provides acceptable security standards – when implemented properly – without breaking the Statelessness REST constraint.
The Token-based authentication still requires the user to authenticate itself (i.e. to perform the login) with a username and password. However, after the authentication process succeeds, instead of creating a persistent session on the server it generates an encrypted authorization token containing some relevant info about the outcome, such as a reference to the user identity (typically, the user Id), some info about the connecting client, the token expiration date, and so on. Once generated, the token is then sent to the client, that can then use it to perform subsequent requests (until it expires and/or the client chooses to discard it) by setting it within the Authorization HTTP header.
The whole process can be summarized in the following diagram:
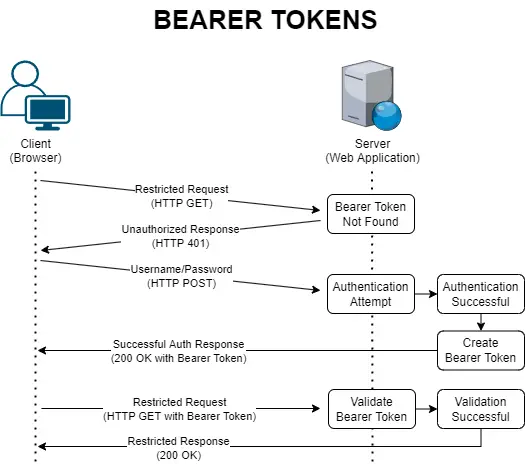
As we can see, no data is stored by the server. As for the client, an implementation may vary: the token can either be stored locally (and then re-used until it expires) or discarded upon its first usage.
The main advantage of Bearer Tokens is that they are a self-contained authorization mechanism since their existence automatically implies a successful authentication attempt; this also means that a single token can be used to authorize restricted requests addressed to multiple Web APIs and/or services - even if they are hosted elsewhere and/or they have no access to the user login data – as long as they all share the same issuer signing key used by the authentication service that generated them.
However, such versatility (and performance benefit) is also the cause of their main security flaws: once issued, they cannot be easily invalidated (or updated). This basically means that, if a third party manages to successfully steal a token and use it, it will be able to perform authorized requests until the token expires. And that’s not all: neither developers, system administrators, nor end-users cannot easily get rid of that token, even if they know it has been compromised. Even disabling the “originating” user wouldn’t do the trick, since that token is the result of an authentication process that took place when that user was still active.
The best workaround against this security issue is to reduce the lifespan of these tokens as much as possible (ideally a few minutes) so that the attacker won’t have much time to act.
API Keys
Another widely used authentication method for Web APIs is the API Key approach. In a nutshell, the service that operates the Web API gives its users a ClientID/ClientSecret pair – or gives them the chance to generate them – that can be used to access the API; that pair is typically sent using the Authorization HTTP header upon each request. However, conversely, from the Bearer Token that requires no authentication, as we have explained early on, ClientID and ClientSecret will be used to authenticate the requesting user every time, as well as authorize it.
The name given to ClientID and/or ClientSecret might vary, depending on the naming convention adopted by each provider and/or service: AppId and ApiKey is another typical way to call these properties. Some providers don’t even require two distinct values, since they do include (or can determine) the client’s identity within the secret key, thus requiring only a single string value: when this occurs, the name of such value is typically ApiKey, AuthKey, or something along that line.
Someone may be wondering why we should force our users to create and use a ClientID and a ClientSecret pair (or an API Key) instead of allowing them to just use their main account’s username and password. The reason is quite simple to understand: being able to separate the keys required to access the API (and only them) from the user’s login credentials is a major security improvement since it gives our users a lot more control over who, when, and how they can access the Web API. They would be able to assign different secrets to different partners, restrict the API usage (or usage quota) for some of them, set up expiration rules, invalidate any given secret at will and without having to change their main account’s password, and so on.
The API Key method is often used by enterprise-level Web APIs provided by popular Software-as-a-Service (SaaS) providers, such as Google, Apple, Microsoft, and Amazon since it can be easily integrated within a web-based management panel, thus giving the user the chance to generate multiple ClientSecret keys and even assign specific behaviors - permissions, expiration, IP restrictions, and so on - for each one of them.
Conversely from the Bearer Token method, the API Key approach requires the Web API(s) and/or service(s) to authenticate the caller upon each request, meaning that:
- It doesn’t have the same versatility (and performance benefits) as Bearer Tokens, since each service must be able to independently perform the authentication process and therefore access the user login data.
- It’s not affected by one of the main Bearer Token security issues, since API Keys can be easily and immediately invalidated at any time by developers, system administrators, and even end-users (if the management panel allows doing that).
- It’s easier to implement for most clients, as it only requires setting up the API Key values somewhere and then using them in the Authorization header upon each request.
At the same time, this method is still vulnerable to the “key steal” attack scenario, which can be mitigated with some security-based behaviors (such as the IP-based restrictions and expiration that we’ve talked about early on), if the provider allows us to do that.
Despite being less versatile and more resource-intensive than the Bearer Token alternative, the API Key approach became very popular among most enterprise-level service providers over the last years, mostly for security and practical reasons. The only real downside is that it often requires a management interface (ideally a “developer panel” with a visual UI of some sort), thus requiring some additional work.
Signatures and Certificates
Most modern API-based cloud computing and storage services, including Microsoft Azure and Amazon Web Services (AWS), allow connecting to their API using a signature-based and/or a certificate-based authentication method. Unlike the previous approaches, which rely on a transport layer that can theoretically be intercepted and/or tampered with by a third-party attacker, these authentication methods perform either a hash of the whole request using a previously shared private key and/or TLS certificate. This ensures that no intruder or man-in-the-middle can ever act as the requesting party, since they won't be able to “sign” the HTTP request.
This approach is easily the most secure one, especially considering that it can be coupled with any other method. However, it’s quite hard to implement for both parties, which is the reason why it's used only by websites and services that manage critical, sensitive, or strictly classified data, thus requiring a strong security posture.
Conclusions
That's it, at least for now: we hope that this overview of the most used HTTP-based authorization methods and techniques used in modern websites and services will help you to choose the right approach for your specific scenario.

, FTP, SSL")
