
Table of Contents
Being able to send and receive e-mail message without relying to external services is often an handy feature of any dedicated server, be it a dedicated/hosted one or a VPS/cloud-based solution. In order to do so, you would want to consider the most widely used MHS (acronym for message-handling services) software available for your operating system of choose:
- Exim (Unix-like, free/GNU)
- Postfix (Unix-like, free/IBM Public License)
- Sendmail (Unix-like, free/BSD License)
- Microsoft Exchange (Windows, closed-source/commercial)
Believe it or not, these players handle over the 80% of the e-mail traffic on a world-wide scale. You might also have noticed that they are either Unix only or Commercial, meaning that if you're using a Windows server you've got to pay another bill. If you're up for it, here's a link to buy a Microsoft Exchange: if you're looking for a way to save some cache you could give a chance to hSendMail, a not-yet-so-much-known Open Source Mail Server for Windows developed by Martin Knafve - recently released upon AGPL license -which this post is mostly about.
Overview
In this post we'll test the 5.6 hMailServer build - january 2015 - which is fully compatible with all Windows server and desktop major versions and builds from XP/2003 to Windows Server 2012 R2 and Windows 10. The software is bundled with a a really good pack of features: it supports all the MTA protocols & standards (POP3, SMTP, IMAP), a web-based Administration and/or e-mail handling management GUI available in all major languages, an extensive and well-written documentation available either online and offline, plus a lot of advanced features such as:
- Virtual domains
- Built-in backup
- SSL encryption
- Anti-spam
- Anti-virus
- Scripting
- Server-side rules
- Multilingual
- Routing
- MX backup
- Multihoming
- SQL backend
On top of that, thanks to its highly-customizable configuration settings and interface, you can also configure it as the default WebMail client for some of the most-used Ajax/PHP/.NET e-mail handling web-based frameworks (RoundCube, SquirrelMail, etc.). Not bad at all, isn't it?
Installation
First thing you've to do is to download the latest version of hMailServer from the Download section of its official site. The installation is straight and forward, but in case you need help you can take a look to the official documentation's installation guide chapter. Pay close attention when the setup wizard will prompt you to select the Database type you'll want to use:
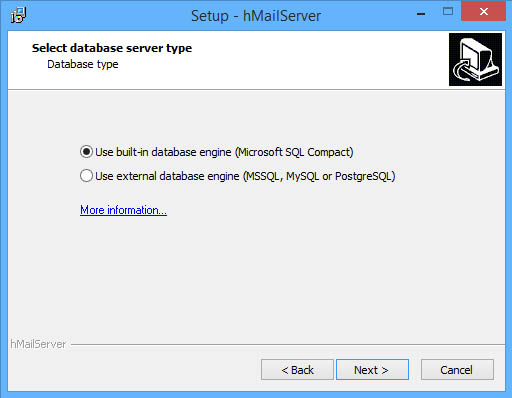
Choose the Database
As of today, hMailServer v5.6 currently supports four different database types:
- Microsoft SQL Server (2000 o superiore)
- Microsoft SQL Server Compact Edition (CE)
- MySQL 4 or higher (5.x being totally fine)
- PostgreSQL
The database of choice will be used to store some configuration options and, most importantly, the message base with all their indexes: that's why it's really important to choose something reliable, expecially if you're setting up a production environment. The authors, other than reminding us that Microsoft SQL Server CE is not allowed to host commercial products, suggest the use of Microsoft SQL Server or PostgreSQL for their performance, security and overall integrity benchmarks. Our setup, proudly working since many years, proudly uses a 5.x build of the standard MySQL Community Edition: we never regretted that choice, so we can't do anything but suggest you to use that aswell if you're not fond of the two big giants above.
At the end of the installation process you will be asked to enter an administration password: this password will be prompted upon all connections from the administration tool to the hMailServer local instance:
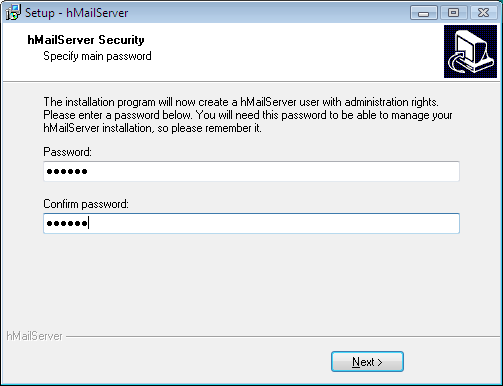
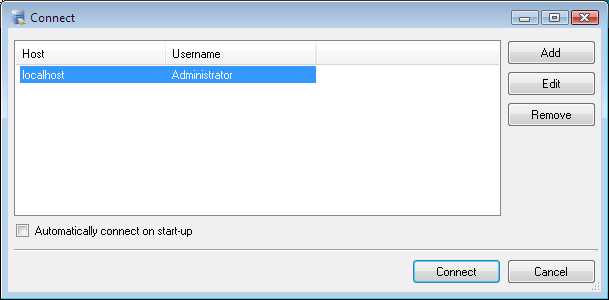
Choose a well-suited password and write it down in a safe place, then double-click on the hMailServer Administrator icon you'll find in your desktop and/or Startup panel. You'll be prompted to select the instance where you wish to connect to, since the administration interface can be used to connect to multiple hMailServer installations as long as they are reachable via DCOM/RPC. If you only need accessing the one you just installed on localhost you won't have any trouble finding it:
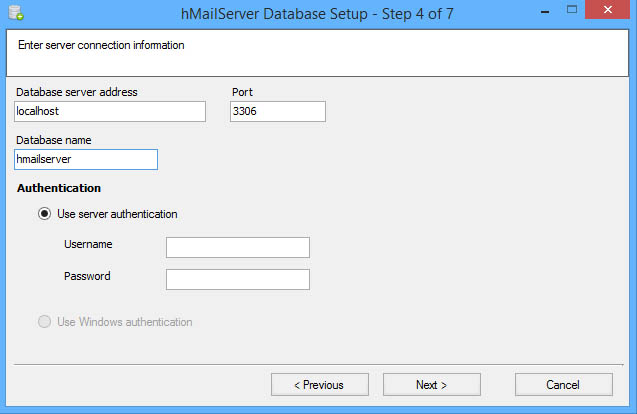
Connect hMailServer to the Database
If you've chosen MS SQL Compact Edition you can skip this paragraph, as you won't be asked to do anything: otherwise, you'll need to go through a small wizard to allow hMailServer connecting to your DB type of choice. First thing you'll be asked for is if you want to use an existing DB or create a new one, then you'll be asked for the connection parameters: ensure to select an username with the proper rights: at least read, write, create/drop tables and, if you issued for a new database to be created, create database.
Configuration
Configuring hMailServer is quite simple: the GUI interface is split upon a number of section, each one of them dedicated to a single aspect, protocol or job type. In the following paragraph we'll dig through the most important ones in order to build a fully-featured Mail Server which will be capable of handling the most common task. First thing we'll have to do is to setup the mail transportation related sections: POP3, IMAP and SMTP for one or more domains you own. In order to do that you'll need to:
- setup the MX Records for each domain, basically routing them to your server.
- create an entry for that domain to hMailServer's configuration.
- configure the mail boxes, the alias and/or the distribution lists using the hMailServer GUI interface.
- enable the SMTP, POP3 and/or IMAP protocols in hMailServer.
Setup the MX Records
In order to be able to manage the e-mail directed to your domain(s) you need to properly handle their MX Records, which basically are the informations received by the other mail servers when they lookup your domain in order to see where to actually route your messages: if you rely upon external, third-party e-mail handling services - such as the one from your hosting provider - your domain MX Records will be configured to point on them. In order to edit your MX Records, enter in the DNS management panel for your domain and add (or change) their IP.
Once you do that, you will have to wait some hours (usually 12-24) to have your changes propagated throughout the whole internet. After this time, each and every e-mail addressed to @yourdomain.ext will be handled over your server.
Add a domain
Go to the Welcome screen and click on Add Domain... to bring a tabbed settings panel into view: insert the hostname of the domain you want to configure into the General tab (hostname.com format): you can also configure one or more domain aliases - as long as you need them. Once you're done, click on the Save button to the lower-right: a new entry will be created, along with three sub-folders for the Accounts, Aliases and Distribution lists related to this domain.
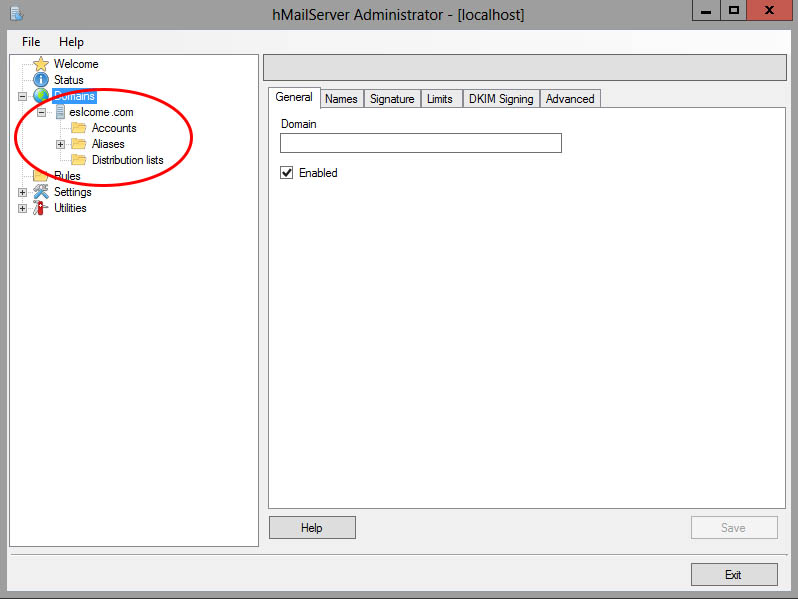
Configure E-Mail Accounts, Aliases and Distribution lists
For each domain defined under the the Domains node you'll be able to create as many Accounts, Aliases and Distribution Lists as you want to. Let's see how each one of them actually works.
Accounts
Each Account is basically a dedicated mailbox in the format of accountName@domain.ext: once created, the server will accept e-mail messages sent to this address and store them into its database. For each Account name you will also be asked to define a password, which will be used to grant access to hMailServer's POP3 and/or IMAP services to receive and send e-mail. Adding accounts is basically what you need to do for each and every e-mail you want to create for yourself and/or for any of your users.
Aliases
An alias, just like the name suggests, is nothing more than an alternative name for an existing account (and its related e-mail address). As soon as you create an alias and bind it to an account, each e-mail sent to aliasName@domain.ext will we accepted by the server and routed to the accountName@domain.ext address. Creating one or more alias is often an excellent way to manage e-mail received by multiple senders (yourName.amazon@, yourName.ebay@, yourName.paypal@ and so on) and still receive them using a single, centralized e-mail address.

For further information about e-mail aliases we strongly suggest you to read this Wikipedia page.
Please notice that hMailServer allows you to create aliases for any e-mail address, alias or distribution list (see below), including those not managed by it: meaning that you'll be able to create aliases for your gmail address, just to make an example.
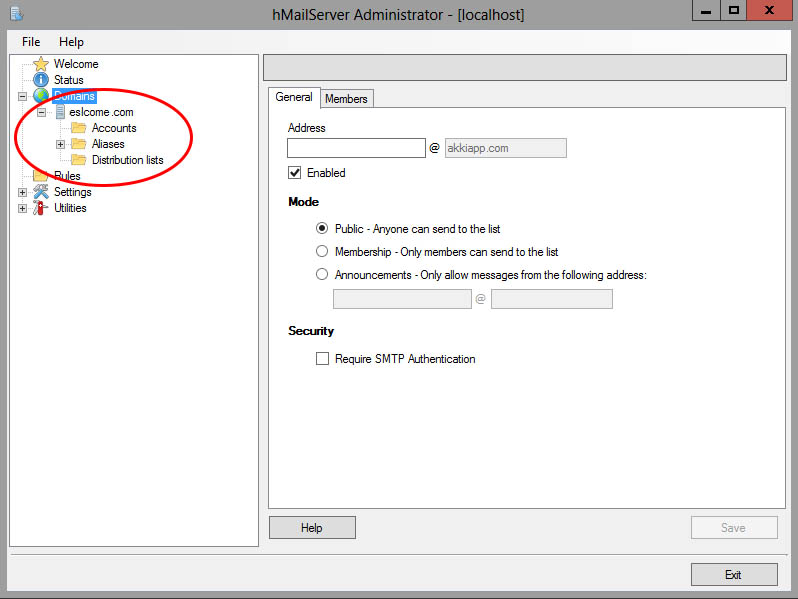
Distribution lists
A Distribution list is rather similar to an alias, except that it routes a copy of each received messages to multiple e-mail addresses instead of just one: those among you that are familiar with how mailing-lists work will find that Distribution lists are pretty much that. You will be also able to choose who can send messages to the list: hMailServer supports three configuration modes: Public (everyone can send messages, including non-subscribers), Membership (subscribers only) or Announcements (only a single e-mail address). To keep it simple, use Public if you need to host an open, support-based mailing-lists, Announcements for newsletters or similar one-way-only communications, and Membership for any other scenario.
Enable POP3 and/or IMAP protocols
The last step we need to handle is to ensure that POP3 and/or IMAP are properly configured. Open the hMailServer's management interface and expand the Protocols node:
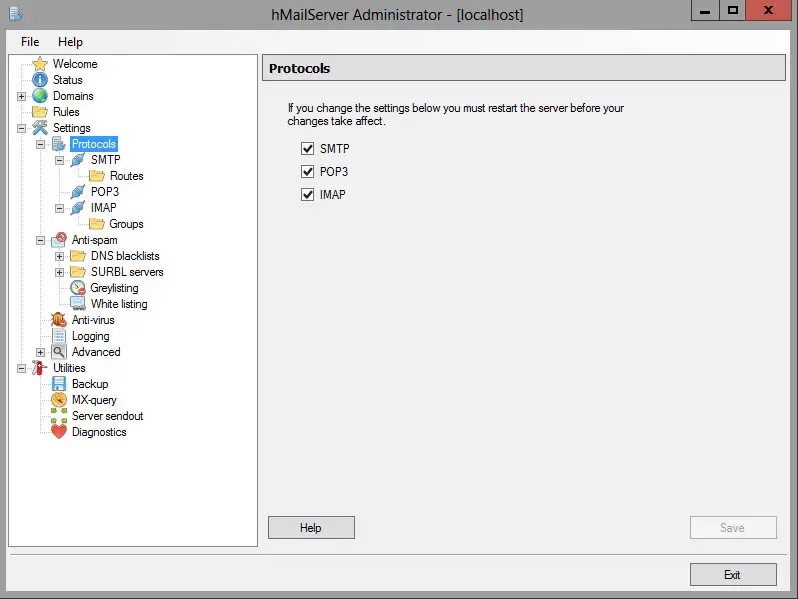
Ensure that the checkboxes near to the protocols you want to activate for your users are checked. In case you also want to activate the SMTP server (to send e-mail messages) you can take the chance to enable such protocol now (see below). For additional info regarding POP3, IMAP and SMTP procotols we strongly suggest reading this post from the hMailServer official docs.
Enable the SMTP protocol
Let's now see how we can configure hMailServer to send our e-mail messages using SMTP. Here are the required steps to perform:
- Enable the SMTP protocol (if you didn't do that already)
- Setup the access permission rules.
Open the hMailServer administration interface and go to the Protocols section: ensure that the SMTP protocol is enabled.
Setup the access permission rules
When activating an SMTP service, it is essential to correctly set the access permissions to the service in order to prevent your server from falling prey to spam-bots or other automatic mechanisms in the perennial search for poorly protected systems through which to convey potentially inappropriate e-mails.
Open the hMailServer management panel and go to Advanced -> IP Ranges. Expand the item with a click of the mouse and check the settings related to IP addresses inside the local network (localhost) or coming from outside (internet). Besides setting specific IP classes you can also enable or disable POP3, IMAP and SMTP services selectively for each of them.
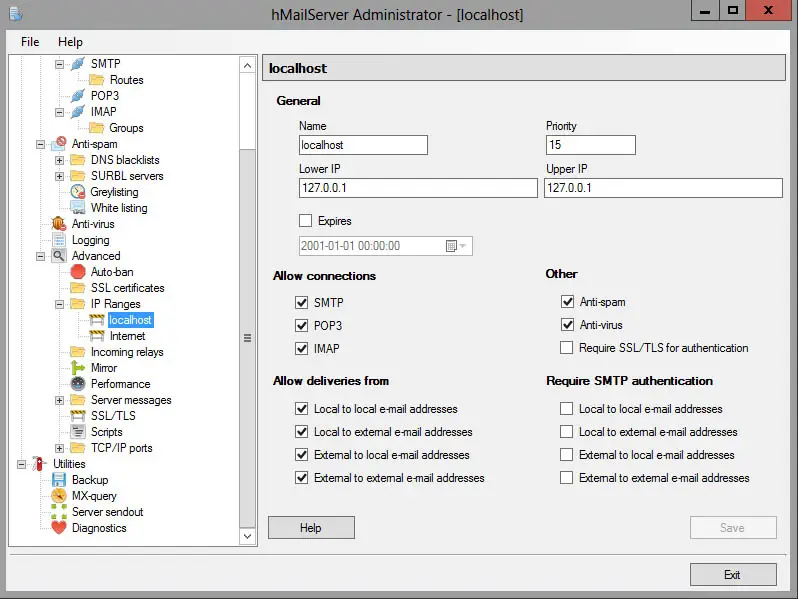
Configure deliveries
The four checkboxes in the Allow deliveries from section allow you to configure the e-mail forwarding permissions. In detail:
- Local to Local allows (or denies) sending emails from and sent to internal mailboxes (i.e. managed by / configured on hMailServer).
- Local to External allows (or denies) sending emails from internal mailboxes (see above) and sent to external mailboxes (or any other mailbox not managed by the local hMailServer instance).
- External to Local allows (or denies) sending emails from external mailboxes and sent to internal mailboxes.
- External to External allows (or denies) sending emails from and sent to external mailboxes.
Require SMTP authentication
Similarly, the four checkboxes present in the Require SMTP authentication section will allow you to request or not the need for authentication for the four possibilities described in the previous paragraph.
As we can see, hMailServer allows you to configure a different management of the Allow deliveries from and Require SMTP authentication permissions for each range of IPs that we are going to define: this feature is particularly convenient in some situations, for example when you need to configure a SMTP server that allows unauthenticated access for the use of the PHP mail() function: which, as many will know, does not allow you to specify authorization credentials, a problem I addressed in a previous article and with respect to which hMailServer, if properly confiured, it represents a possible solution.
IMPORTANT: By default, hMailServer does not require SMTP authentication to send mail received from a service that shows up with local IP address (localhost, 127.0.0.1), as can be seen by looking at the screenshot shown above. As for the services that connect with any external IP, it is usually a good idea to disable authentication if the recipient is an internal mailbox (i.e. managed by / configured on hMailServer) so as to allow external SMTP servers to send e-mails to the local instance: it is strongly recommended - or better to say, a duty - to request authentication for any sending to external mailboxes (local to external, external to external) so as to prevent our server from be used by spam services or malicious scripts to convey potentially unwanted messages.
Conclusions
That's it for now: the overview provided should allow you to configure the service with all its basic functionality. For any other configuration needs I suggest referring to the excellent hMailServer official documentation.
 what it is and how to prevent it")