Table of Contents
In this five-part tutorial we'll see how we can create a sample React Native app (you might call it a "Hello World" or "boilerplate") that will be capable of receiving Push Notifications using Firebase. Such guide could be a great headstart for React Native beginners, yet also for those intermediate or experienced developers who want to know more about push notifications: how they work, what are their best usage scenarios and how much they can be an improvement for almost any mobile app.
The entire source code shown throughout this tutorial, as well as a working sample app built with it, is available on GitHub under MIT license: if you happen to like it, don't forget to give it a star (and a like to this website)!
For the sake of simplicity this tutorial has been splitted into multiple parts, each one dedicated to a specific sub-topic:
- Part 1 of 5: Understanding Push Notifications, in which we'll try to understand what push notifications actually are and the impact they could have (when used properly) on a typical client-server app.
- Part 2 of 5: Setup React Native and Firebase, where we'll deal with the installation and configuration of our whole development stack: React Native, the Firebase SDK and the Visual Studio Code environment, together with the required settings to get our app ready to work with Android and iOS.
- Part 3 of 5: Configure the Firebase Service, in which we'll create the Firebase Project and configure the Firebase Push Notification Services to ensure that our React Native app will be able to receive push notifications through the Firebase API on any Android and iOS device.
- Part 4 of 5: Design and Test the React Native UI, where we'll test our front-end skills by laying out a React-Native UI in order to make our app actually able to receive push notifications and send HTTP requests to the server to remotely keep track of our actions - and possibly fire subsequent push notifications to other clients.
- Part 5 of 5: Server-Side Handler, in which we'll use ASP.NET Core to create a sample, lightweight web service that will be able to receive HTTP requests issued by the clients and/or feed them with push notifications through the Firebase API.
In this fourth post we'll see how we can create the front-end UI layout using React Native and handle the push notifications from the client-side.
Create the React Native UI
Now that all the pre-reqs have been set in place, let's see how we can implement our app's UI using React Native. This step requires writing (and commenting) a good amount of JavaScript code, therefore it can be useful to take a look at this tutorial's GitHub project:
And, more precisely, at the App_FireBase.js file. That file contains all the required source code to emulate a send-and-receive notification roundtrip using the Firebase send API, which allows a React Native app to send push notifications through Firebase. Do you remember the high-level workflow schema published in the Part #1 of this tutorial? That's precisely the case, with the only difference that the Web Server role is being handled by the Firebase send API.
Import files
Here are the relevant parts of the App_FireBase.js file, starting with the import statements:
|
1 2 3 4 5 6 7 8 9 10 11 12 13 14 15 16 17 18 19 20 21 22 23 24 |
import React, {Fragment} from 'react'; import { Alert, SafeAreaView, StyleSheet, ScrollView, View, Text, TextInput, Button, StatusBar, Clipboard, Platform } from 'react-native'; import { Header, LearnMoreLinks, Colors, DebugInstructions, ReloadInstructions, } from 'react-native/Libraries/NewAppScreen'; import firebase, { RNFirebase } from 'react-native-firebase'; |
Nothing strange here: we're just referencing all the modules that we're going to use within the file, including the firebase packages.
Constants
|
1 2 3 4 5 6 |
// This is the default FCM Channel Name (required by Android) const fcmChannelID = 'fcm_default_channel'; // This is the Firebase Server Key (for test purposes only - DO NOT SHARE IT!) // cfr: https://www.ryadel.com/en/react-native-push-notifications-setup-firebase-4/ const firebase_server_key = '<YOUR_FIREBASE_SERVER_KEY>'; |
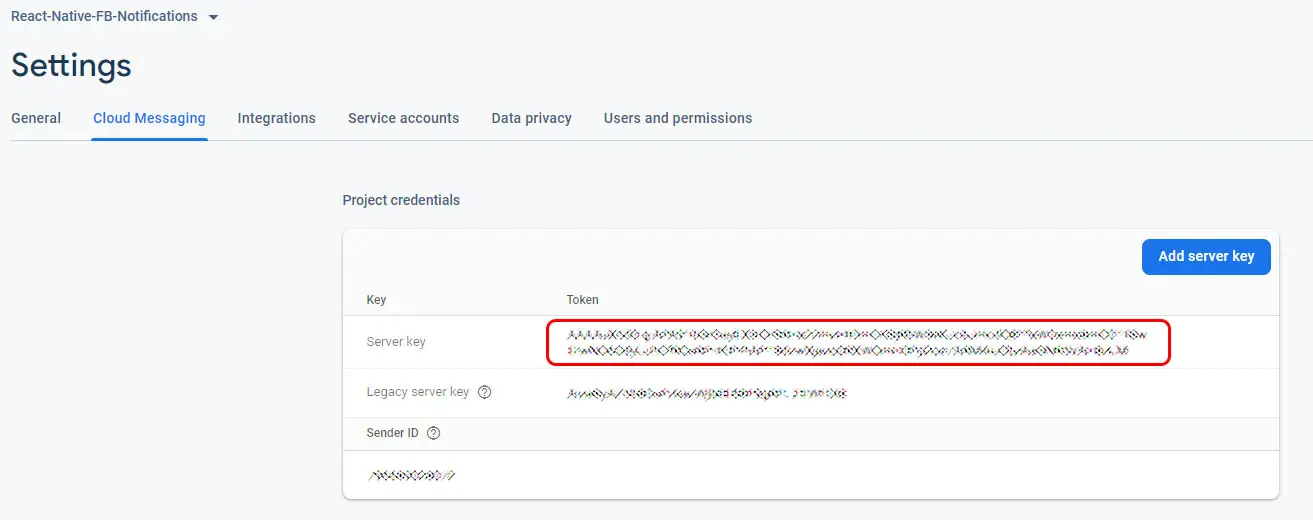
These are two required constants: the first one can be left like it is, while the latter must be changed with the Firebase Server Key that you can find on the Firebase console (see Part #3 of this tutorial), just like the screenshot below:
Constructor and Lifecycle Hooks
|
1 2 3 4 5 6 7 8 9 10 11 12 13 14 15 16 17 18 19 20 |
export default class App extends React.Component { constructor() { super(); this.state = { firebase_messaging_token: '', firebase_messaging_message: '', firebase_notification: '', firebase_send: '' }; } async componentDidMount() { this.createNotificationChannel(); this.checkNotificationPermissions(); this.addNotificationListeners(); } componentWillUnmount() { this.removeNotificationListeners(); } |
The next part of the file is dedicated to the App class implementation: as we can see, we're defining four state variables that we'll pass to the UI template and a good amount of internal methods that will be executed upon componentDidMount() and componentWillUnmount() events of the class's life cycle.
Let's take a look at these methods' implementations to see what they do.
Create Notification Channel
|
1 2 3 4 5 6 7 8 9 10 11 |
createNotificationChannel = () => { console.log("createNotificationChannel"); // Build a android notification channel const channel = new firebase.notifications.Android.Channel( fcmChannelID, // channelId "FCM Default Channel", // channel name firebase.notifications.Android.Importance.High // channel importance ).setDescription("Test Channel"); // channel description // Create the android notification channel firebase.notifications().android.createChannel(channel); }; |
The createNotificationChannel() method builds the FCM notification channel, which is required by Android devices, using the fcmChannelID constant defined above.
Check Push Notifications Permissions
|
1 2 3 4 5 6 7 8 9 10 11 12 13 14 15 16 17 18 19 20 21 22 23 24 25 26 27 28 29 |
checkNotificationPermissions() { console.log("checkNotificationPermissions"); // show token firebase.messaging().hasPermission() .then(enabled => { if (enabled) { console.log('user has notification permission') this.setToken(); } else { console.log('user does not have notification permission') firebase.messaging().requestPermission() .then((result) => { if (result) { this.setToken(); } else { } }); } }); } setToken(token) { console.log("setToken"); firebase.messaging().getToken().then((token) => { this.setState({ firebase_messaging_token: token }); console.log(token); }); } |
The checkNotificationPermissions() method performs two important tasks:
- It ensures that the user already granted the required permissions to allow push notifications usage: in case it doesn't, it tells the OS to ask for them.
- After the user gave permissions (or if they have already been granted) it sets the FCM Token to the corresponding state variable, so that it can be used within the UI as well as by other methods: that value is required to send push notifications to the client that is currently running the app, which is something we're going to do in a short while.
It's worth noting that the token is being set using an internal setToken() method, which has been defined to avoid code repetition (to keep the code more DRY) since we need to perform those steps two times.
Add Notification Listeners
|
1 2 3 4 5 6 7 8 9 10 11 12 13 14 15 16 17 18 19 20 21 22 23 24 25 26 27 28 29 30 31 32 33 34 35 36 37 38 39 40 41 42 43 44 45 46 47 48 49 50 |
addNotificationListeners() { console.log("receiveNotifications"); this.messageListener = firebase.messaging().onMessage((message) => { // "Headless" Notification console.log("onMessage"); }); this.notificationInitialListener = firebase.notifications().getInitialNotification().then((notification) => { if (notification) { // App was opened by a notification // Get the action triggered by the notification being opened // Get information about the notification that was opened console.log("onInitialNotification"); } }); this.notificationDisplayedListener = firebase.notifications().onNotificationDisplayed((notification) => { console.log("onNotificationDisplayed"); }); this.notificationListener = firebase.notifications().onNotification((notification) => { console.log("onNotification"); notification.android.setChannelId(fcmChannelID); firebase.notifications().displayNotification(notification).catch((err) => { console.log(err); }); // Process your notification as required // #1: draw in View var updatedText = this.state.firebase_notification + "\n" + "[" + new Date().toLocaleString() + "]" + "\n" + notification.title + ":" + notification.body + "\n"; this.setState({ firebase_notification: updatedText }); }); this.tokenRefreshListener = firebase.messaging().onTokenRefresh(fcmToken => { // Process your token as required console.log("onTokenRefresh"); }); } removeNotificationListeners() { this.messageListener(); this.notificationInitialListener(); this.notificationDisplayedListener(); this.notificationListener(); this.tokenRefreshListener(); } |
The addNotificationListeners() method is in charge of registering all the required listeners for incoming push notifications whenever the class is being mounted; the removeNotificationListeners() does the opposite, such as unregistering them all when the class gets unmounted.
Send Push Notifications to Server
|
1 2 3 4 5 6 7 8 9 10 11 12 13 14 15 16 17 18 19 20 21 22 23 24 25 26 27 28 29 30 31 32 33 34 35 36 37 38 39 40 |
sendToServer = async(str) => { console.log("sendToServer"); console.log(str); // SEND NOTIFICATION THROUGH FIREBASE // Workflow: React -> Firebase -> Target Devices fetch('https://fcm.googleapis.com/fcm/send', { method: 'POST', headers: { 'Content-Type': 'application/json', Authorization: 'key=' + firebase_server_key, }, body: JSON.stringify({ "registration_ids":[ this.state.firebase_messaging_token ], "notification": { "title":"Title", "body":str }, "data": { "key1" : "value1", "key2" : "value2", "key3" : 23.56565, "key4" : true } }), }) .then((response) => { console.log("Request sent!"); console.log(response); console.log("FCM Token: " + this.state.firebase_messaging_token); console.log("Message: " + str); this.setState({ firebase_send: '' }); }) .catch((error) => { console.error(error); }); } |
The sendToServer() method, as its name implies, sends a text message to the Web Server through a push notification that gets created on-the-fly. As we've already said, the HTTP request used to send the data to the server is calling the Firebase send API instead of a real Web Server. That call is performed using the API specifications and it will only work if the Authorization header is being properly set.
Helper methods
|
1 2 3 4 5 6 |
writeToClipboard = async(str) => { console.log("writeToClipboard"); await Clipboard.setString(str); // raise a popup message to allow "copy" from Android & IOS devices alert(str); } |
The writeToClipboard() method is just a helper function that allows the UI to send data to the clipboard and on screen: it will be called from the app UI to make us able to easily retrieve the FCM Token and use it elsewhere (for testing purposes only): you won't likely need it in production.
UI Layout & Styling
|
1 2 3 4 5 6 7 8 9 10 11 12 13 14 15 16 17 18 19 20 21 22 23 24 25 26 27 28 29 30 31 32 33 34 35 36 37 38 39 40 41 42 43 44 45 46 47 48 49 50 51 52 53 54 55 56 57 58 59 60 61 62 63 64 65 66 67 68 69 70 71 72 73 74 75 76 77 78 79 80 81 82 83 84 85 86 87 88 89 90 91 92 93 94 95 96 97 98 99 100 101 102 103 104 105 106 107 108 109 110 111 112 113 114 115 |
render() { return ( <Fragment> <StatusBar barStyle="dark-content" /> <SafeAreaView> <ScrollView contentInsetAdjustmentBehavior="automatic" style={styles.scrollView}> {global.HermesInternal == null ? null : ( <View style={styles.engine}> <Text style={styles.footer}>Engine: Hermes</Text> </View> )} <View style={styles.body}> <View style={styles.sectionContainer}> <Text style={styles.sectionTitle}>Notification Test View</Text> <Text style={styles.modulesHeader}>Firebase modules currently installed:</Text> {firebase.admob.nativeModuleExists && <Text style={styles.module}>admob()</Text>} {firebase.analytics.nativeModuleExists && <Text style={styles.module}>analytics()</Text>} {firebase.auth.nativeModuleExists && <Text style={styles.module}>auth()</Text>} {firebase.config.nativeModuleExists && <Text style={styles.module}>config()</Text>} {firebase.crashlytics.nativeModuleExists && <Text style={styles.module}>crashlytics()</Text>} {firebase.database.nativeModuleExists && <Text style={styles.module}>database()</Text>} {firebase.firestore.nativeModuleExists && <Text style={styles.module}>firestore()</Text>} {firebase.functions.nativeModuleExists && <Text style={styles.module}>functions()</Text>} {firebase.iid.nativeModuleExists && <Text style={styles.module}>iid()</Text>} {firebase.links.nativeModuleExists && <Text style={styles.module}>links()</Text>} {firebase.messaging.nativeModuleExists && <Text style={styles.module}>messaging()</Text>} {firebase.notifications.nativeModuleExists && <Text style={styles.module}>notifications()</Text>} {firebase.perf.nativeModuleExists && <Text style={styles.module}>perf()</Text>} {firebase.storage.nativeModuleExists && <Text style={styles.module}>storage()</Text>} <Text value={'\n\n'} /> <Text style={styles.highlight}>FCM Token:</Text> <Text>{this.state.firebase_messaging_token}</Text> <Button onPress={() => this.writeToClipboard(this.state.firebase_messaging_token)} title="Copy to Cliboard" /> <Text value={'\n\n'} /> <Text style={styles.highlight}>Send Notification:</Text> <TextInput style={styles.textInput} value={this.state.firebase_send} onChangeText={(txt) => this.setState({firebase_send: txt})} /> <Button onPress={() => this.sendToServer(this.state.firebase_send)} title="Send and Receive" /> <Text value={'\n\n'} /> <Text style={styles.highlight}>Received Notification:</Text> <Text>{this.state.firebase_notification}</Text> </View> </View> </ScrollView> </SafeAreaView> </Fragment> ); } } const styles = StyleSheet.create({ scrollView: { backgroundColor: Colors.lighter, }, engine: { position: 'absolute', right: 0, }, body: { backgroundColor: Colors.white, }, sectionContainer: { marginTop: 32, paddingHorizontal: 24, }, sectionTitle: { fontSize: 24, fontWeight: '600', color: Colors.black, }, sectionDescription: { marginTop: 8, fontSize: 18, fontWeight: '400', color: Colors.dark, }, highlight: { fontWeight: '700', }, footer: { color: Colors.dark, fontSize: 12, fontWeight: '600', padding: 4, paddingRight: 12, textAlign: 'right', }, modules: { margin: 20, }, modulesHeader: { fontSize: 16, marginBottom: 8, }, module: { fontSize: 14, marginTop: 4, textAlign: 'center', }, lineStyle:{ borderWidth: 0.5, borderColor:'black', marginTop:10, marginBottom:10, }, textInput:{ borderWidth: 0.5, borderColor:'black', marginTop: 0, marginBottom: 0, } }); |
The render() method is in charge of displaying the UI on screen. As we can see, we make good use of a bunch of the constants, state properties and methods that we talked about early on: we also included the styles constant, which contains the CSS styling to make the UI of our testing app a bit less ugly.
Test Drive & Screenshots
Let's see what happens if we run the app using Visual Studio Code and a Android emulator:
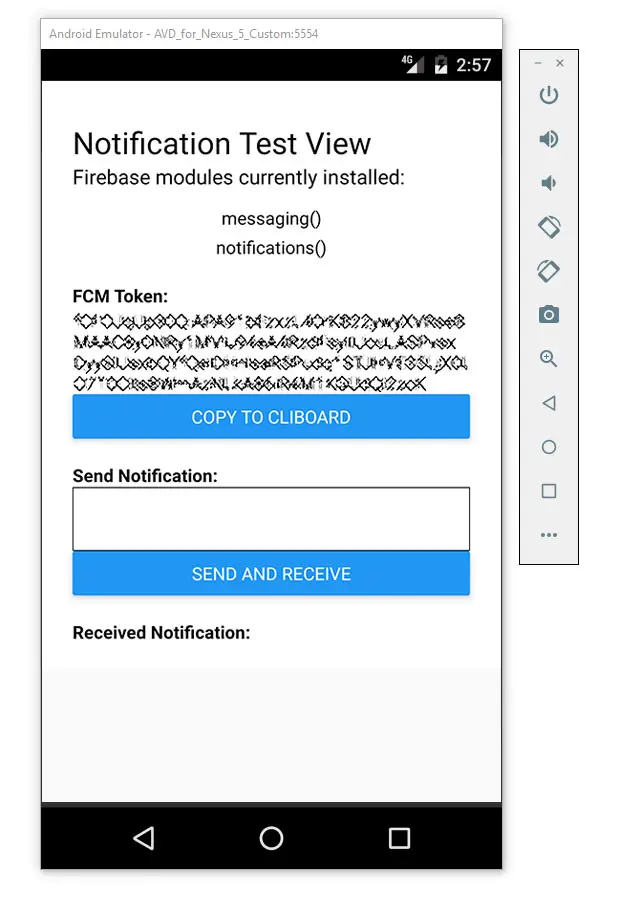
If we did everything properly, we will see the above UI, where we can either:
- Fetch our FCM Token, which can be used to send push notifications to this app from the Firebase online console or from any other push notification service.
- Input a message and send it as a push notification using the sendToServer() method that we revieved early on - which will internally call the Firebase send API.
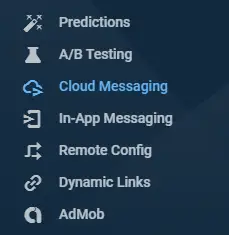
The former option requires a bit more work, but it can be done quite easily thanks to the Test Lab section of the Firebase online console:
If we try to perform the latter option, we should be able to see the full notification roundtrip in a matter of few seconds:
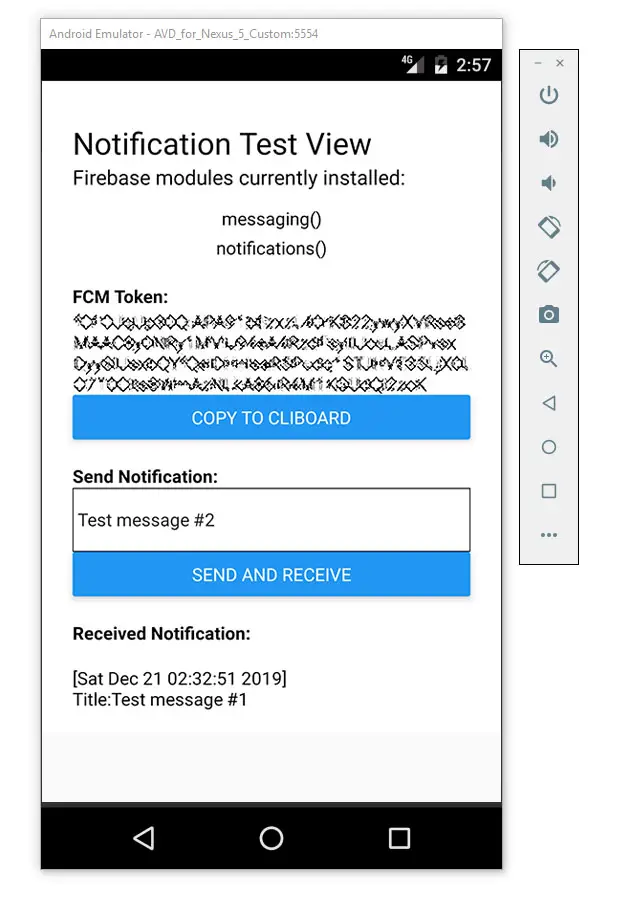
The text below the Received Notification panel is where we'll see the content of any push notification addressed to our app (using the FCM Token) that our smartphone (or emulator) will receive.
Conclusion
That's it! If everything went good, it means we've successfully created a working React Native UI that can be used to send and receive push notifications on Android and iOS device: the receive part is handled by the Firebase app packages, while the send part is being performed using the Firebase send API... Which can be OK for testing scenarios, but definitely not good for production deploy, because it requires too many info (such as the Server Key) which should be kept secret from the app front-end.
For that very reason, in the next chapter we'll see how to replace the Firebase send API with a back-end Web Service made with .NET Core.

Part 5 of 5: .NET Core back-end Web Service


This is the best tutorial EVER! It’s so well writen and explains everything. I tried at least 5 other tutorials that was unclear and hard to understand. This was perfect! I managed to implement the push notifications inside my existing app and its working fine! Really, thanks for all your work and for making this tutorial.
Hears from Brazil!