Table of Contents
Since its introduction in the first Windows NT Server, the Event Viewer has always been an essential tool for any System Administrator as the primary source to detect, locate and review a vast majority of issues related to Windows programs, services, frameworks, and even third-party installed software in order to improve the performances and the overall stability of any virtual or physical machine.
It's almost sad that, despite all these years, this tool is still affected - at least in my humble opinion - by at least two major issues:
- the constant slowness, due to the fact that all logs are basically stored in log files which are then parsed in real-time by the application itself resulting in a severe performance impact.
- the unconfortable location, nested inside the Control Panel > Administrative Tools since it's meant to be used by admins only.
These two issues are often the reason why the Event Viewer is still not always used by many users & admins who tend to forget about its existence, leaving errors and warnings that could easily be solved as they pile up.
This post shows a way to avoid this undesirable behavior by setting up a simple e-mail notification system of all the system event as soon as they're made available to the Event Viewer. The system will also allow the user to choose the event log file (Application, Security, Setup & more) and/or the event type (Information, Error & more) and/or the event ID: let's see how to achieve such result.
Windows 2008 RC2
Windows Server 2008 RC2 - and all the previous versions - gives the user the option to setup a native e-mail alert: all we need to do is to right-click the log file/event where we want to attach the notification upon and select the Attach a task to this log/event... command: then, in the Action panel, choose Send an e-mail and fill up the required fields: sender, address, SMTP server info,etc.
Windows 2012 Server
This is not the case of Windows 2012 Server and Windows 2012 R2 Server, where the Send an e-mail option is shown as deprecated. The word usually means that the functionality will be no longer supported in future version but that's not the case in this scenario, as the system will prevent us to actively use it even now - if we try to save, it won't let us to.
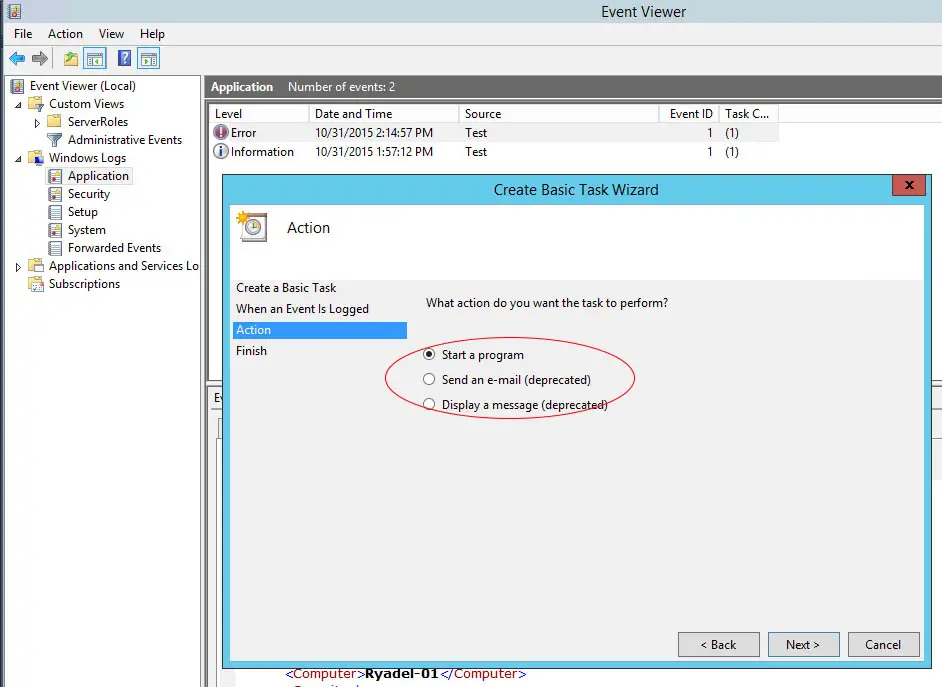
Luckily enough, we can obtain the same behaviour by using a Powershell script: it's also worth to mention that - as clearly stated in this Microsoft TechNet Forum post - the send-by-mail feature removal was apparently performed by Microsoft in order to enforce Powershell script-based workarounds like the one we're about to show. The reason behind this choice ain't clear enough - no wonder that many sysadmins complained about that: the good news is that the Powershell method, other than being very simple to adopt, allows a much wider set of options than the deprecated Send to e-mail native option. In order to implement that you need to perform two tasks: Create the Powershell script and Setup the Scheduled Task. As soon as you do that, you can also Generate a Test Event them to check that everything is properly working.
Create the Powershell script
Open notepad.exe or your text editor of choice and write down the following:
|
1 2 3 4 5 6 7 8 9 10 11 12 13 14 15 16 17 18 19 20 21 22 23 24 25 26 27 28 29 30 31 |
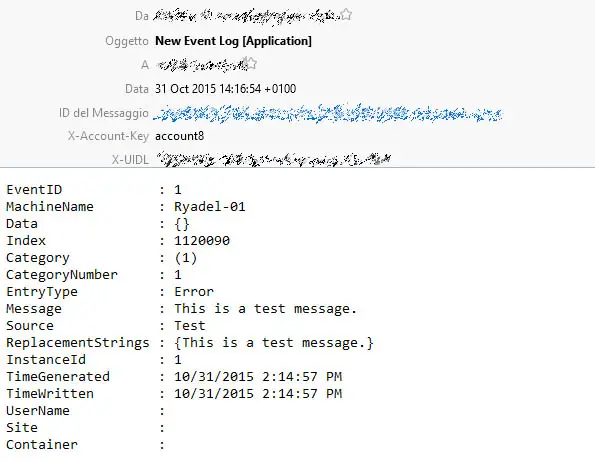
# ------------------------------------- # Ryadel.com - Powershell script to send an e-mail through the Event Viewer # ------------------------------------- # # To test this script you can use Powershell to write your own test error log entry in the following way: # ------------------------------------- # New-EventLog –LogName Application –Source "Test" # Write-EventLog –LogName Application –Source "Test" –EntryType Error –EventID 1 –Message "This is a test message." $event = get-eventlog -LogName Application -newest 1 #get-help get-eventlog will show there are a handful of other options available for selecting the log entry you want. #example: -source "your-source" # "Error" - send only error if ($event.EntryType -eq "Error") { $PCName = $env:COMPUTERNAME $EmailBody = $event | format-list -property * | out-string $EmailFrom = "$PCName <noreply@source.address>" $EmailTo = "your@destination.address" $EmailSubject = "New Event Log [Application]" $SMTPServer = "localhost" Write-host "Sending Email" Send-MailMessage -From $EmailFrom -To $EmailTo -Subject $EmailSubject -body $EmailBody -SmtpServer $SMTPServer } else { write-host "No error found" write-host "Here is the log entry that was inspected:" $event } |
This script, when executed, will ask the system to send an e-mail to the specified e-mail containing some useful informations regarding the latest Error entry in the Application log file: this also means that it should be executed when the Application log gets updated so - if it's an error - we'll receive our notification e-mail. Needless to say, remember to carefully check out your SMTP settings and destination e-mail, or you won't get any mail whatsoever.
If you need something more from the script - or you want to modify its behaviour - you can change its contents at will. If you choose to do that, unless you're a Powershell expert, I strongly suggest you to check these two useful resource guides:
- Powershell Syntax Guide by the ss64.com website, which is still my favourite Powershell syntax guide on the web.
- Get-EventLog Official Documentation, explaining the Powershell command used to fetch the latest event.
When you're done, save the script in an appropriate folder of your HDD - for example, C:\Scripts PowerShell\eventviewer-send-email.ps1 .
Now that you have the script in place, all you need to do is to launch it right after an entry is written upon the event log file. You can do that using the Event Viewer, as shown in the following paragraph.
Setup the Scheduled Task
- Open the Event Viewer.
- Select the log file or event you want to attach your script to. Needless to say, you need to pick the log file or event suited for the script you've made: if you used a script similar to the above one, which basically catches the latest Error in the Application log file, you most certainly need to attach it to the Application log.
- Right-click and select Attach a task to this log...
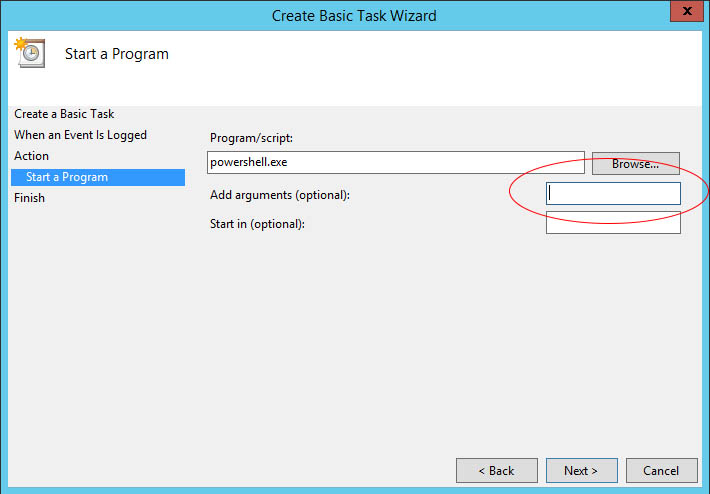
- Give the task a name, description etc. and go ahead until you get to the Action panel (see screenshot above): from there select Start a Program and click on the Next button.
- In the following screen, insert
powershell.exe in the Program/script textbox and, in the Add arguments (optional) field, write the full file path of the .ps1 script created in the previous paragraph (remember to use quotes if needed): for example, if you saved it in
C:\Scripts PowerShell\eventviewer-send-email.ps1 , write the following:
1"C:\Scripts PowerShell\eventviewer-send-email.ps1"
As soon as you do that, all you have to do is wait for the next Application Error log entry to check that everything is working properly. If you don't want to wait you can generate a sample log entry using Powershell: check out the following paragraph to see how you can do that.
Generate a Test Event
We can easily write an event log entry using these two Powershell commands:
|
1 |
New-EventLog –LogName Application –Source "Test" |
|
1 |
Write-EventLog –LogName Application –Source "Test" –EntryType Error –EventID 1 –Message "This is a test message." |
The first command creates a new Source named Test, which will be used by the next command to generate the actual error entry.
If everything has been setup properly, we'll get an e-mail from our server containing all the the error message relevant details: TimeGenerated, TimeWritten, EventID, Message, Source, EntryType & more.:
That's it for now: happy event viewing!
Many thanks Ryan, very useful and for once : simple to follow ! :)
Hello,
Thank you very much for this script, i would like to know if you can help me with the same script but i would like to specify which Event ID’s i want to send to my email from System.
Thank you
Hi Ryan,
Please If I intend to modify this to send only critical triggered alerts? what do I do
Hello, im getting a “get-eventlog : Requested registry access is not allowed.” error. I have edited the script to point to the security logs.
$event = get-eventlog -LogName Security -newest 1
# “Audit Success” – send only error
if ($event.EntryType -eq “Audit Success”)
{
$PCName = $env:HDC
$EmailBody = $event | format-list -property * | out-string
$EmailFrom = “$PCName ”
$EmailTo = “dschneider@Domain.ca”
$EmailSubject = “New Event Log [Security]”
$SMTPServer = “localhost”
Write-host “Sending Email”
Send-MailMessage -From $EmailFrom -To $EmailTo -Subject $EmailSubject -body $EmailBody -SmtpServer $SMTPServer
}
else
{
write-host “No error found”
write-host “Here is the log entry that was inspected:”
$event
}
I am using Mail Alert Simple Mailer ( https://sourceforge.net/projects/mail-alert/) instead of PowerShell script to send all email notifications. It’s fast, safe and reliable.