
This tutorial describes the common mandatory tasks to properly route, install, deploy and configure a web site or service upon a remote server of any kind: VPS, dedicated server, web farm, public or private cloud et. al.: it's not meant to be exhaustive or suitable for every possible scenario, yet it could help some first-hand SysAdmins either for performing new installations or to check existing ones and/or to better understand what's going on under the hood.
Prerequisites
Before starting, let's ensure that you're in possession of the following tools:
- A registered web domain with a proper DNS management control panel, similar to those offered by Aruba and other Domain Name Registrar companies like NameCheap, Aruba, GoDaddy etc.
- A properly configured remote server, either physical or virtual, with a working and running IIS, Apache or other Web Service installation.
- A web site or service of any kind (HTML, PHP, ASP.NET, Phyton, Java et. al.) or a framework setup package such as WordPress, Joomla, MediaWiki, PhpBB et. al. ready to install.
Hostname and IP Address
First thing to do is configuring the hostname and the IP address which will be used by the website. In order to do this you need to:
- Define a public IP in your possession to use for your website/service (such as 5.189.148.122): in most cases it will be the IP Address (or one of the multiple IP Addresses) provided with the physical or virtual server you bought. You can choose any IP Address, including those already used for another website or service - assuming it's routed to the same machine you'll use for your new site.
- Define the hostname(s) you will assign to the aforementioned IP, which will be the internet address(es) of your website or service: it will most likely be the domain you purchased from your DNR service of choice (es. ryadel.com e www.ryadel.com) or a third-level domain name (es. guides.ryadel.com).
- Create an appropriate A record for the given hostname pointing to that IP Address using the Domain DNS administration panel.
Perform a local test using the hosts file
If you prefer, before altering the public DNS, you can also perform a local test by creating a DNS override rule in your local machine. If you're using Windows you can easily do that adding an appropriate entry to your hosts file, which is located here: C:\Windows\System32\drivers\etc\hosts and serves this exact purpose.
The hosts file can be opened with any text editor, including notepad, and it can be used to define custom DNS override rules: for example, if you want to bind the 5.189.148.122 IP address to the www.ryadel.com hostname, you'll need to add the following entry:
|
1 |
80.88.92.129 www.ryadel.com |
It's very important to remember that the rules declared inside the hosts file will always override the public DNS entries, meaning that they will get priority over the settings defined using the DNR's DNS management panel. That's why it's recommended to remove any custom rule from the hosts file at the end of your tests in order to avoid them altering your DNS routing logic in the future.
Check it out
You can check the results of this task by issuing a simple ping <hostname> from the command prompt, ensuring it will resolved to the IP of your choice. Once you verified that, go to the next step.
Firewall & Routing
Single Server
If you only have a single-server farm, the only thing you need to do is to open its Firewall to incoming connections over ports 80 (for HTTP) and/or 443 (for HTTPS). If you're using the Windows integrated Firewall service you most likely have the ports already opened by the IIS or Apache install program as shown in the following screenshot:
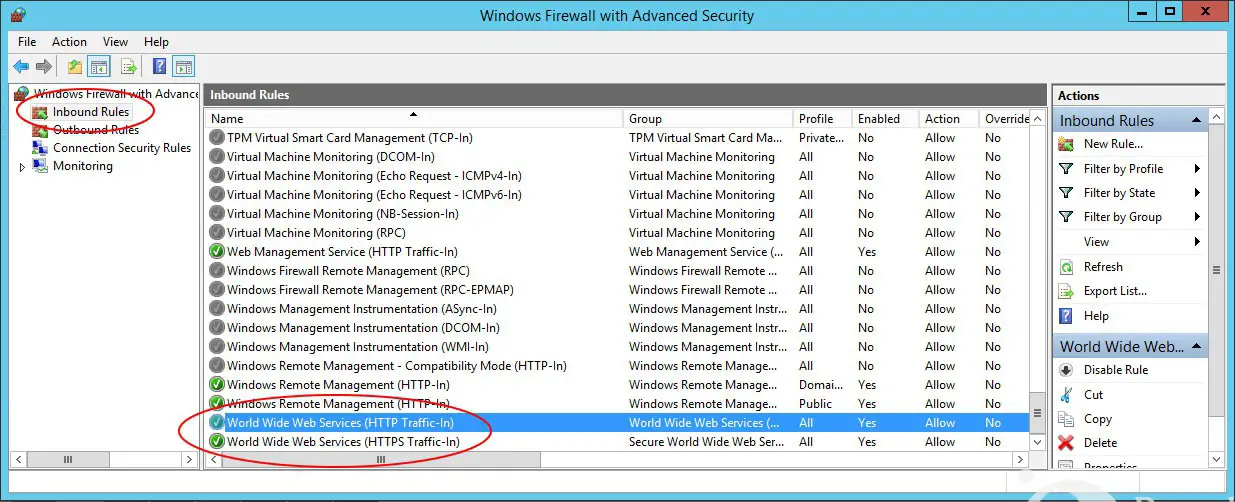
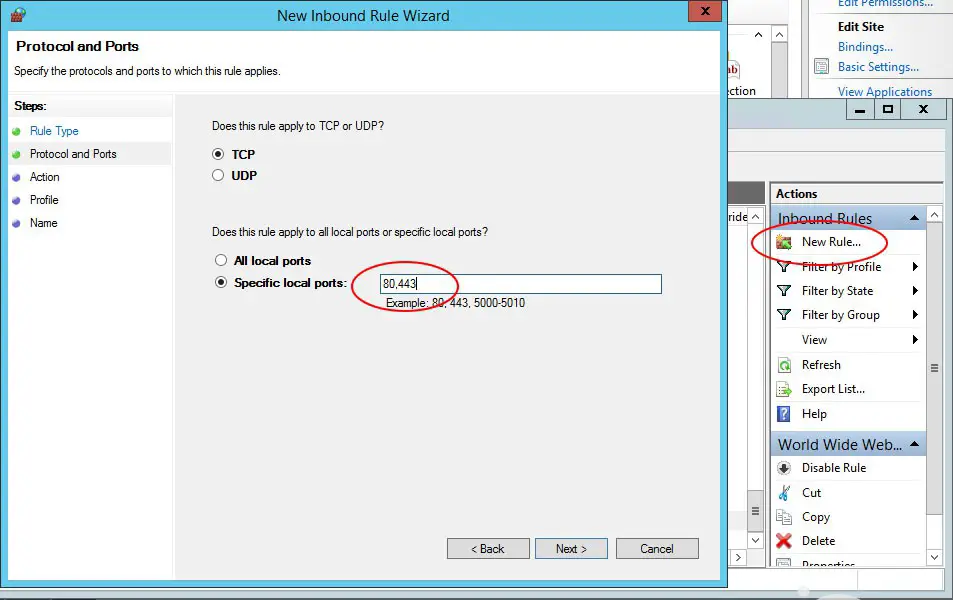
If you don't, you need to add them yourself. Click on the New Rule... link in the upper-right corner to launch the Wizard, then create a new incoming rule applied to local ports: type in the 80 and/or 443 ports, depending on your needs:
Multiple Servers
If your web server is a node in a Server Farm environment - either physical or virtualized - you most likely have a more complex scenario to deal with. The most common implementation usually involves a dedicated machine doing the Firewall and the VPN server using a dedicate OS (Kerio Connect, FreeBSD/PFSense or other stuff), responding to all your public IP addresses and redirecting the traffic to all other nodes - including our web server - using an internal local network. There could also be more services in-between, such as load balancers, proxies/reverse proxies, et. al.: we can't address everyone of them, so we'll just assume that if you're using them, you know how to configure them to route your traffic properly: they won't change the main topic, which is routing the incoming traffic to the public IP address, port 80/443, to our web server internal IP address, same ports. If you can achieve that, do it: otherwise, contact your System Administrator or think about ease your server farm network configuration.
Check it out
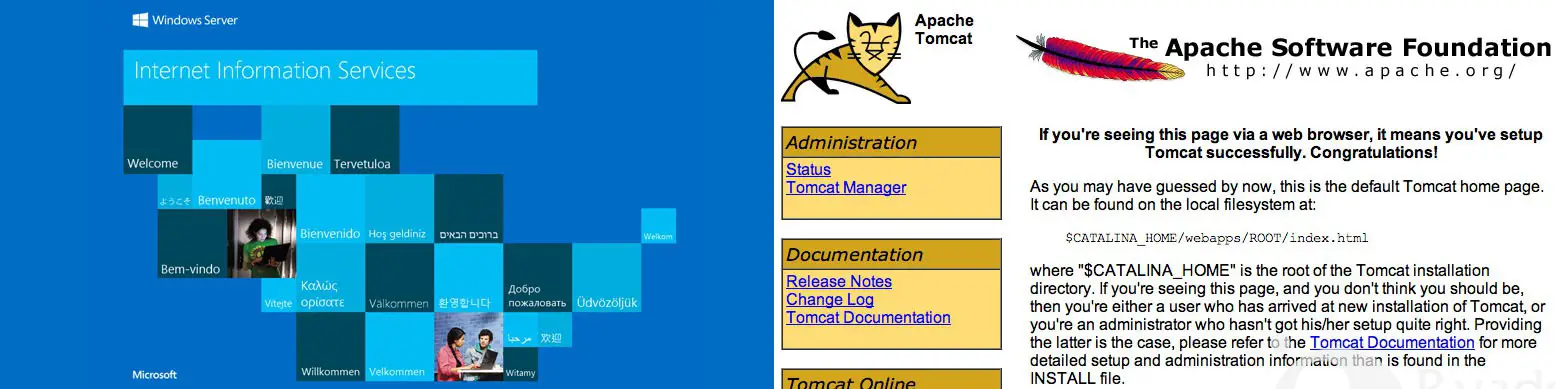
You can check if the Firewall (and its internal routing) has been properly configured by connecting to the web site/service hostname: if everything has been setup properly you should be able to see it or, if you haven't installed it already, the welcome page of IIS / Apache installation.
IIS & Web Server
Once the connection has been estabilished and the IP address properly routed, all you have to do is to setup the Web Server. The relevant steps mostly are:
Publish the website on the server
In most cases, publishing a website merely means copying all the relevant files (html, css, js, images, server-side scripts, binary files and so on) inside the folder used by the web server for publishing web content: inetpub , httproot , wwwroot and the likes, depending on the web service installed and the system configuration. Such task can be handed by using a standard FTP software (we strongly suggest FileZilla, which we already mentioned here), RDP or RDP-like softwares such as VNC or TeamViewer with file transfer enabled, VPN, Web Applications made available through your Web Hosting Service or other framework-based deploying tools such as Visual Studio's Web Site Publishing Tool, and more. Needless to say, it will be also required to properly setup the relevant .ini , web.config e/o httpd.conf files to allow and/or restrict publishing of the various contents, as well as configuring the most common stuff such as: char codes, connection strings, absolute/relative paths, server/client cache, http headers and all the required stuff needed by the website. If you're using software suites such as Joomla and/or WordPress they will take care of most of this stuff automatically, as long as you follow the installation instructions provided.
Web Service Configuration
Just to make a quick example, we'll briefly describe the basic steps to configure a standard website upon a standard Windows Server + IIS 8 machine.
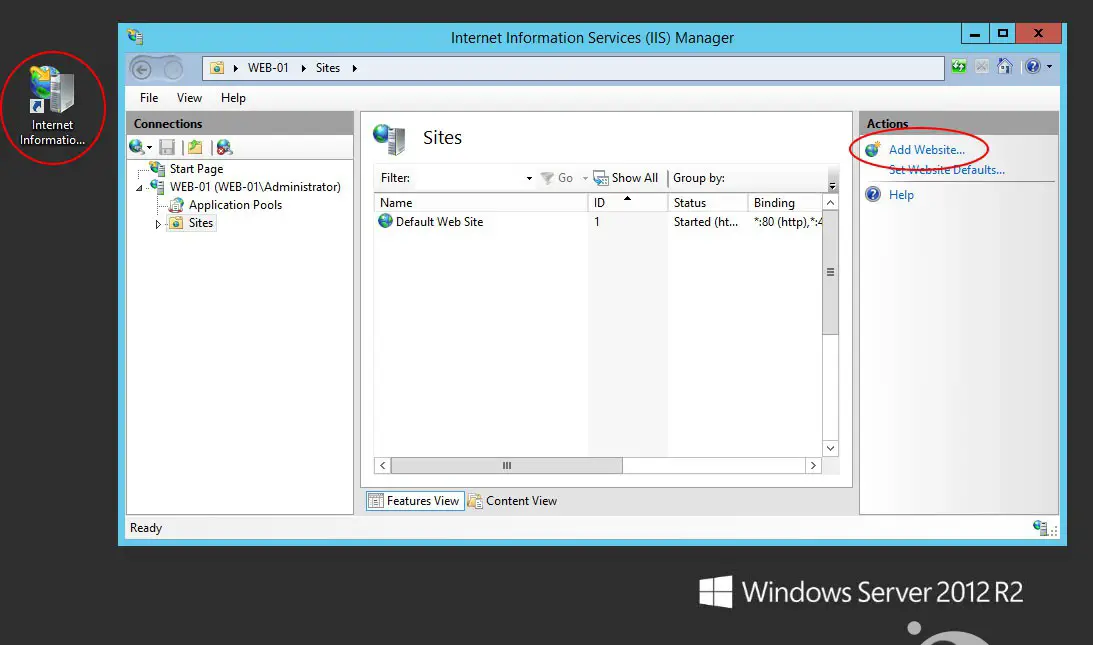
Add a new Web Site
Open the IIS Management Tool (aka IIS Manager) from Control Panel > Administrative Tools and add a new Web Site.
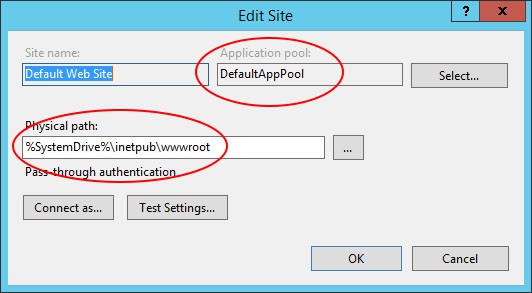
Once done, open the Basic Settings... panel and define a root folder - the one you used to copy the website files we talked earlier: you also need to choose between creating a new Application Pool (IIS default choice) or Select an existing one. If you have little or no experience with IIS and Application Pools we strongly suggest to create a new one every time, unless you reached a critical mass of Web Sites and Application Pools within the same IIS instance: if that's the case, we strongly suggest you to read this excellent guide to Application Pools and set up your Web Sites in a way that they can share them whenever they can.
Binding
From the rightmost menu, click to the Bindings... link: a new modal window will open, where you can setup the (target) hostnames, IP addresses and/or ports your website will answer to: in most scenarios the best choice you can do here is set the hostnames only, leaving the IP addresses to All Unassigned (and port 80), so your machine configuration won't be bound to one or more specific IP addresses: that's usually a wise thing to do since public IP addresses might change in the future - for example if you change web hosting provider or hosting plan - while your website hostname(s) will most likely stay the same.
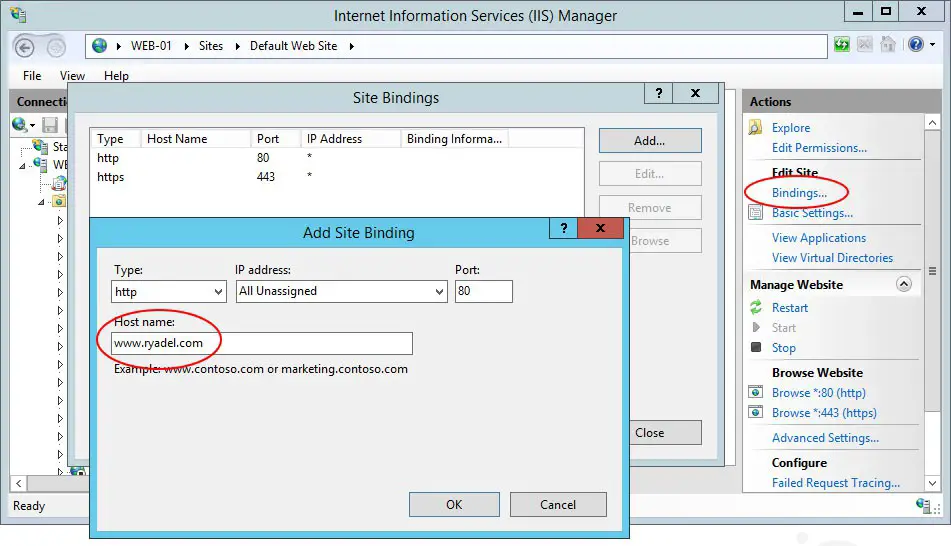
This is a sample binding we can setup to ensure that our website will always be served to requests asking for ryadel.com or www.ryadel.com:
|
1 2 3 4 |
Type Host Name Port IP Address ------------------------------------------------- http ryadel.com 80 * http www.ryadel.com 80 * |
Binding on HTTPS/SSL
If we want to support HTTPS/SSL as well, the first thing we can do is to acquire an HTTPS/SSL certificate: these can be easily purchased online from a Certificate Authority (or authorized resellers) such as GoDaddy. The SSL certificate can be quite cheap (from 20$) or very expensive (over 300$), depending on the provided insurance, security encryption used and validation levels (here's a good explanation of all these), but you have to renew it every year.
Once we've got the SSL certificate, we need to:
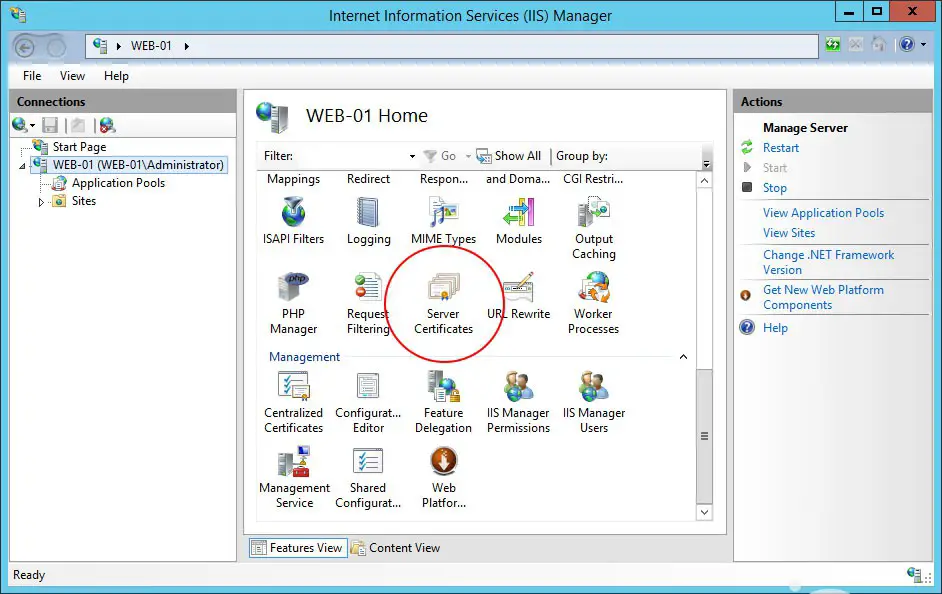
- install it using the IIS Manager by clicking to the Server Certificates icon: be sure to select the IIS main instance from the leftmost node tree, not a specific website.
- add a new binding to support incoming connection to port 443 as well as 80, in the following way:
|
1 2 3 |
Type Host Name Port IP Address ------------------------------------------------- https www.ryadel.com 443 * |
It's worth noticing that whenever we setup the HTTPS binding we also need to set two additional options:
- The Require Server Name Indication checkbox (only from IIS 8 and above), which you should enabled to support multiple certificates on the same IP address and TCP port number, hence allowing multiple HTTPS websites to be served off the same IP address without requiring all those sites to use the same certificate. If you only purchased a standard HTTPS certificate for a single website/IP Address, you can leave this unchecked and go on. For further info about SNI support on IIS 8+ we suggest you to read the following article on the IIS official website.
- The SSL Certificate to use (you can select here the one you installed from Server Certificates).
Checking it out
All is left now is checking that everything is working properly. The faster way to do so is open a web browser and trying to connect to all the configured hostnames (in the Bindings... section of IIS Manager) for the installed web site and/or service: it can't hurt to also check out all the static and dynamic web pages, paying specific attention to those featuring dynamic contents (i.e. from Database queries) so we'll check the DB connection strings as well as other DataProvider-related settings.
If the website allows user authentication, we should also check the following:
- login/logout/session expiration (by looking at the client browser's cookie or localStorage data) for at least one registered user.
- basic CRUD operations for database items and/or file upload/download/delete for at least one registered user.
That's all for now: happy publishing!
 what it is and how to prevent it")

2 Comments on “Deploying and configuring a web site on a remote server”