: The application is configured to issue secure cookies - Cause e soluzioni del problema")
Table of Contents
As we recently wrote a few weeks ago in this older post, the most appropriate way to create a Web Service SOAP on ASP.NET is, by the end of 2016, to use the WCF Framework (acronym for Windows Communication Foundation): that's a rather outdated architecture, yet it's still preferable than the now more-than-obsolete ASMX pages.
In the above mentioned article, in addition to solving a specific problem related to the configuration of a WCF service on IIS8, we spent a few minutes reminding about the features of the architecture, proudly presented by Microsoft in October 2008 and then quickly removed from the spotlight to leave space for the Web API paradigm, with an exclusive focus on the REST-based Web Services. In this article we'll summarize the steps needed to create a Web Service SOAP starting from scratch using the latest versions of the tools needed: Visual Studio (2012, 2013, 2015, or 2017 or later) and Internet Information Services (8 or later).
Create a WCF project
The first thing to do is launch Visual Studio and create a new project: VS2015 provides two templates that fit the purpose: the first one, named WCF Service Library, allows you to create a separate library to use in other projects: the second, WCF Service Application, additionally ships the required endpoints to handle SOAP calls over the web.
In our case, we will use the latter: the name of our sample application will be MyWCF.
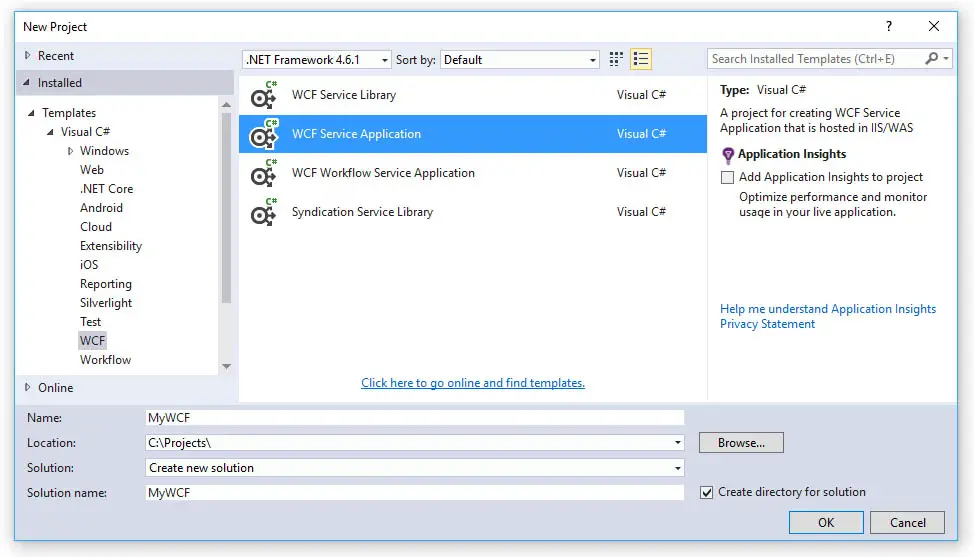
As soon as we click OK Visual Studio will create a solution and a project that contains a sample Web Service, Service1.svc, and its IService1.cs interface, with two already working methods: GetData, which can accept a SOAP request containing an input generic type Int32, and GetDataUsingDataContract, which instead requires a structured input.
WCF Test Client
We can test both methods by running the application in Debug Mode: Visual Studio will provide a dedicated tool - the WCF Test Client - which we can use to make SOAP requests and view the results.

IMPORTANT: Remember to select the Service1.svc file in the Solution Explorer before launching the application in Debug, otherwise the WCF Test Client will not be initialized.
Apparently, we're more than halfway done! Our Web Service already works, all we have to do now is implement the methods we are interested in, in addition to or in substitution for example ones.
Adding a GetToken Method
Let's now try to add a classic GetToken method, which accepts two string type fields - a username and a password - in input and returns a Guid if the authentication attempt is successful, or an empty string in case of an error. Obviously, since we do not have a database of users available, we will limit ourselves to implementing a sample code, assuming that actual implementation will be more complex: what's more, now, is to understand the functioning of the WCF architecture.
Let's open the IService1.cs file and define our method:
|
1 2 3 4 5 6 7 8 9 10 11 12 |
[ServiceContract] public interface IService1 { [OperationContract] string GetData(int value); [OperationContract] CompositeType GetDataUsingDataContract(CompositeType composite); // TODO: Add your service operations here [OperationContract] string GetToken(string userName, string password); } |
Compared to the existing code we have added only the last two lines, which define precisely the features of the method we want to add: the [OperationContract] attribute is of particular importance because it marks the method as an operation to be exposed at the Web level Service.
Let's now add the actual implementation within the Service1.svc file as follows:
|
1 2 3 4 5 6 7 8 9 10 11 12 13 14 15 16 17 18 19 |
/// <summary> /// Retrieve a non-permanent token to be used for any subsequent WS call. /// </summary> /// <param name="userName">a valid userName</param> /// <param name="password">the corresponding password</param> /// <returns>a GUID if authentication succeeds, or string.Empty if something goes wrong</returns> public string GetToken(string userName, string password) { if (userName == "testUser" && password == "testPassword") { // Authentication Successful return Guid.NewGuid().ToString(); } else { // Authentication Failed return string.Empty; } } |
As we can see, the code is extremely simple: we are limited to checking the data sent by the SOAP request: if a valid account is returned we will return a Guid, otherwise an empty string. As already mentioned, in a real-case scenario we would certainly have a database to use to perform the two operations we simulated: retrieve the matching username / password corresponding to the received SOAP request and, in case of succesful authentication, store the token to send in the response that we will return, so that we'll be able to retrieve it and check it later.
To test our new service we can launch our application in Debug Mode and use the WCF Test Tool to enter the sample values that we have set as valid: testUser and testPassword. If we did everything correctly, we should be able to see the following result:

Once the Invoke button is pressed we will be able to verify the correct outcome of our response in the bottom section of the WCF Test Tool. In the above screenshot the Guid has been generated, thus proving that everything works correctly.
Set the WSDL Binding Type
As you probably already know if you work with SOAP Web Services, there are four possible Binding Types to which our WSDL can conform: the four typologies are effectively described in this rticle published on the IBM website, the meaning of which can be summarized in the following quote:
The WSDL document describes a Web service. WSDL binding describes how the service is bound to a messaging protocol, especially the SOAP messaging protocol. WSDL SOAP binding can either be a Remote Procedure Call (RPC) style binding or a document style binding. SOAP binding can also have encoded use or a literal use.
The WCF architecture works to generate WSDL automatically, while allowing you to define which Binding Type to use: this choice can be made using the [XmlSerializerFormat] attribute, which can be assigned either on a general level - or immediately above interface definition - that for each single method. These are the permissible values, corresponding respectively to the four possible modes:
Rpc/Encoded
|
1 |
[XmlSerializerFormat(Style = OperationFormatStyle.Rpc, Use = OperationFormatUse.Encoded)] |
Rpc/Literal
|
1 |
[XmlSerializerFormat(Style = OperationFormatStyle.Rpc, Use = OperationFormatUse.Literal)] |
Document/Encoded
|
1 |
[XmlSerializerFormat(Style = OperationFormatStyle.Document, Use = OperationFormatUse.Encoded)] |
Document/Literal
|
1 |
[XmlSerializerFormat(Style = OperationFormatStyle.Document, Use = OperationFormatUse.Literal)] |
|
1 |
[ServiceContract(Name = "Service", Namespace = "http://www.MyWCF.com/")] |
Set the Endpoint Addresses
In case we don't like the Namespace / ClassName / MethodName convention, we're free to customize the endpoint URL by slightly modifying the two [OperationContract] attributes already present within the IService1.cs interface for each of the our methods:
|
1 2 |
[OperationContract(Action = "https://myurl.com/OtherName/GetToken", ReplyAction = "https://myurl.com/OtherName/GetToken")] string GetToken(string userName, string password); |
Needless to say, if we want to use custom URLs, we will also need to manage the routing of these requests at the server-side routing level. To do this, we'll need to equip our Global Application Class file, better known as Global.asax, and define one or more Route within the Application_Start override method, in the following way:
|
1 2 3 4 5 6 |
protected void Application_Start(object sender, EventArgs e) { RouteTable.Routes.Add(new ServiceRoute( "OtherName", new ServiceHostFactory(), typeof(MyWCF.Service1)) ); } |
... and that's it: enjoy your brand-new SOAP Web Service!
EDIT: If you have issues with HTTP 404 errors when the Web Service is running in production on your IIS-enabled Web Server machine, do not forget to read this article explaining how to overcome this specific problem. If you need to perform a general purpose, manual SOAP request without using the SoapClient class, you can also read this guide.


2 Comments on “How to create a SOAP Web Service using ASP.NET WCF, Visual Studio and IIS 8+”