Table of Contents
In this post I will explain how to setup and deploy a production-ready ASP.NET Core Web Application on a NGINX-Powered Linux CentOS 7.x server. These instructions have also been tested with all major Linux distributions, such as Ubuntu, Fedora, Debian and RHEL.
The ASP.NET Core version I used to write this guide is .NET Core 2.1.2 Runtime, which is the most recent one at the time of writing: however, there's a high chance that they will work for newer ASP.NET Core versions as well.
Introduction
Before starting up, it can be wise to quickly explain how we'll get it working. As you might already know, the preferred way to host a .NET Core app on Linux is to setup a Kestrel service on the Linux machine that will serve our web app on port 5000; once done, we will setup a NGINX instance that will act as a reverse proxy, forwarding the incoming requests to the Kestrel web server. This pattern is called edge-origin proxy and we already talked about it in this other post.
Here's a simple diagram that might help you to understand how it will work:
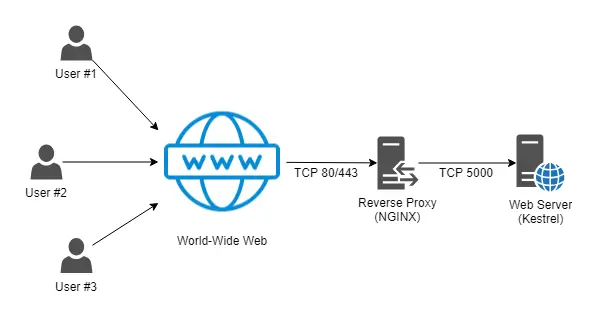
If we look at the above picture, we can immediately see how there are a lot of advantages in using such approach:
- Scalability: the Reverse Proxy and the Web Server can be installed on the same machine or in different machines within the same environment/web farm (or even among different web farms). We can also have multiple web servers, depending on how much we want (or need) to scale the web application: the NGINX reverse proxy will be an excellent load balancer, as we explained here.
- Data Security: the edge-origin pattern helps to shield the Web Server machine (or process) against malicious attacks, since it only opens the port 80 on the internal network. The only exposed machine (or process) is the Reverse Proxy, which is not the one actually executing the back-end code and therefore less vulnerable to external attacks.
- Performance: the Reverse Proxy can be configured to conditionally cache content from the back-end servers, thus eliminating the need to connect to the web server at all for many requests. This is great for performance and can also shield the web servers from DDoS attacks and other brute-force malicious attempts.
- Versatility: although this post presents a Linux-only install, this pattern will allow you to efficiently and transparently mix-in Linux and Windows servers: the web server(s) might as well be an IIS-powered Windows Server instead of the Linux Kestrel service we'll be using in a short while.
In order to implement this pattern on a single Linux CentOS machine, we need to do the following:
- Prepare the .NET Core Web Application by adding the required set of middlewares to support the reverse proxy feature.
- Install and Setup the .NET Core runtime to the Linux CentOS machine.
- Setup & configure the Kestrel web server service to serve our .NET Core web app on TCP port 5000.
- Setup & configure the NGINX reverse proxy service to forward the HTTP requests received on TCP ports 80 and/or 443 to the Kestrel web server on TCP port 5000.
As a side step, we'll also need to configure a process management tool to help restart the web app in case of crashes.
Prepare the Web Application
The first thing we have to do is to ensure that our web application will be properly configured to be served through a reverse proxy. In order to do that, we need to use the Forwarded Headers Middleware from the Microsoft.AspNetCore.HttpOverrides package. The middleware will use the X-Forwarded-Proto header to update the Request.Scheme, ensuring that redirect URIs and other security policies will work properly.
To install the middleware, open your Startup.cs file and put the following code in the Startup.Configure method:
|
1 2 3 4 5 6 7 |
// Invoke the UseForwardedHeaders middleware and configure it to forward the X-Forwarded-For and X-Forwarded-Proto headers. // NOTE: This must be put BEFORE calling UseAuthentication or similar authentication scheme middlewares. // ref.: https://www.ryadel.com/en/asp-net-core-2-publish-deploy-web-application-linux-centos-tutorial-guide-nginx app.UseForwardedHeaders(new ForwardedHeadersOptions { ForwardedHeaders = ForwardedHeaders.XForwardedFor | ForwardedHeaders.XForwardedProto }); |
IMPORTANT: As written in the comments, this middleware must be put BEFORE calling UseAuthentication or other authentication scheme middlewares.
Once done we can switch to our Linux CentOS machine, where we'll perform most of the remaining tasks.
Install the .NET Core runtime
The next thing to do is to install the .NET Core 2.1 runtime package on our Linux CentOS machine. This is the only package we need for apps deployed to production environments: the .NET Core SDK package, for example, is not required at all.
Add the dotnet product feed
Before installing .NET, you'll need to register the Microsoft key and the product repository. In order to do that, open a linux terminal window and run the following command:
|
1 |
$ sudo rpm -Uvh https://packages.microsoft.com/config/rhel/7/packages-microsoft-prod.rpm |
It's worth noting that you'll only need to do these things once (per Linux machine).
Right after that, run the following command to ensure that your system is up-to-date with the latest security standards:
|
1 |
$ sudo yum update |
Last but now least, you can install the .NET SDK by typing the following command:
|
1 |
$ sudo yum install aspnetcore-runtime-2.1 |
This last command will install the .NET Core Runtime Bundle, which includes the .NET Core runtime and the ASP.NET Core runtime. To install just the .NET Core runtime, use the following command instead:
|
1 |
$ sudo yum install dotnet-runtime-2.1 |
Deploy the Web Application
Once done, we are ready to publish our .NET Core Web Application on the Linux CentOS server. The simplest thing to do that is to use a FTP client, assuming that our Linux CentOS server has a FTP server ready and working: in case it doesn't, we can either install a FTP server from scratch by following this tutorial or use SSH or other file-transfer methods.
To publish a .NET Core Web Application via FTP you can either use the built-in FTP publishing feature or publish to a local filesystem folder and then manually upload the resulting files to your server using a standard FTP client.
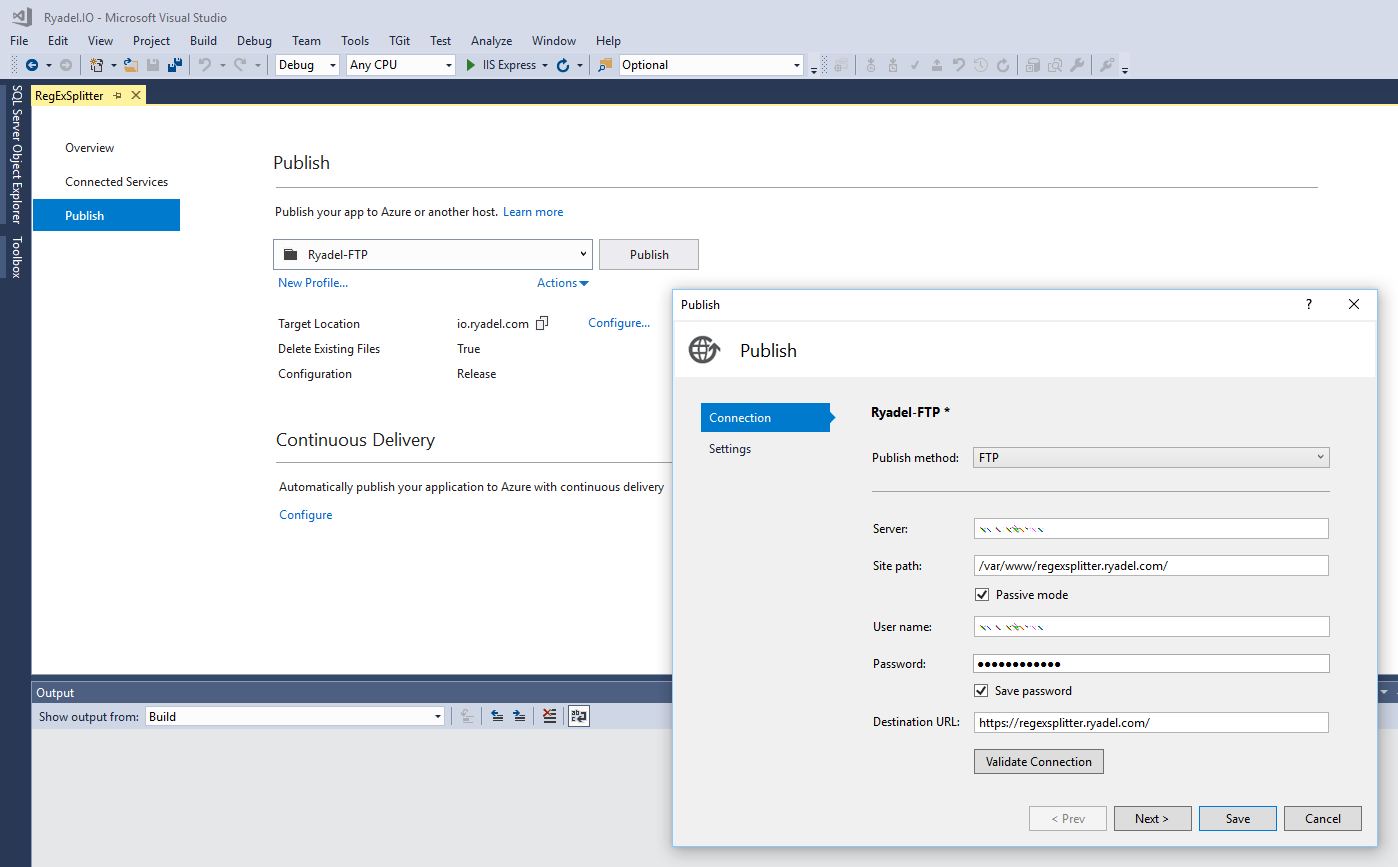
Be sure to choose a suitable folder: as you can see in the above screenshot in this tutorial we'll be using /var/www/regexsplitter.ryadel.com/ , therefore be sure to replace this with your folder in the next paragraph.
As soon as the file transfer is done, remember to setup the proper permissions to the Linux CentOS folder using chown: if you don't do that, you'll run into a blocking issue (see Troubleshooting paragraph below).
Here's a typical chown command to do that, assuming that you'll be using www-data user and the www group (the -R switch means "recursive"):
|
1 |
$ chown -R www-data:www /var/www/regexsplitter.ryadel.com/ |
Setup the Kestrel service
The next thing to do is to create and configure the Kestrel service - our web server.
Let's start by creating the service definition file in the /etc/systemd/system/ folder:
|
1 |
$ sudo nano /etc/systemd/system/kestrel-regexsplitter.service |
If you prefer, replace nano with any other editor of choice. Also, feel free to replace regexsplitter with your (lower-case) web application name or with anything that will remind you that.
In the newly-created file, put the following content:
|
1 2 3 4 5 6 7 8 9 10 11 12 13 14 15 16 17 18 19 20 21 22 |
[Unit] Description=.NET Web Application on Linux [Service] WorkingDirectory=/var/www/regexsplitter.ryadel.com ExecStart=/usr/bin/dotnet /var/www/helloapp/RegExSplitter.dll Restart=always # Restart service after 10 seconds if the dotnet service crashes: RestartSec=10 KillSignal=SIGINT SyslogIdentifier=dotnet-example User=www-data Environment=ASPNETCORE_ENVIRONMENT=Production Environment=DOTNET_PRINT_TELEMETRY_MESSAGE=false # How many seconds to wait for the app to shut down after it receives the initial interrupt signal. # If the app doesn't shut down in this period, SIGKILL is issued to terminate the app. # The default timeout for most distributions is 90 seconds. TimeoutStopSec=90 [Install] WantedBy=multi-user.target |
Take a look at the highlighted lines above: these are the values that you will have to configure depending on your web application. Replace our sample values with your actual working directory, your .NET Core DLL file name and the Linux user you'd like to use (the same you've granted folder permissions with chown early on).
After you performed the required changes, save and close the file.
Now that we have configured the service, we just need to start it...
|
1 |
$ sudo systemctl start kestrel-regexsplitter.service |
... and check its status:
|
1 |
$ sudo systemctl status kestrel-regexsplitter.service |
If the status command shows that something's off (red lines or advices), check out the Troubleshooting paragraph below. If you don't see anything like that, it most likely means that your Kestrel web service is up and running (yay!).
However, before going further, it's definitely advisable to check out that everything is running fine. Open a web browser on your Linux CentOS machine and check out the following URL:
|
1 |
http://localhost:5000 |
If everything works well, we should be able to see your website!
If we do, we can enable the service to make it automatically start upon each boot:
|
1 |
$ sudo systemctl enable kestrel-regexsplitter.service |
In case we don't, take a look at the browser's error message and then check out the Troubleshooting paragraph below.
Why we're not using Kestrel?
You could be tempted to just use the Kestrel web service and get the job done now, without having to deal with NGINX. Despite being 100% possible, we strongly advise against doing that for the same reasons stated by Microsoft here:
Kestrel is great for serving dynamic content from ASP.NET Core. However, the web serving capabilities aren't as feature rich as servers such as IIS, Apache, or Nginx. A reverse proxy server can offload work such as serving static content, caching requests, compressing requests, and SSL termination from the HTTP server. A reverse proxy server may reside on a dedicated machine or may be deployed alongside an HTTP server.
As we can see, they are basically enumerating the advantages of the edge-origin pattern that we already introduced early on. To put it short, Kestrel is not meant to be used to the frontline: therefore, the right thing to do is definitely to keep it far from the edge and leave such task to NGINX.
Configure NGINX
The last thing we have to do is to install and configure NGINX to serve our .NET Core web application as a reverse proxy. In this paragraph we'll just assume that you already have a NGINX instance installed on your Linux CentOS machine and that you have at least a vague idea of how it works. If you don't, you can either read this tutorial to install NGINX and them take some time to read these posts to learn its basics.
Here's the relevant code snippet that you can add to (or include in) your /etc/nginx/nginx.conf configuration file to setup the regexsplitter.ryadel.com domain as a reverse-proxy:
|
1 2 3 4 5 6 7 8 9 10 11 12 13 14 15 16 17 18 19 20 21 22 23 24 25 26 27 28 29 30 |
server { listen 80; listen [::]:80; server_name regexsplitter.ryadel.com; return 301 https://regexsplitter.ryadel.com$request_uri; } server { listen 443 ssl http2; listen [::]:443 ssl http2; server_name regexsplitter.ryadel.com; ssl_certificate /var/ssl/certificate.pem; ssl_certificate_key /var/ssl/certificate.key; root /var/www/regexsplitter.ryadel.com/wwwroot/; index index.html; autoindex off; location / { proxy_pass http://localhost:5000; proxy_http_version 1.1; proxy_set_header Upgrade $http_upgrade; proxy_set_header Connection keep-alive; proxy_set_header Host $host; proxy_cache_bypass $http_upgrade; proxy_set_header X-Forwarded-For $proxy_add_x_forwarded_for; proxy_set_header X-Forwarded-Proto $scheme; } } |
Again, replace the urls, paths and names according to your own project. Also, be sure to add or include any other configuration file or setting you want or need to use (seo, cache configuration, static content, blocked locations, anti-DDoS features and so on). We intentionally kept it to the bare minimum, yet you most likely want to have more stuff than that.
Troubleshooting
If you follow the tutorial throughly, there's a high chance that you shouldn't need this paragraph at all. However, in the unlikely scenario that something went wrong, here's a brief list of the most common issues that might occur, together with some suggestions and workarounds.
217/User - Kestrel permissions error
This error message can be seen when you check the status of the Kestrel service from your Linux console:
(code=exited, status=217/USER)
Solution: check the user written in the Kestrel service file (as explained in the Setup the Kestrel service paragraph) and be sure that the permissions have been set accordingly using the sudo chown command.
SSL_ERROR_RX_RECORD_TOO_LONG
This error message can be seen when you check your Kestrel web server by visiting the http://localhost:5000 URL with your Linux server's local browser.
Secure Connection Failed
An error occurred during a connection to localhost:5000.
SSL received a record that exceeded the maximum permissible length.Error code: SSL_ERROR_RX_RECORD_TOO_LONG
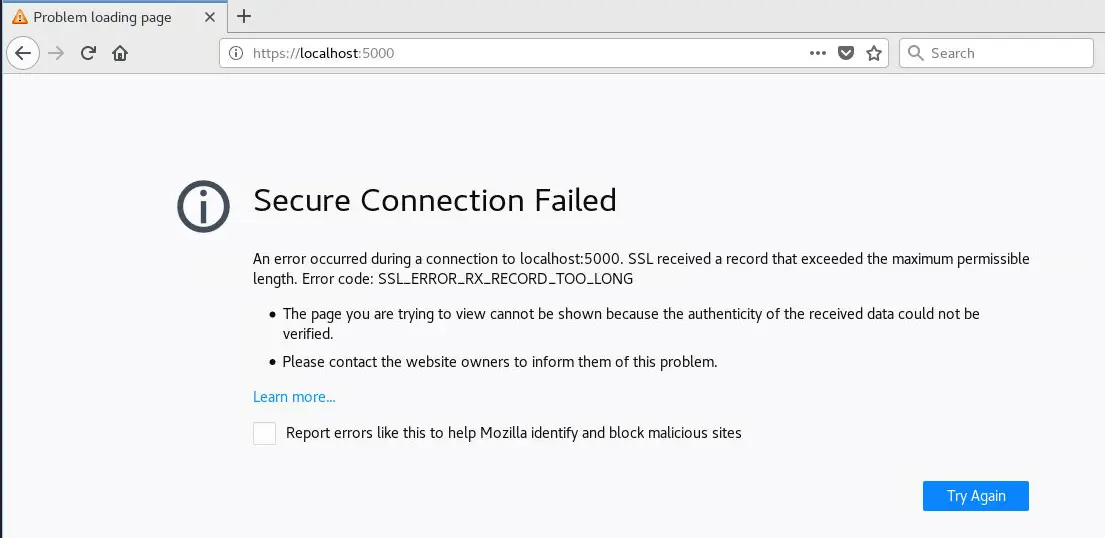
If you see this, it mostly means that you've configured your Kestrel web server to only accept SSL connections, but you didn't setup the SSL certificate accordingly.
Solution: review your Kestrel SSL certificate configuration (if you need help with that, check out this post). Alternatively, you can consider to re-configure your web application to accept non-SSL connections and then publish it again: there will be no security issues if you do that, since the origin server will be only accessible by the reverse-proxy: the SSL channel will still be used for outside requests, as it will be handled by NGINX.
HTTP listening port (TCP 5000) busy
If you plan to install multiple ASP.NET Core 2 Web Application on the same web server, you'll most likely need to have to deal with multiple Kestrel processes: while doing that, you could have some issues with the default http listening port, which defaults to TCP 5000 for all Kestrel instances... unless you change it at runtime: to learn how to do that, take a look at this tutorial.
Change default Kestrel HTTP listening port
Conclusion
That's it, at least for the time being. I sincerely hope that this tutorial will help other developers and system administrators to host their .NET Core web applications to Linux-based servers, since they work really well - arguably even better than their Windows counterpart, at least in some scenarios!
If you want to take a close look to a .NET Core web application that is currently hosted on a Linux server with the same technique shown in above tutorial, check out regexsplitter.ryadel.com: the full source-code is also available on GitHub.

thank you for this comprehensive tutorial.
“/www/var/regexsplitter.ryadel.com” should be “/var/www/…/regexsplitter.ryadel.com”
Thanks! Fixed the typo
Hi Ryan. I have an issue with deployment with error 150.
[root@localhost ~]# sudo systemctl status kestrel.service
● kestrel.service – .NET Web Application on Linux
Loaded: loaded (/etc/systemd/system/kestrel.service; enabled; vendor preset: disabled)
Active: activating (auto-restart) (Result: exit-code) since Sun 2021-02-07 00:32:55 +0330; 7s ago
Process: 7148 ExecStart=/usr/bin/dotnet /var/www/helloapp/WebLinux.dll (code=exited, status=150)
Main PID: 7148 (code=exited, status=150)
Tasks: 0 (limit: 11080)
Memory: 0B
CGroup: /system.slice/kestrel.service
Feb 07 00:32:55 localhost.localdomain systemd[1]: kestrel.service: Main process exited, code=exited, status=150/n/a
Feb 07 00:32:55 localhost.localdomain systemd[1]: kestrel.service: Failed with result ‘exit-code’.
Hi there: are you able to get further info regarding that error? (StackTrace or something like that). Please take a look at the journal and see if you can retrieve further info on that.