


Table of Contents
Introduction
Master-Master replication, also known as mirror, is by far the simplest technique you can use to increase the performance and the reliability of your MySQL server installation. If you don't know what it is, just imagine two MySQL server instances continuosly updating each other in real-time while fullfilling their job. In order to do that you'll need a second machine/server, meaning you'll have to sustain more costs: don't make this stop you - an investment like that is hardly worthless: conversely, it will most likely be a substantial improvement for your system. That's what you'll basically gain:
- A 1:1 mirror your entire database pool (or a selection of your choice), ensuring you won't lose anything due to an hardware (or software/OS) crash.
- A more robust, fail-proof and scalable environment, as long as you'll connect different web sites/services/apps to each of your DB and install a software or hardware http load balancer to distribute clients between them.
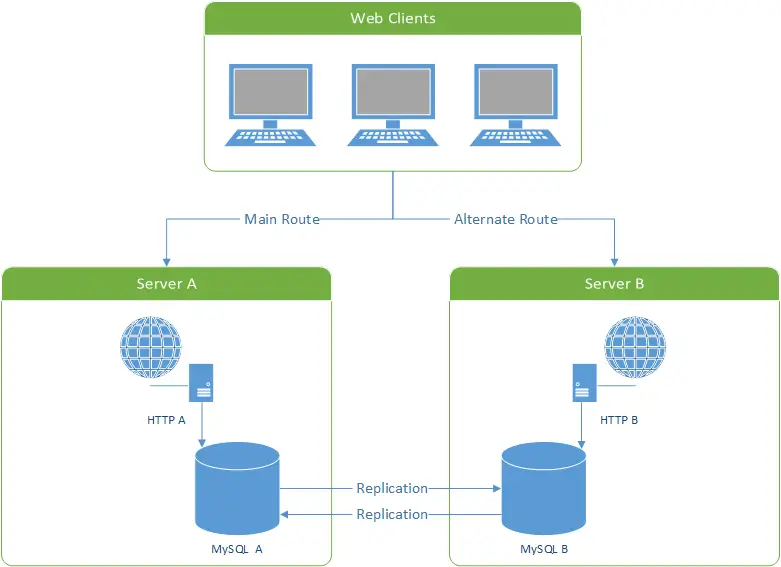
One of the most common scenarios involving Master-Master replication is when you have a 2 VPS (or hosting servers) environment/farm, each one providing an http web server (such as IIS or Apache) containing one or more web sites connected to a local MySQL server instance on the same machine. Once you put up a Master-Master replication mechanism between the two MySQL instances you'll basically have setup a real-time web mirror, which you can use as a disaster recovery (see picture below), and/or a 2-nodes web cluster managed by an hardware load-balancer responding to a third IP - or any other balancing technique you might want to adopt.
Requirements
In order to setup a MySQL Master-Master replication you'll need two different Server system instances (VPS, Hosting, virtualized instances... anything will do), each one responding to a specific IP address: they don't need to be identical, as long as they can both properly run the same version of MySQL Server (v5.1 or above is strongly suggested). We'll be calling them Server A and Server B from now on.
Step 1. Installing MySQL Server
The first thing you need to do is to install MySQL on Server A and Server B. If you already have a MySQL instance up and running on one of them, just upgrade it to the latest version you feel confident to use and then install that same identical version to the other one.
As soon as you're finished, edit the main config file - /ProgramData/MySQL/MySQL Server 5.x/my.ini on Windows, /etc/mysql/my.cnf on Linux - and type-in the following settings, replacing the existing ones if present:
Server A
|
1 2 3 4 5 6 7 8 9 |
server-id=1 log-bin="mysql-bin" binlog-ignore-db=test binlog-ignore-db=information_schema replicate-ignore-db=test replicate-ignore-db=information_schema relay-log="mysql-relay-log" auto-increment-increment = 2 auto-increment-offset = 1 |
Server B
|
1 2 3 4 5 6 7 8 9 |
server-id=2 log-bin="mysql-bin" binlog-ignore-db=test binlog-ignore-db=information_schema replicate-ignore-db=test replicate-ignore-db=information_schema relay-log="mysql-relay-log" auto-increment-increment = 2 auto-increment-offset = 2 |
Please notice that this configuration will replicate/mirror each and every db with the sole exception of test and information_schema. You might also want to keep out other databases such as mysql or other ones: if that's the case, just add those you want to exclude by adding a binlog-ignore-db and replicate-ignore-db command for each one of them.
IMPORTANT NOTE: replicating the mysql database seems to be a bad idea for Debian-based system: check this comment for details. If you're unsure about doing that, you might just choose to exclude that: the only thing you'll be missing would be syncing your users automatically, which isn't critical as long as you don't do that frequently.
It's also worth mentioning that you can also use an opt-in logic instead of the opt-out we've used here: just delete each and every binlog-ignore-db and replicate-ignore-db replacing them with binlog-add-db and replicate-add-db instead, specifying only the database you need/want to mirror.
Once you did that, you can stop the servers and restart them.
Step 2. Create the Replicator User(s)
Next thing you need to do is to create the replicator user in either Server A and Server B. You can do that using MySql shell using the following commands:
|
1 2 3 |
mysql -u root -p [root_password] CREATE USER 'replicator'@'%' IDENTIFIED BY '[replicator_password]'; GRANT REPLICATION SLAVE ON *.* TO 'replicator'@'%' IDENTIFIED BY '[replicator_password]'; |
Replace [root_password] with your MySQL root user password and [replicator_password] with any password of your choice: you'll need to use that later on (see Step 4.5).
Fullfill this step for Server A and Server B: you can either use the same replicator password for both servers or pick a different one for Server A and Server B, as long as you'll use the right one during Step 4 and Step 5 ahead.
Step 3. Perform a full Sync
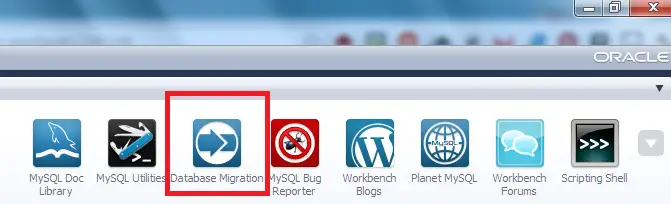
This is a task you'll need to do manually: you need to be sure that the two MySQL instances starts with the same data. If you're using MyISAM engine only, you can do that either by copying the relevant tables from your MySQL /data/ folder: alternatively, you can export / import your tables using MySQL statements/commands such as those described in the official MySQL manual. If you prefer to keep scripting to the minimum you can always use some external software who can take care of that, such as the Database Migration Tool included in the MySQL Workbench suite like shown in the above picture (read the how-to here):
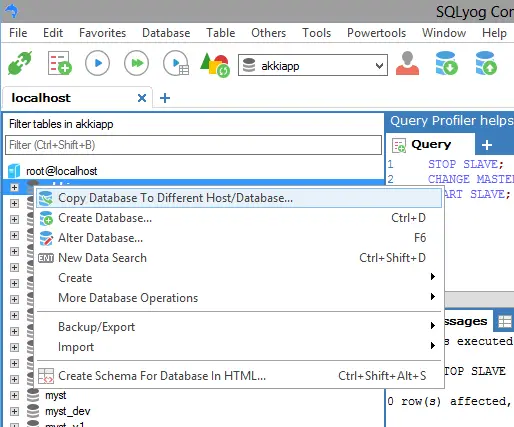
Or the ultra-neat Copy Database to different Host/Database function featured by the excellent Webyog's SQLyog, which is also one of the most spectacular MySQL GUI ever made: if you aren't using it already, I strongly suggest you to download and install the Community Edition (multi-platform and open-source) from its official GitHub repo: you'll hardly regret that.
Step 4. Configure replication from Server A to Server B
The next thing we need to to is to replicate all the commands received by Server A to Server B: in other words, we need to configure Server B as a slave of Server A. In order to do so, connect to Server A (via SQLyog, query browser or console) and type the following sql command:
|
1 |
SHOW MASTER STATUS; |
You'll receive a status response from Server A like the following:
|
1 2 3 4 5 6 |
+------------------+----------+--------------+------------------+ | File | Position | Binlog_Do_DB | Binlog_Ignore_DB | +------------------+----------+--------------+------------------+ | mysql-bin.000001 | 107 | example | test, informatio | +------------------+----------+--------------+------------------+ 1 row in set (0.00 sec) |
You're going to use the File and Position column values in a few.
Now connect to Server B (via SQLyog, query browser or console) and type the following sql commands:
|
1 2 3 |
STOP SLAVE; CHANGE MASTER TO MASTER_HOST = 'Server A IP Address', MASTER_USER = 'replicator', MASTER_PASSWORD = '[replicator_password]', MASTER_LOG_FILE = 'mysql-bin.000001', MASTER_LOG_POS = 107; START SLAVE; |
Replace Server A IP Address with Server A numerical IPv4 address, [replicator_password] with the password you choose for your replicator user during Step 2, mysql-bin.000001 and 107 with the File and Position column values retrieved above.
The output from Server B should look similar to the following:
|
1 |
Query OK, 0 rows affected (0.01 sec) |
Step 5. Configure replication from Server B to Server A
Now you need to do the same thing from the other side. That is, replicate all the commands received by Server B to Server A, configuring the latter as a slave of the former. Connect to Server B and type the following sql command:
|
1 |
SHOW MASTER STATUS; |
You'll receive a status response like the following:
|
1 2 3 4 5 6 |
+------------------+----------+--------------+------------------+ | File | Position | Binlog_Do_DB | Binlog_Ignore_DB | +------------------+----------+--------------+------------------+ | mysql-bin.000001 | 107 | example | test, informatio | +------------------+----------+--------------+------------------+ 1 row in set (0.00 sec) |
Now connect to Server A (via SQLyog, query browser or console) and type the following sql commands:
|
1 2 3 |
STOP SLAVE; CHANGE MASTER TO MASTER_HOST = 'Server B IP Address', MASTER_USER = 'replicator', MASTER_PASSWORD = 'replicator_password', MASTER_LOG_FILE = 'mysql-bin.000001', MASTER_LOG_POS = 107; START SLAVE; |
Replace Server B IP Address with Server B numerical IPv4 address, replicator_password with the password you choose for your replicator user, mysql-bin.000001 and 107 with the File and Position column values retrieved above.
The output from Server A should look similar to the following:
|
1 |
Query OK, 0 rows affected (0.01 sec) |
... That's about it.
Test the Replication
Your MySQL Servers are now in Master-Master replication mode. You can test it in a number of ways. such as:
- create a new database using your favorite tool (or via MySQL console) on Server A, then connect to Server B to see if it's also there.
- create a new user on Server B, then connect to Server A to see if it's also there.
- issue some insert, delete and/or update query commands from Server A, and check that the same data will be inserted, deleted and/or modified also in Server B.
Notice that the first two tests will work only if you chose to replicate the mysql database (see Step 1): if you chose to exclude it, or to adopt the opt-in method, you'll need to create/delete the databases and sync the users manually.
UPDATE: If the Replication breaks, loses its sync or stops working, I strongly suggest you to take a look at this other post to fix it and/or to put up some countermeasures to prevent it from happening again.
