
Table of Contents
Standby, also known as sleep mode, is one of the most useful features of the latest windows builds: when properly used it allows any user not only to save a tremendous amount of power, but also to extend the expected life of your hardware by many years: that is, of course, assuming it works, which happens to not always be the case.
There is a rather common issue, experienced by many users, when the PC keeps waking up right after it's put into sleep mode. It usually occurs after few minutes, but it can also be a matter of seconds... or hours. Whichever the timeframe is, this obonoxious issue makes the whole feature completely useless. Having experienced this scenario ourselves, we wrote this post hoping to help anyone facing it to fix their system so that they can sleep safe and sound - without wasting power and hardware. Let's see how we can do that.
Mouse, Keyboards, Network Card
These are the most common 3 peripherials causing the issue: every one of them has, per Windows default settings, the permissions to wake up the computer upon receiving any user input - or anything they believe it is. For mouse and keyboard, it's rather obvious: you move the mouse or press a keyboard button, the peripherial tells windows that something's going on. This behaviour is usually fine for the keyboard, unless you got cats, babies or other people working on your same desk; it's usually less secure for the mouse, since any small movement occurred around your desk will have a good chance to trigger an input and waking up your PC. That's why the first thing you should do if you experienced this issue is to try and disable the mouse.
The Network Interface Card - NIC from now on - is a total different story, as it can detect two kinds of what it thinks might be user-based inputs: standard TCP/IP network traffic - such as downloads and uploads - and a magic packet, which is a specific command to remotely wake your system from the TCP/IP stack by using the Wake-On-LAN feature of the card itself. To keep it short, if you have a permanent internet connection - such as an ADSL, CABLE or Fiber Channel - you should really stop your NIC from waking up your system in case of network traffic, because you're gonna always have it.
So, the mouse and the NIC. How can we unload their guns? We have two options: the first one involves the Windows GUI, while the second relies to the command-line. Let's see how we can use both of them.
Using the GUI
You can specifically enable or disable the waking up feature for any perhiperial from the Device Manager. Here's how you can open it:
- If you got Windows 8 and above, right-click on the Start (the bottom-left Windows icon) and choose Device Manager.
- For older releases of Windows, open the Control Panel, then select the System icon and open the Device Manager from that.
Once opened, select the mosue, the keyboard and the NIC, depending on the peripherial(s) you want to block:
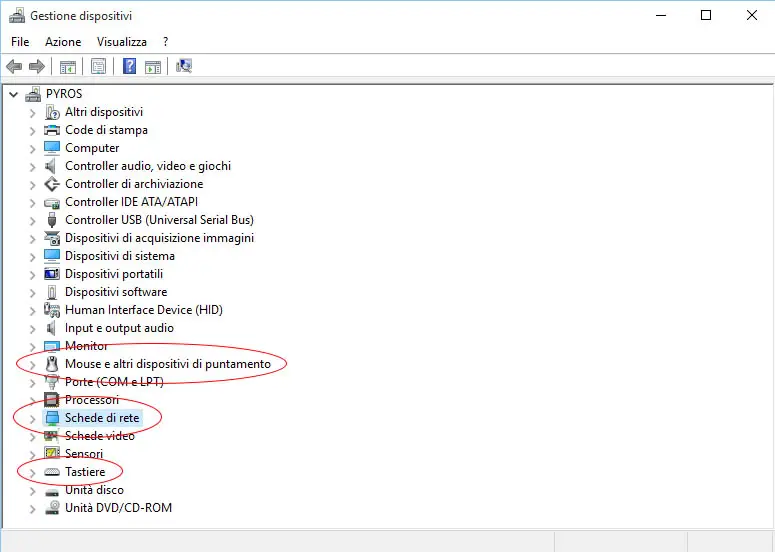
Open the tree until you see your chosen perhiperial, then right-click on it and open the Properties panel. That's the place where you'll find the Energy Saving settings you'll need to change:
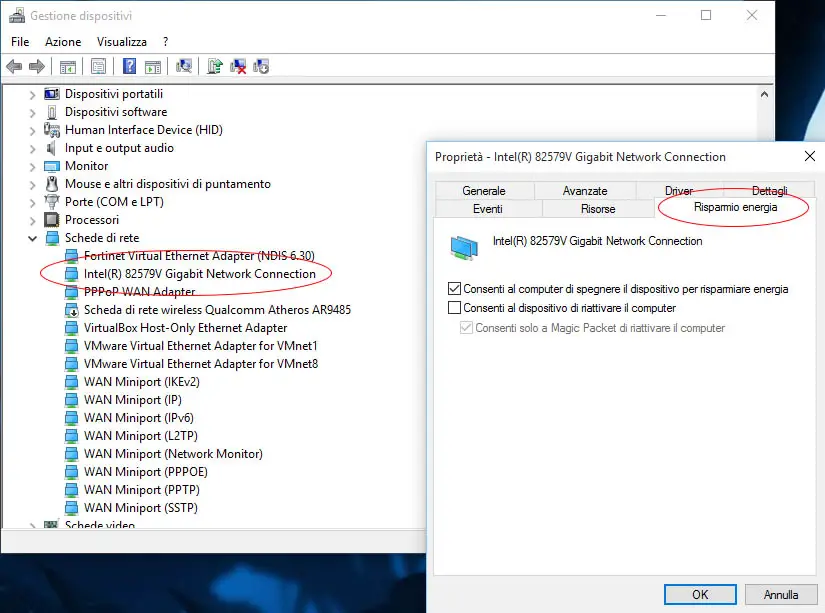
For mouse and keyboard this is a rather trivial task, as long as they have a single option - allow or disallow the device to waking up the computer. The NIC features another option, allowing us to restrict the waking up capabilities to magic packets only: an excellent way to solve our problem without dismantling the NIC's Wake-On-LAN capabilities.
Using the Command-Line
If the GUI didn't solve the issue, there is an even powerful tool in the Windows shed to achieve the same task: we're talking about a command-line command that goes by the name of powercfg, available since Windows 7. In order to use that, wait for your first unwanted wake-up, then open a command prompt with administrative rights. Once open, type the following:
|
1 |
powercfg -lastwake |
This command will give some informations about the peripherial which issued the latest wake-up order. Keep note of it, then type the following:
|
1 |
powercfg -devicequery wake_armed |
This command will output a list of all the active peripherials who are authorized to issue a wake-up order to your system. Use the data gathered from the previous command to pinpoint the culprit(s), then revoke its (or their) permissions by issuing the following command:
|
1 |
powercfg -devicedisablewake "DEVICE_NAME" |
Remember to replace DEVICE_NAME with the exact name shown by the previous command. if you cannot do that for security reasons, chances are you're not operating with Administrator rights - check if you ran an elevated command-prompt and, if that's not the case, close and reopen it using administrative rights (right-click > run as Administrator).
If you need to allow a device to wake-up your computer, you can also use the following command:
|
1 |
powercfg -deviceenablewake "DEVICE_NAME" |
Which works just like the previous one, yet doing the exact opposite.
IMPORTANT NOTE: If you did not write down the device name of something previously disabled, you can also look for it in the Device Manager (see Using the GUI paragraph above).